
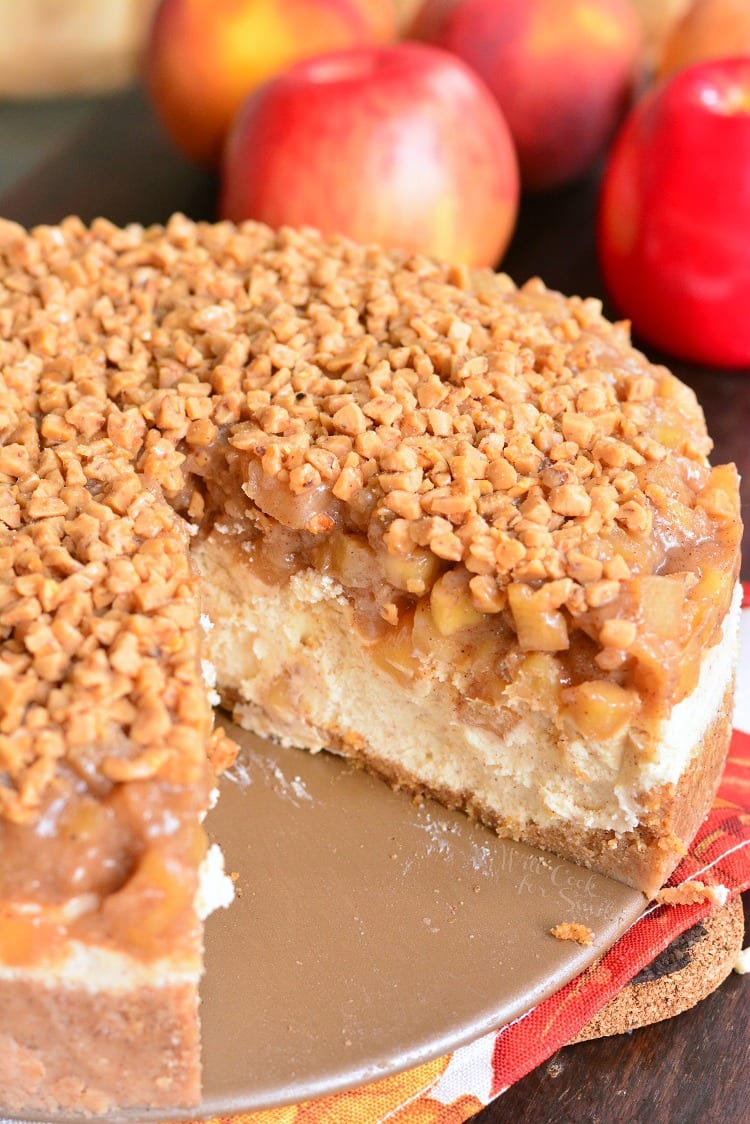
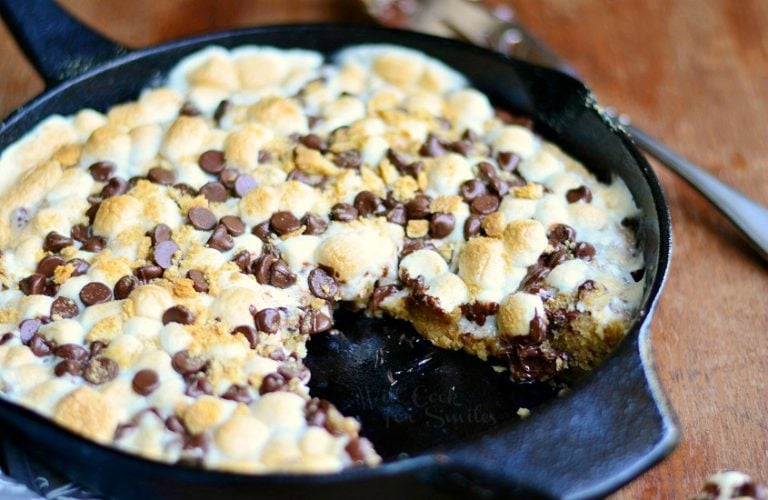
Apple Pie Cheesecake
There’s a certain magic in the air when fall arrives, a cozy feeling that makes you want to wrap yourself in a warm blanket with something utterly delicious. This Apple Pie Cheesecake is the very essence of that feeling, bottled up into the perfect dessert for any holiday table or special occasion. It’s more than just a sweet treat; it’s an experience that tastes like cherished memories and crisp autumn days.
As someone who considers apple pie their favorite, I’ve spent years incorporating those beloved flavors into everything from bread pudding and pancakes to donuts. This cheesecake is the culmination of that passion. And while a dessert this beautiful might seem intimidating, it’s surprisingly straightforward. The process is simpler than you might think, with much of the time dedicated to letting the oven and refrigerator do the work.
Key Ingredients and Substitutions
I consider cheesecakes my specialty, I’ve made hundreds of them through the years not only to share here but also for friends and family. In my circle, I’m actually known as “the cheesecake girl.” I’ve tested many products, tried lots of ingredient variations, and learned a lot of what works and what doesn’t:
Sweet Apple Options – use sweet and juicy apples like Gala, Cosmic crisp, Honeycrisp, or Fuji apples.
Graham Cracker Crumbs – check the baking aisle of the grocery store if graham cracker crumbs are available. Many stores do carry it and it will save a step of blending your own. If it is not available, get graham crackers and pulse them in the food processor until fine crumbs.
Cream cheese – use full fat cream cheese to get the best rich and creamy cheesecake texture. (Reduced fat cream cheeses also sometimes contain more liquid.)
Apple Pie Spice – this is a blend of ground cinnamon, nutmeg, and allspice. You can easily mix your own if it’s not available at the store. To make a batch, I combine 4 Tbsp ground cinnamon, 2 tsp ground nutmeg, and 1.5 tsp ground allspice.
Heavy whipping cream – just like full fat cream cheese, it will provide the best rich and creamy cheesecake texture so don’t substitute.
Gluten Free Substitution – to make this cheesecake gluten free, use gluten free graham crackers for the crust and gluten free all purpose flour to make the apple pie filling.
I Found The Springform That Does Not Leak!
For years I’ve wrapped my springform with foil and roasting bags and tried all different tricks to try and keep the water from leaking into the pan. Most of it worked okay to keep water out but a little would still leak in. Now, I’ve found a pan that has been working awesome to keep the water out! This is not an advertisement at all, I just want to share the pan that made my life easier!
This is the leakproof springform pan that I use and it works great. I’ve tested it with and without foil wrap on the outside. (Williams Sonoma also makes a leakproof springform but it’s more expensive.)
How To Make An Apple Pie Cheesecake
Great thing about this recipe is that you can make the apple pie filling ahead of time or make it while the cheesecake is baking. If you choose to make it ahead, store it in the refrigerator, in a food storage container with a lid, and warm it up before adding to the cheesecakes.
To make the apple pie filling: peel, core and dice the apples first. Melt butter in a sauce pot and add the apples, brown sugar, vanilla, and spices. Mix well and cover it with the lid to cook the apples over medium heat until they start to softened. Take the lid off and let the apples cook uncovered until most of the liquid is cooked out.
This will take about 15 minutes and if you’re noticing that there is still a lot of liquid, strain some of it off. (Tip: don’t discard the strained liquid, it’s great in pancakes or oatmeal!) Sprinkle flour over the top, mix, and cook for a few more minutes, until the mixture thickens. Set the apples aside until ready to top the cheesecake.
Preparing the cheesecake
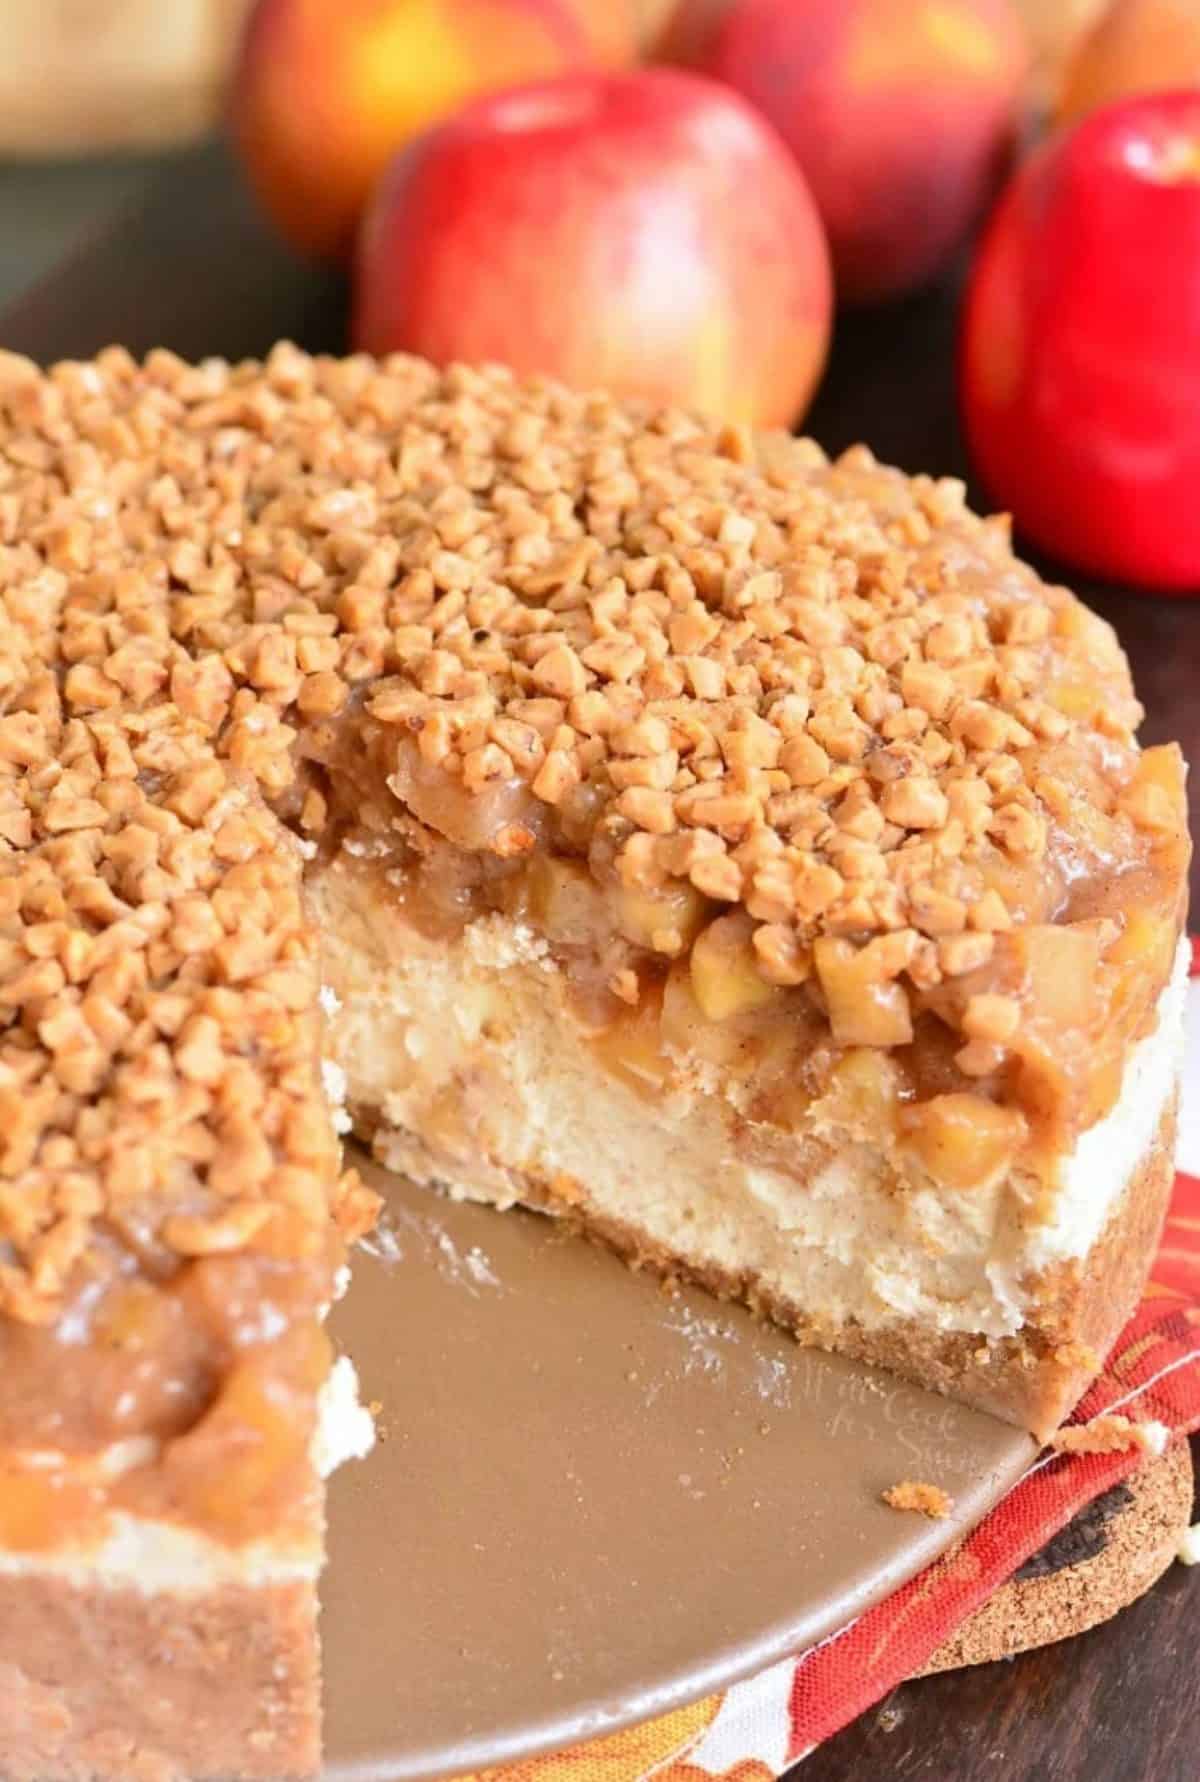
To make the crust: mix the graham cracker crumbs with sugar and apple pie spice until incorporated and then stir in melted butter. Spread the crust mixture in the greased springform evenly and then use the bottom of a measuring cup to pat it down.
Expert tip: if you want to be able to take out the whole cheesecake from the springform easier, line the bottom of the springform with a cut-out circle of parchment paper.
Making the cheesecake batter: Beat the cream cheese in the bowl of an electric mixer, on medium-high speed, for a couple of minutes, until smooth and fluffy. Pour in sugar, as you continue to mix and let it mix for another minute or two. Beating the cream cheese for a few minutes will contribute to the soft, smooth, and fluffy cheesecake.
Keep mixer on and add the eggs, one at a time. Beat until smooth and stop the mixer to scrape the sides and bottom of the bowl. Raise the speed back up and add the sour cream, vanilla extract, and heavy whipping cream, continuing to beat it all together until smooth.
Lower the speed to stir and mix in cornstarch and cinnamon. Stop and scrape the bowl and mix again on higher speed until the cheesecake mixture is smooth.
Pour the cheesecake batter over the prepared crust and make sure it’s spread evenly.
Baking Instructions
Bake the cheesecake in the water bath! Place the large roasting pan in the oven first and preheat the oven to 325°F. Once preheated, carefully place the cheesecake filled springform pan inside the roasting pan. Starting off to the side, pour in hot water into the roasting pan until it’s about halfway up the side of the springform. Make sure not to splash the water so it doesn’t get into the cheesecake or it could compromise the cheesecake.
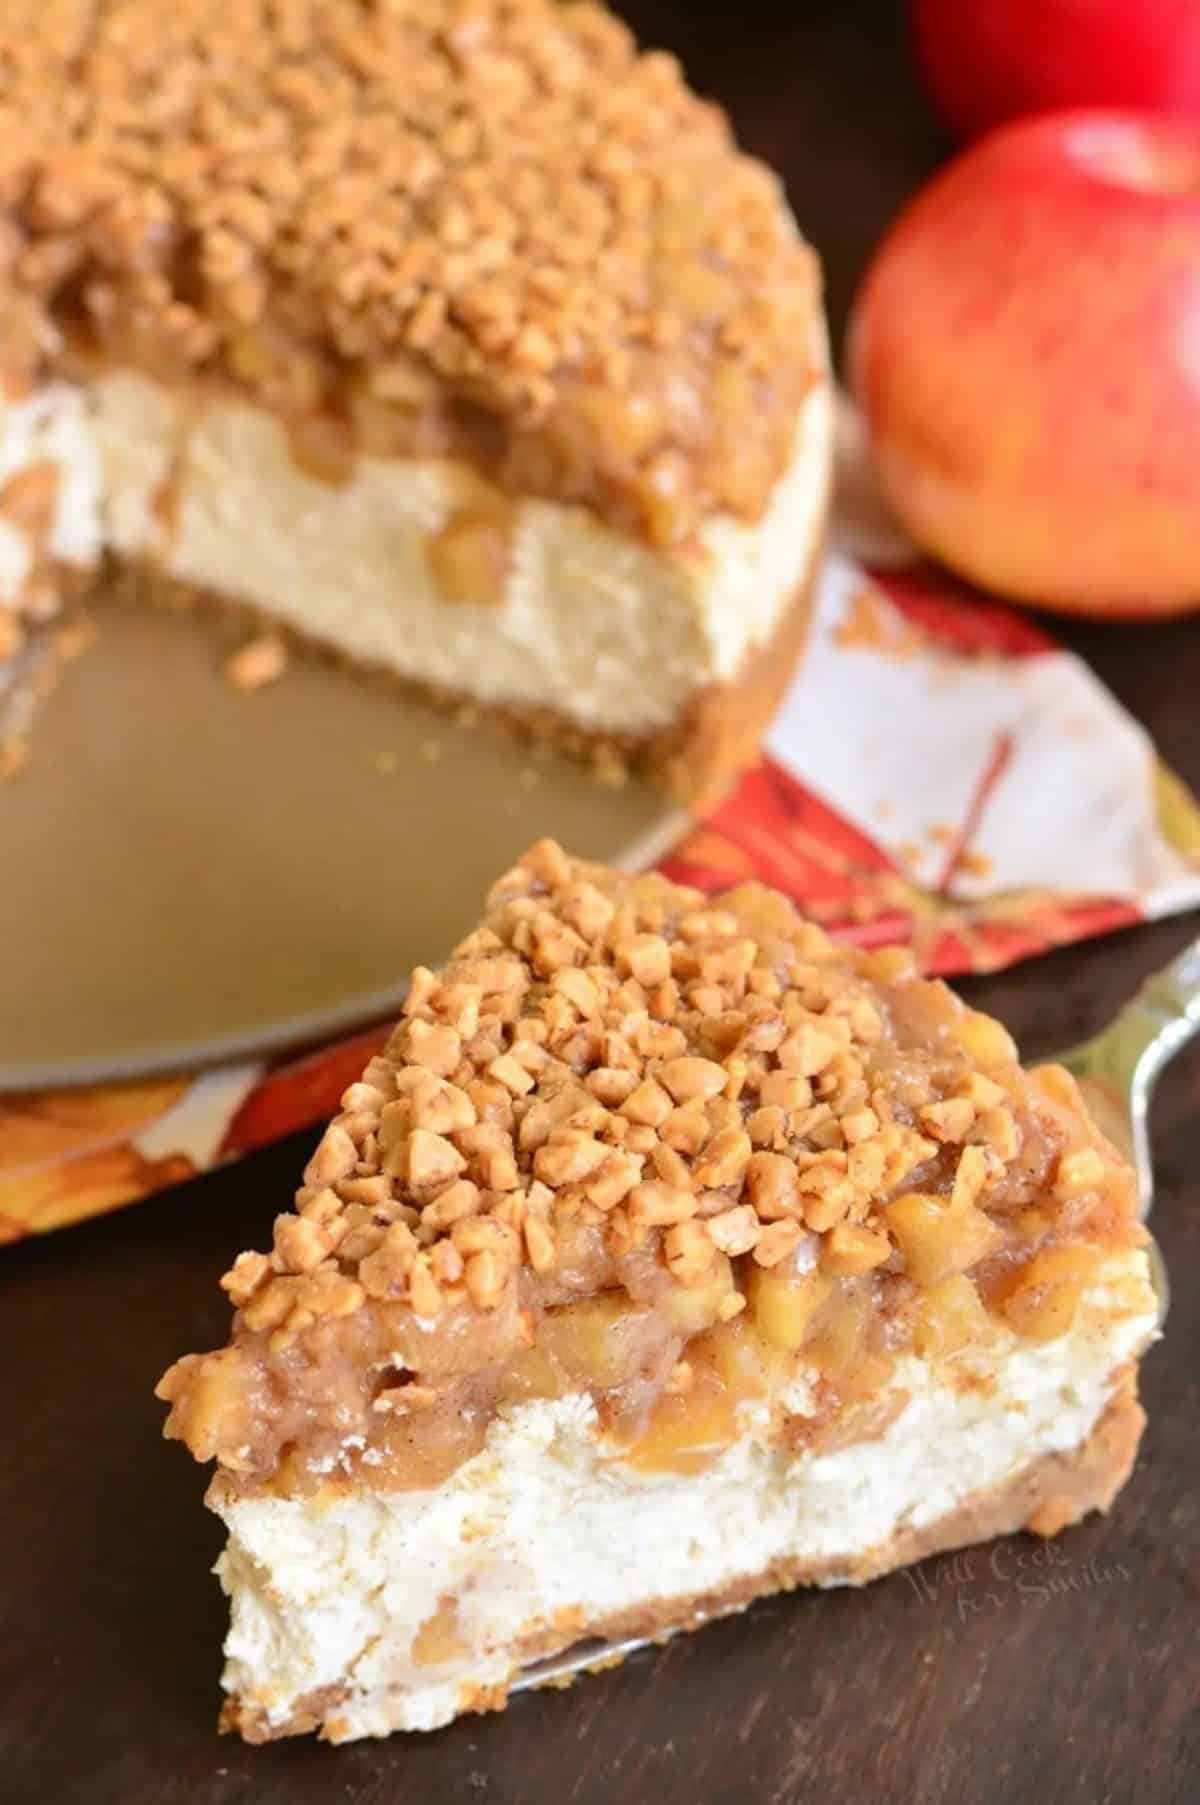
Bake for about 70-75 minutes. Turn off the oven, open the oven doors half-way, and let the cheesecake rest for 10 minutes. Take it out of the water bath and rest it on the counter until cooled to room temperature. Cover the cheesecake and transfer it to the refrigerator and chill for another 4 hours or overnight.
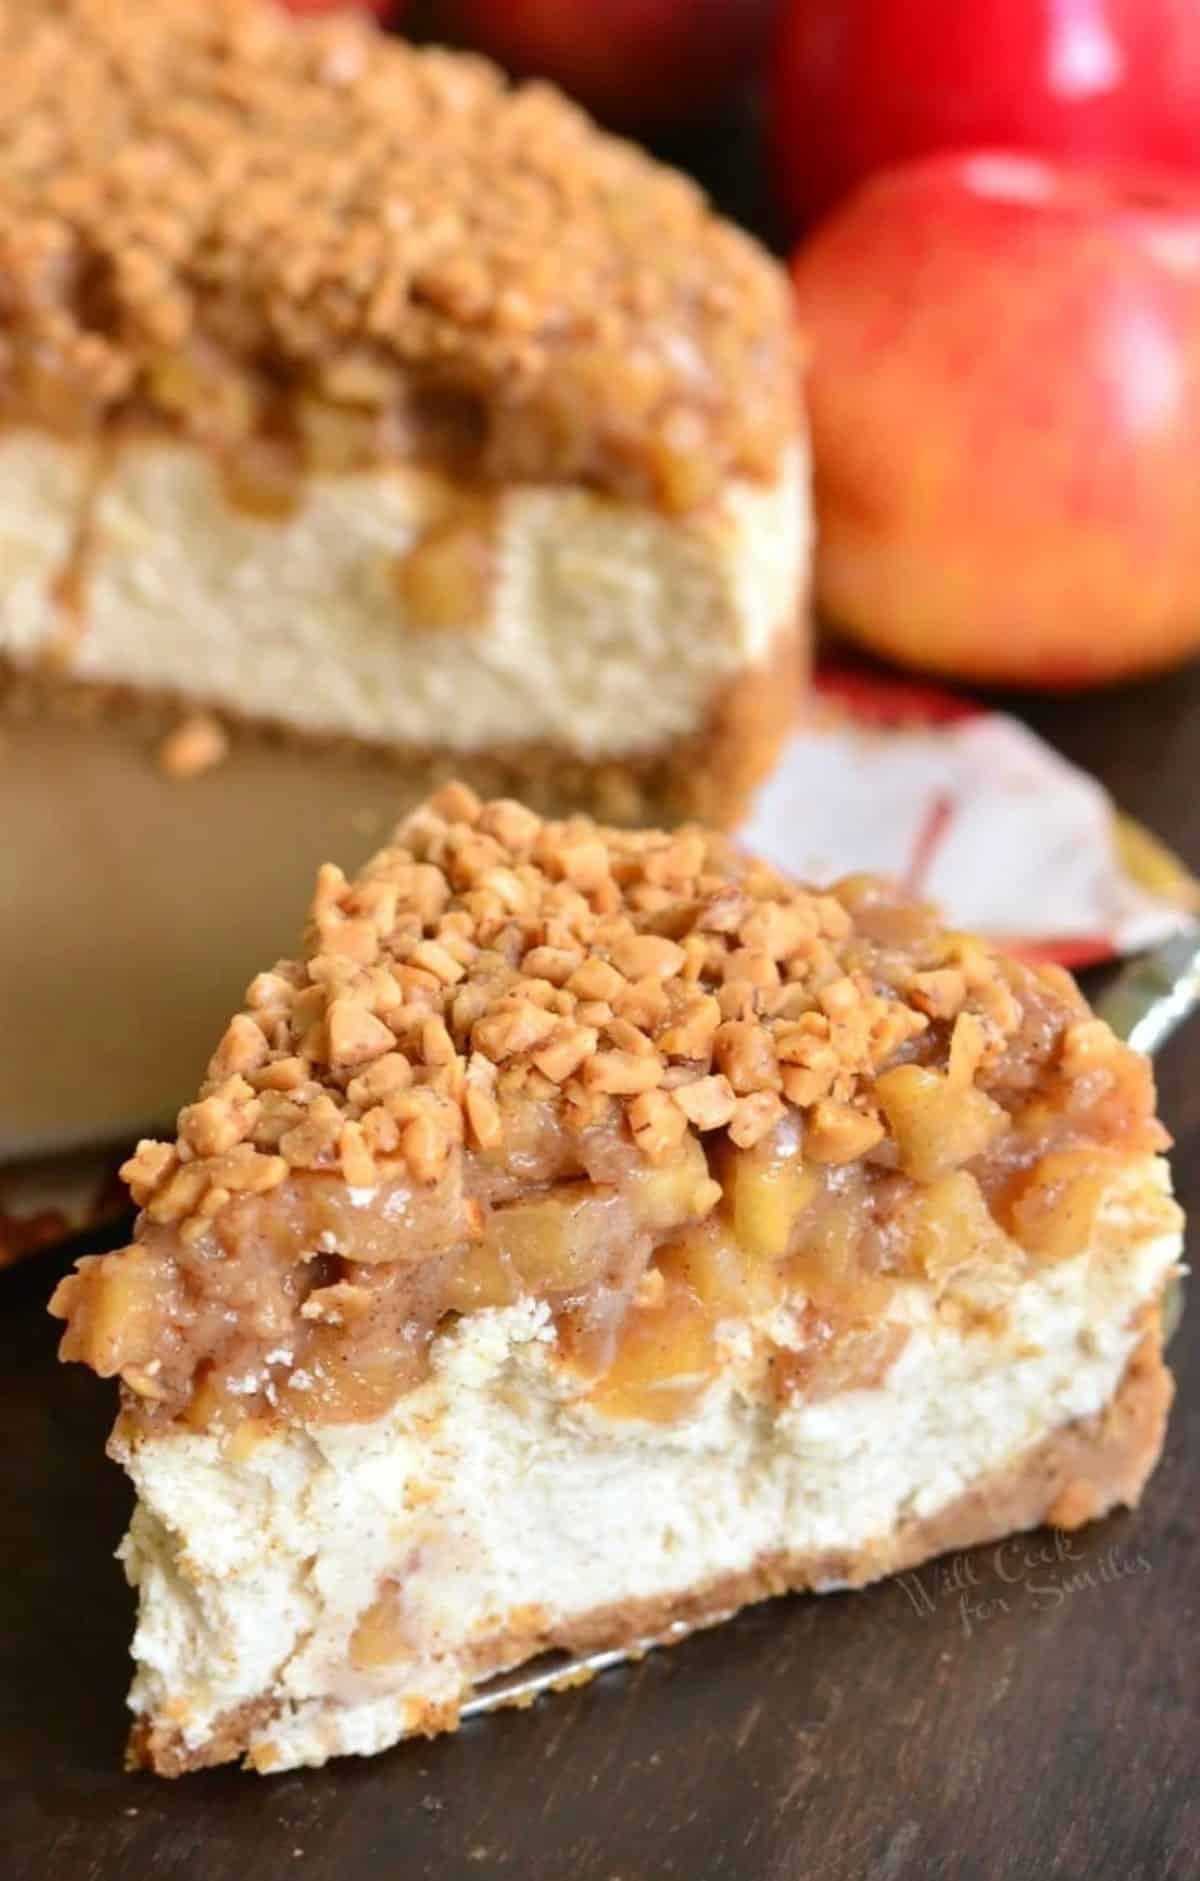
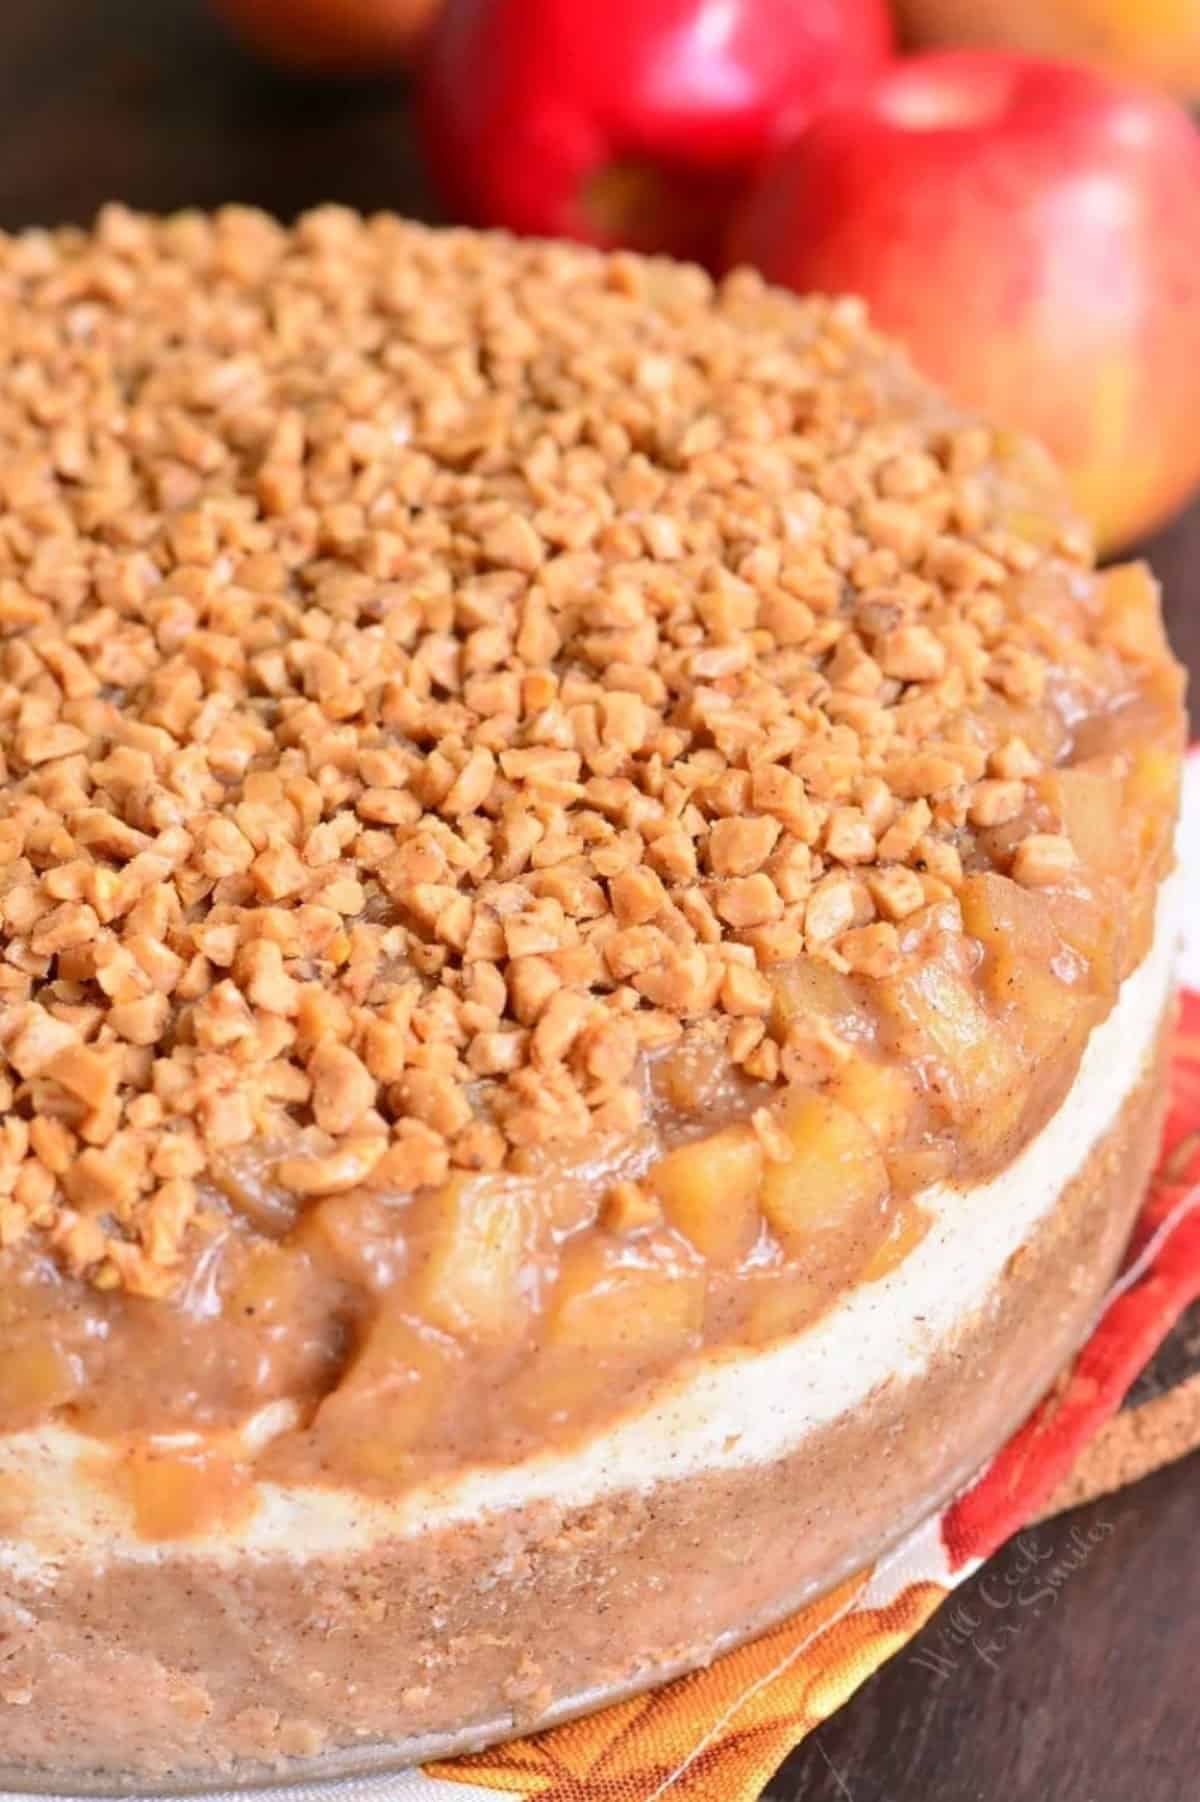
Once completely chilled, spread the apple pie filling evenly over the top and sprinkle the toffee crunch over the apples.
Can I make the cheesecake ahead of time?
Absolutely! The apple pie topping can be made ahead of time. You can make it a day before and store it in the refrigerator, in an air-tight container. When you’re ready to top the cheesecake with it, just heat it up in a microwave until warm so it’s easier to spread.
You can also make the whole cheesecake ahead of time but don’t add the toffee crunch. Cover it air-tight and refrigerate. Add the crunch topping when ready to serve.
Why do I have to do the water bath when baking cheesecake?
While it is not a necessity, it is highly (HIGHLY) recommended. It’s worth the extra baking time and the extra step because:
- Bain Marie (or water bath) is a baking technique meant to keep direct heat away and to ensure even baking of these delicate desserts.
- Baking the cheesecake in a water bath gives it a wonderfully smooth and silky texture.
- It helps prevent cracking.
- It also helps prevent the cheesecake from sagging in the middle.
Can I use canned apple pie filling?
While technically you can use canned apple pie filling, I want to caution that it is a different texture and flavor from this homemade one. Canned apple pie filling will also be more runny so may slide off the cheesecake slices.
More Apple Fall Recipes
If you haven’t noticed, I’m a little obsessed with making desserts based on an apple pie and even my favorite apple pies like homemade Dutch apple pie and caramel apple pie with cookie crust. Yes, apple pie is my favorite pie so I love to incorporate those flavors and make desserts like the apple pie bread pudding, apple pie pancakes, apple monkey bread, apple blondies, baked apple donuts, apple pie mini cheesecakes and really anywhere I can add an apple pie filling.
PIN THIS RECIPE FOR LATER
DID YOU MAKE THIS RECIPE? PLEASE leave a 🌟 star rating! Let me know how you liked it by leaving the 📝 comment below or share and tag me on social media @willcookforsmiles. DON’T FORGET to subscribe to my newsletter!
Apple Pie Cheesecake Recipe
Ingredients
Crust:
- 1½ cups graham cracker crumbs
- ¼ cup brown sugar
- 5 Tbsp butter melted
- 2 tsp apple pie spice
Cheesecake Filling:
- 24 oz cream cheese (3 packs) softened
- 3/4 cup white granulated sugar
- 2 eggs
- 2 Tbsp sour cream
- ¾ cup heavy cream
- 1 tsp vanilla extract
- 2 Tbsp corn starch
- 1 Tbsp cinnamon
Apple Pie Filling:
- 3 Tbsp butter
- 2.5 lbs gala apples (or other sweet apples)
- 1 cup brown sugar
- 2 tsp vanilla
- 1/2 Tbsp. apple pie spice
- 1/4 cup flour
Topping:
- 6 oz Toffee crunch pieces
Instructions
Apple Pie Filling:
- Apple pie filling can be done ahead of time. You can make it a couple of days before, or a few hours before you need it, or while cheesecake is baking.
- Peel, core and dice the apples.
- In a medium pot, over medium heat, melt butter. Add diced apples and stir well.
- Add brown sugar, apple pie spice, and vanilla, stir and cover with a lid.
- Cook, stirring occasionally, until the apples start to soften. Take off lid.
- Cook uncovered, until apples are soft and juices are mostly cooked down. Stir occasionally.
- Sprinkle flour over apples and stir well. Cover and cook for a few minutes.
- Take off heat and set aside until ready to use. (Or cool and refrigerate in a container with a lid.)
Crust:
- Preheat the oven to 325℉ degrees and grease a 9 inch springform pan. You will need a large roasting pan that’s bigger and longer than the springform pan. (I usually use the aluminum foil disposable ones). If you are not sure about your springform holding up in water, you can wrap the outside of the springform pan in heavy duty aluminum foil from bottom up to the sides. (I recommend wrapping the outside of the springform in foil before adding the crust and cheesecake batter.)
- Mix the graham cracker crumbs, sugar, melted butter, and apple pie spice. Stir very well, until all incorporated. Press graham cracker mixture into the pan, evenly, all over the bottom and about half way up the side.
Cheesecake:
- Start beating cream cheese and sugar on medium-high speed until smooth, about 2 minutes.
- Add vanilla extract and sour cream. Mix until combined.
- Add eggs, one at the time, beating after each addition. Scrape sides and bottom of the bowl and beat until all incorporated.
- Lower speed to low and add corn starch and cinnamon.
- Bring the speed up a little and start to pour in heavy cream. Mix until all combined, scrape the sides and bottom of the bowl and mix again for another minute or so, until smooth.
- Pour the cheesecake batter into the prepared pan with crust and make sure it’s spread evenly.
- Place roasting pan into the oven and place the cheesecake springform pan inside the roasting pan. Carefully add hot water to the roasting pan, about half way up the side of the springform.
- Bake for 70-75 minutes. Turn off the oven and open the oven door half way. Let cheesecake rest for about 10 minutes and take it out of the oven (out of the roasting pan and carefully take off the foil).
- Let it rest for 20 minutes on the counter and then gently run a greased butter knife between sides of the cheesecakes and the springform to carefully separate it. (You don’t actually have to take the cheesecake out of the pan until ready to serve.)
- Cool cheesecake for an hour.
- While still in the springform, scoop warm (or room temperature) apple pie topping over the cheesecake and gently spread it evenly. Cover and refrigerate for at least 4 hours.
- When you're ready to serve the cheesecake, spread toffee crunch pieces all over the top. NOTE: don't add toffee crunch pieces ahead of time because they will soften. Add before serving.
Video
Notes
Nutrition
Would you like to save this recipe?
Categories:
Apple Recipes, Cheesecake Recipes, Christmas Baking Recipes, Dessert Recipes, Fall Recipes, Thanksgiving Dinner Recipes,All images and text ©Lyubov Brooke for ©Will Cook For Smiles. Please do not use my images without prior permission. If using my posts in collections and features, please link back to this post for the recipe.
Disclaimer: Nutrition information shown is not guaranteed to be 100% accurate as most ingredients and brands have variations.


Straight forward and very easy to follow recipe! Absolutely delicious!!!
Thank you so much! 😊 I’m really glad you found it easy to follow and delicious—that means a lot to me. I appreciate you taking the time to leave such a kind comment!
Can you replace the toffee with a different topping? What would be a best alternative?
At the top u say oven at 325 and in the video u say oven at 375 which one is it
I’m glad you caught that — it’s a typo in the video! The correct temperature is 325°F. Thanks so much for letting me know!
Yes please, OMG!
I hope you love it! 🙂
I just made this but haven’t served it yet. Looks good BUT realized I forgot the heavy cream. Will it be gross? Dry? Was going to serve it at a dinner party. Thoughts?
Sorry, I am just seeing this in the future if you need a repsonse quickly you can always send me a message on Facebook or Instagram. How did it come out?
Have used this recipe multiple times and every time it has been a huge hit.
I am so glad you like it, Whitney!
Made this for Thanksgiving this year, and it was amazing! Thank you for sharing this recipe.
When it says “cool for an hour” does that mean at room temp or in the fridge? Mine is currently in the oven and it looks amazing!
Why only 2 eggs?
I only use 3 eggs in cheesecakes when I use 24 ounces of cream cheese, this is a slightly smaller cheesecake so it only has 2 eggs in it.
Can you use canned apples by comstock
Yes, you can use canned apple as long as it isn’t to runny.
Made this as a snack for our meal prep this week since we went apple picking. My husband loves apple pie and cheesecake, so I had to make this for him! I replaced both sugars with coconut sugar and the corn starch with arrowroot flower. Wow. This is the first cheesecake I made that didn’t crack. We just had some this morning and it was AMAZING!!!! My husband is already asking me to make it again.
I am so glad you both like the recipe, Andrea! Thanks for stopping by to let me know!
I am about to try this amazing looking Apple Pie Cheesecake, but I live in Australia. I am not sure what I can substitute for the toffee crunch? Is it a toffee bar crumbled you have used? I would appreciate your input!
Thank
Hi Hellen, do you have toffee baking bits there? If not you can use a crumbled toffee bar!
I was wondering if this recipe could be made in the instant pot? If so, what modifications would need to be done to accommodate it?
I have never made a cheesecake in an instant pot so I cant not be sure how it would turn out.
I actually used the same recipe, cut it in half because the instant pots are smaller and their spring forms are smaller. And I did the pressure cook for 32 minutes. Make sure you cover the top of the cheesecake in foil moisture doesn’t fall into the top.
This cheesecake is delicious, inventive, and perfect for the Fall! It caught my eye so I added it to my Thanksgiving menu and i didn’t regret it! I didn’t have a springform pan or the toffee coating but I supplemented with an aluminum pan and salted caramel drizzle. I couldn’t stop eating it!
Also, I found a baking tip that suggested covering the pan in aluminum foil before adding it to the roasting pan water bath.
So glad you liked it! Yes, you should cover the pan in foil before baking, or water will get in and make it soggy.
My apple pie filling got a tad too thick. Is there a way to thin it out some before putting on the cheesecake? I’m afraid it’s not going to spread well.