
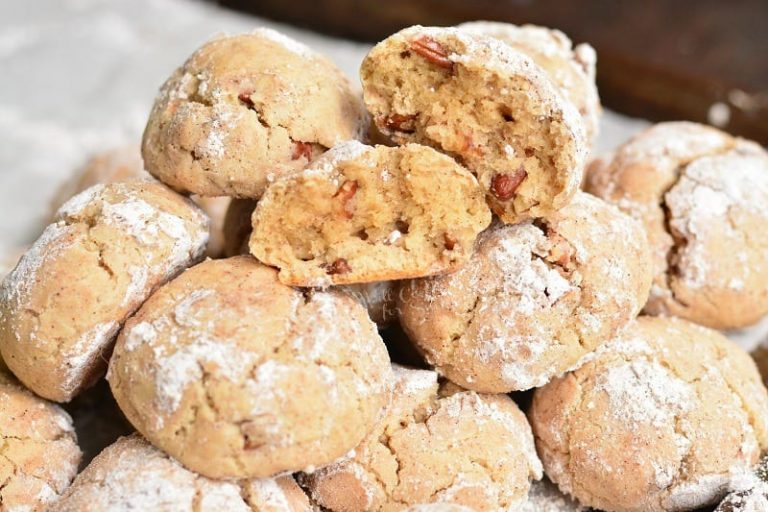
Brown Butter Snickerdoodle Cookies
The quick step of browning butter takes just a few minutes, it adds a rich, nutty, and caramel-like flavor and a chewier, denser texture with crisper edges. These are the kind of cookies that come together easily, smell incredible while they bake, and deliver the perfect sweet bite every time. (Psst…they are freezer friendly!)

“You weren’t kidding about the snickerdoodles, that was one of the best cookies I’ve ever had!”
~That was a message that I got from one of my friends who tried these cookies!
Why Brown Butter Makes All the Difference
In classic snickerdoodles, softened butter gives sweetness and richness. But when you brown the butter first, letting the milk solids caramelize and deepen in flavor, you unlock a whole new layer: a nutty, toasty depth that pairs beautifully with the cinnamon-sugar coating. The dough turns slightly more golden, the aroma becomes more fragrant, and the finished cookies get that irresistible combo of chewy centers and crisp edges.
This simple swap (soft butter → browned butter) upgrades a humble cookie into something special. Because some of the water cooks out during browning, the cookies will often bake up with a more concentrated, chewy texture. That’s why I love making brown butter cookies so much, like my brown butter chocolate cookies.

Key Ingredients – Helpful Tips and Substitutions
Unsalted butter – use unsalted butter to control the salt content. When browning butter, I never noticed a difference between starting with cold or room temperature butter, so no need to leave it out to warm.
Sugars – white granulated sugar keeps the cookies sweet, crisp on the edges, and helps create that classic snickerdoodle texture. While the brown sugar adds moisture and chewiness and complements the warm flavor of brown butter.
Eggs – at room temperature eggs whisk smoothly into the warm butter mixture, helping the dough come together properly.
All-purpose flour – remember to spoon the flour into the measuring cup and then leveling off the top. This helps measure the flour more accurately, without packing in excess flour.
Ground cinnamon – if you just love cinnamon, add a little more into the batter. If you are not as crazy about it, you can omit the teaspoon that is in the cookie dough and just leave what’s in the coating.
Cream of tartar – essential for that signature snickerdoodle tang and chewy texture. It reacts with baking soda to lift the cookies without making them cakey.
Baking soda – works with the cream of tartar for proper spread and rise.
Coarse salt – is important in baking because it balances sweetness and enhances flavor in every bite.

How To Make Brown Butter Snickerdoodles: Step by Step
Brown the butter. Melt your butter over medium heat, stirring often. Let it foam, then continue stirring slowly until you smell that warm, nutty aroma and see amber brown bits form. That’s when you know it’s ready. Transfer the butter (and all those flavorful browned bits) into a bowl.
Mix the dough. Whisk in the sugars, then whisk eggs and vanilla, whisking vigorously for about 30 seconds to whip some air into the batter. Take a few second break and whisk vigorously again. Add in your dry ingredients: flour, cream of tartar, baking soda, salt and use a rubber spatula to mix them into the wet mixture until evenly combined.

Chill! No, not you chill….the cookie dough chill. Pop it in the refrigerator for about 30 minutes. No need to chill longer. (As a matter of fact, if you do chill it a lot longer, let the cookie dough warm up a little on the counter before baking.)
Roll in cinnamon sugar. Use a cookie scoop to scoop the dough and then roll each dough ball in a cinnamon-sugar mix so every cookie gets a lovely, spiced coating.
Bake. Arrange dough balls on parchment-lined baking sheets, leaving about 2 inches in between. Bake 10-11 minutes, until the edges turn lightly golden and the centers remain soft and puffy. (You will see some crinkling, that’s a good thing!)
Cool & enjoy. Let cookies sit on the baking sheet a few minutes, then move to a wire rack to finish cooling (or enjoy warm, no judgment here! Just be careful so they’re not too hot).

Tips To Remember For Best Cookies
- Watch the butter carefully while browning. Don’t walk away, it’s a quick process. It can go from “perfectly golden” to “burnt” quickly, so stir frequently and remove from heat as soon as those toasted bits appear.
- Chill time matters for better texture (but only about 30 minutes!) Your recipe only needs a short chill time, just enough to help the dough firm up and bake evenly. Longer chilling isn’t necessary and actually too much. (I’ve tested these cookies both ways, chilled and not chilled, several times and texture was better when chilled for a bit.)
- Don’t over-mix after adding flour. Overworking the dough can lead to tougher cookies. Mix just until combined.
- Don’t over-bake. Remove the cookies when the edges look set, but the centers are still soft. They continue to cook on the hot baking sheet, which gives you the perfect balance of crisp edges and chewy middles.

Storing and Freezing These Cookies
Storing – Once completely cooled, store cookies in an airtight container at room temperature. They stay good (and chewy!) for several days.
Freezing before baking – If you want to make ahead, you can freeze unbaked snickerdoodle cookie dough balls (rolled and cinnamon-sugar coated). Place the dough balls on a baking sheet and freeze until solid, about an hour. Transfer the frozen dough balls to an airtight container or freezer bag for up to 2-3 months. Then bake directly from frozen (adding a minute or two of bake time).
Freezing baked cookies – stack the cookies between layers of parchment paper. Place the cookies in an airtight container or freezer bag and freeze for up to 2 months. When ready to enjoy, thaw at room temperature for about 15 minutes.

Recipe FAQ
For these cookies, Yes! Browning the butter is the magic that gives these snickerdoodles a deeper, almost caramel-nutty flavor and specific texture. It’s a different process to make cookie dough with softened butter instead (and different results).
Cream of tartar gives snickerdoodles their signature tang as well as contributes to that soft, chewy interior with a slight bite, which is the “snickerdoodle” character many of us love.
This is usually due to dough being too soft/warm, or dough not chilled, or over-mixing. We are mixing in a bowl, so it’s less likely to over-mix. And chilling for 30 minutes will help the too warm batter.
This is often due to over-baking or too much flour / wrong ratios. Make sure to set the timber, make sure your oven runs at the correct temperature (oven thermometer helps), and make sure to measure ingredients correctly.
Some More Cookies You May Enjoy
If you love soft, chewy cookies, you’ll enjoy some of my other reader-favorite treats like white chocolate cranberry crinkle cookies, soft sugar cookies, and my cozy soft gingerbread cookies. These brown butter snickerdoodle cookies are also perfect for the holidays, so make them along with eggnog cookies and rum balls. They all pair beautifully with the warm, comforting flavor of these snickerdoodles.
DID YOU MAKE THIS RECIPE? PLEASE leave a 🌟 star rating! Let me know how you liked it by leaving the 📝 comment below or share and tag me on social media @willcookforsmiles. DON’T FORGET to subscribe to my newsletter!

Brown Butter Snickerdoodle Cookie Recipe
Equipment
- Cooking Pan medium
Ingredients
- 1 cup unsalted butter 2 sticks
- 1 1/4 cup white granulated sugar
- 1/4 cup light or dark brown sugar
- 2 eggs room temperature
- 2 tsp vanilla extract
- 3 cups all purpose flour
- 1 tsp ground cinnamon
- 2 tsp cream of tartar
- 1 tsp baking soda
- 1/2 tsp coarse salt
For rolling:
- 1/4 cup white granulated sugar
- 3 tsp ground cinnamon
Instructions
To Brown Butter:
- Chop butter and add it to the cooking pan. Heat butter in a cooking pan, over medium heat, until melted. Butter will be roaring bubbling for the first minute or so and then calm down and become foamy.
- Continue cooking, slowly stirring every few seconds to discourage burning. You will start to notice that the butter is darkening and turning to golden brown. You will also smell a distinct nutty aroma. You want to take the pan off heat when the butter is golden-browned but not too dark or it will burn. It usually takes about 3-5 minutes altogether.
Making Cookie Dough:
- Transfer browned butter into a large, heatproof mixing bowl. (If using metal, be careful at first as metal is an excellent heat conductor and it will be hot.)
- Whisk in both sugars and vanilla extract until fully incorporated. (Smell it…I love this part of brown butter cookies!)
- Whisk in eggs vigorously until mixture is smooth with no lumps remaining, about 30 seconds. Let mixture stand a couple of minutes, then whisk for 30 seconds. (We're contributing to the texture here!)
- Using rubber spatula, stir in flour, cinnamon, cream of tartar, salt and baking soda until just combined but evenly incorporated.
- Place the cookie dough into the refrigerator for about 30 minutes. (No need to chill longer.)
Baking Snickerdoodles:
- Preheat the oven to 375℉ and line a baking sheet with parchment paper.
- Whisk together granulated sugar and cinnamon for the sugar coating.
- Use a cookie scoop to get even amount of cookie dough each time, I usually use a #40 (1½ Tbsp.) cookie scoop.
- Quickly roll the cookie to shape it and roll it in cinnamon sugar mixture to coat. Place the rolled cookies on the baking sheet about 2 inches apart.
- Bake for 10-11 minutes, take them out of the oven and let them cool on the baking sheet for about 10 minutes. Take them off the baking sheet onto a cooling wire rack.
Video
Notes
- Storage: Store cooled cookies in an airtight container at room temperature for several days.
- Freezing before baking: You can freeze rolled and cinnamon sugar coated dough balls for a hour and then transfer into air-tight container or bag. Bake from frozen, just add 1–2 minutes of bake time.
- Freezing after baking: cool and stack the cookies with parchment paper in between each one. Freeze in a storage container or bag for up to 2 months. Thaw on the counter.
Nutrition
Would you like to save this recipe?
All images and text ©Lyubov Brooke for ©Will Cook For Smiles. Please do not use my images without prior permission. If using my posts in collections and features, please link back to this post for the recipe.
Disclaimer: Nutrition information shown is not guaranteed to be 100% accurate as most ingredients and brands have variations.


These cookies deserve 6 stars!!! The brown butter makes all the difference! We loved every last bite!!
Ahh, thank you so much!! I couldn’t agree more—the brown butter really is the magic! So happy you loved every bite, and I truly appreciate you taking the time to share this!
These cookies deserve 6 stars!!! Easy to follow recipe and it’s true that the brown butter takes them to an incredible and tasty next level!!
These cookies were SO good! My family loved the chewy texture. Brown butter was fun to make and you’re right, smelled so good!
Yay! I’m thrilled your family loved them. And yes, brown butter is such a magical smell—I swear it makes every recipe better. Thank you for trying them and for coming back to share!
These cookies were so delicious and soft with just the right amount of cinnamon and sweetness
These cookies are so soft and delicious with just the right amount of cinnamon and sweetness
Thank you so much! 😊 I’m happy you enjoyed them. I love that balance of cinnamon and sweetness too — so happy they turned out perfectly soft for you!
I made these yesterday and they were a huge hit! My family loved them! Thanks for the recipe.
Thank you so much! 😊 I’m thrilled they were a hit — that makes me so happy to hear. I really appreciate you trying the recipe and sharing your feedback!
Hi Lyuba – Best snickerdoodles ever! And so easy to make. Thanks for the great recipe.
Thank you so much! That means a lot. 😊 I’m so happy you loved the snickerdoodles and found them easy to make. Thanks for taking the time to share your kind feedback!