
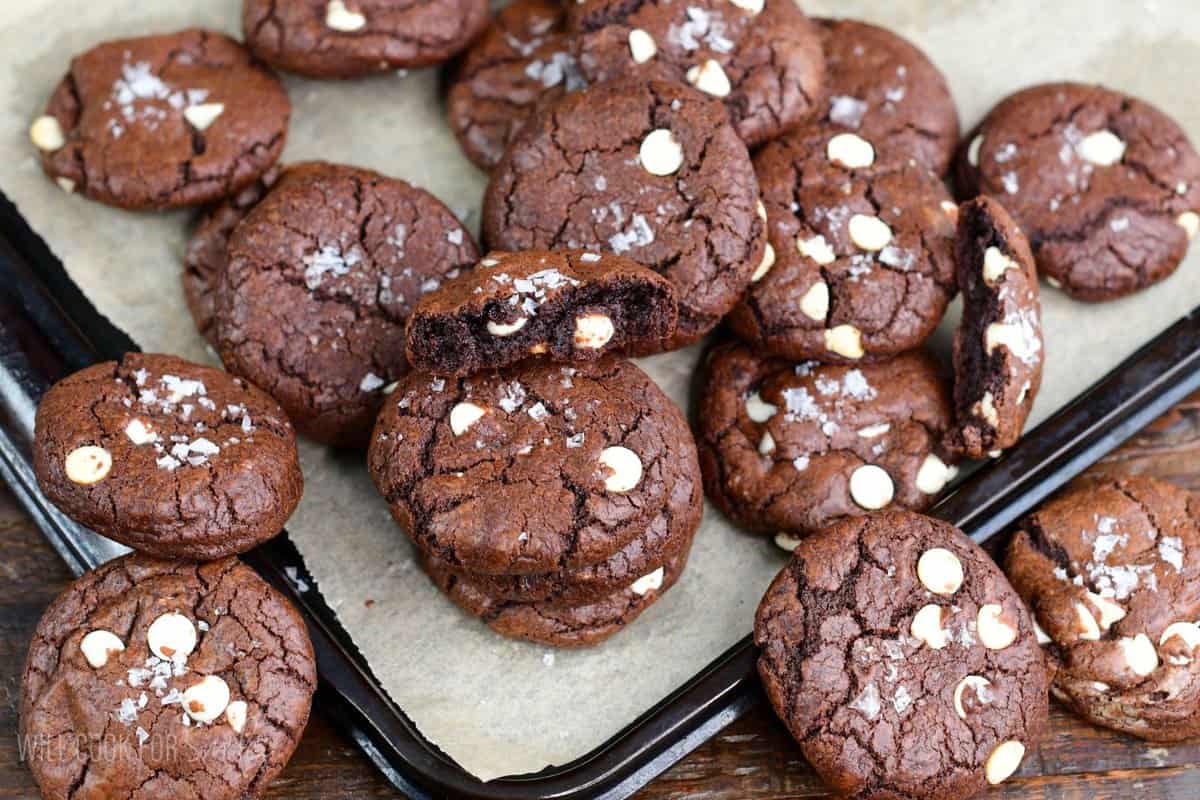
Salted Brown Butter Chocolate Cookies
If you love easy cookies that are soft and fudgy in the middle and full of rich, chocolate and nutty flavor, these brown butter cookies will be your new obsession. These cookies use simple pantry ingredients of butter, sugar, eggs, flour, and cocoa powder but the browned butter technique transforms them into something amazing. They come together quickly, and freeze beautifully for holiday cookie trays, gifting, or chocolate emergencies.
Why Brown Butter Makes the Best Cookies
Browning butter enhances cookies in three important ways :
- Caramelized flavor: When butter browns, the milk solids toast through the Maillard reaction creating a deep, nutty aromas that enhances chocolate. It enhances all flavors without overpowering.
- Crispy edges and Chewier centers: Browning cooks off some water, creating a more concentrated dough and chewier texture on the inside and crispy on the outside.
- It’s a simple technique that upgrades any cookie, especially chocolate cookies, into something richer, toastier, and more decadent.
Why Lyuba’s Chocolate Brown Butter Cookies So Good!
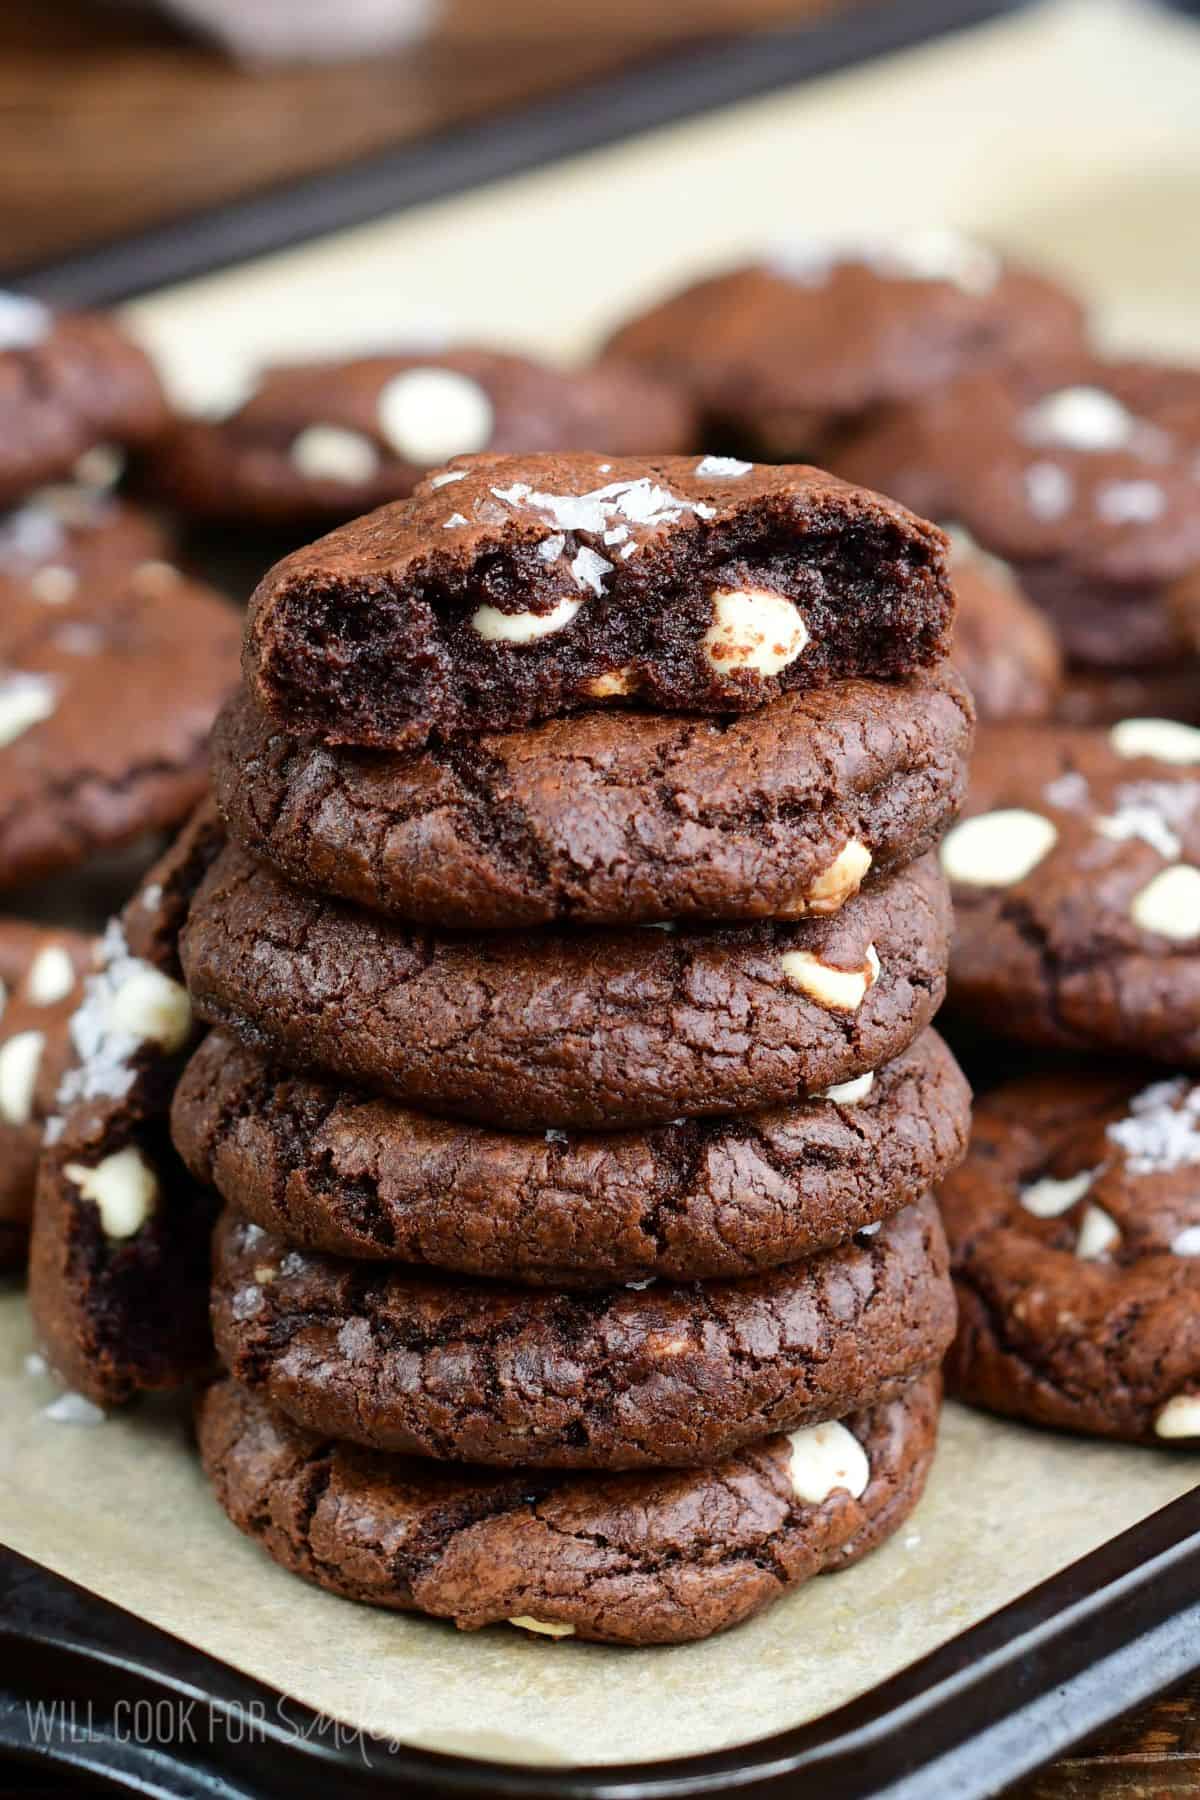
Perfectly soft + gooey texture. The brown butter technique, baking soda, and baking method keeps them beautifully chewy in the center with lightly crisp edges.
A mixer-free recipe. These cookies come together in one bowl, no creaming butter needed. Just whisk and fold. (I even call them lazy cookies because of minimal effort.)
No chill time! No need to wait to chill the dough, it comes together very well and cools enough to roll the cookies and bake right away.
White chocolate chips add contrast. They melt into sweet pockets that balance the dark cocoa beautifully.
A pinch of coarse salt. The sprinkle of coarse salt on top enhances flavor of the cookie by bringing in a salty component to a sweet cookie. It’s a perfect sweet/salty flavor balance.
Important Ingredient Notes and Tips
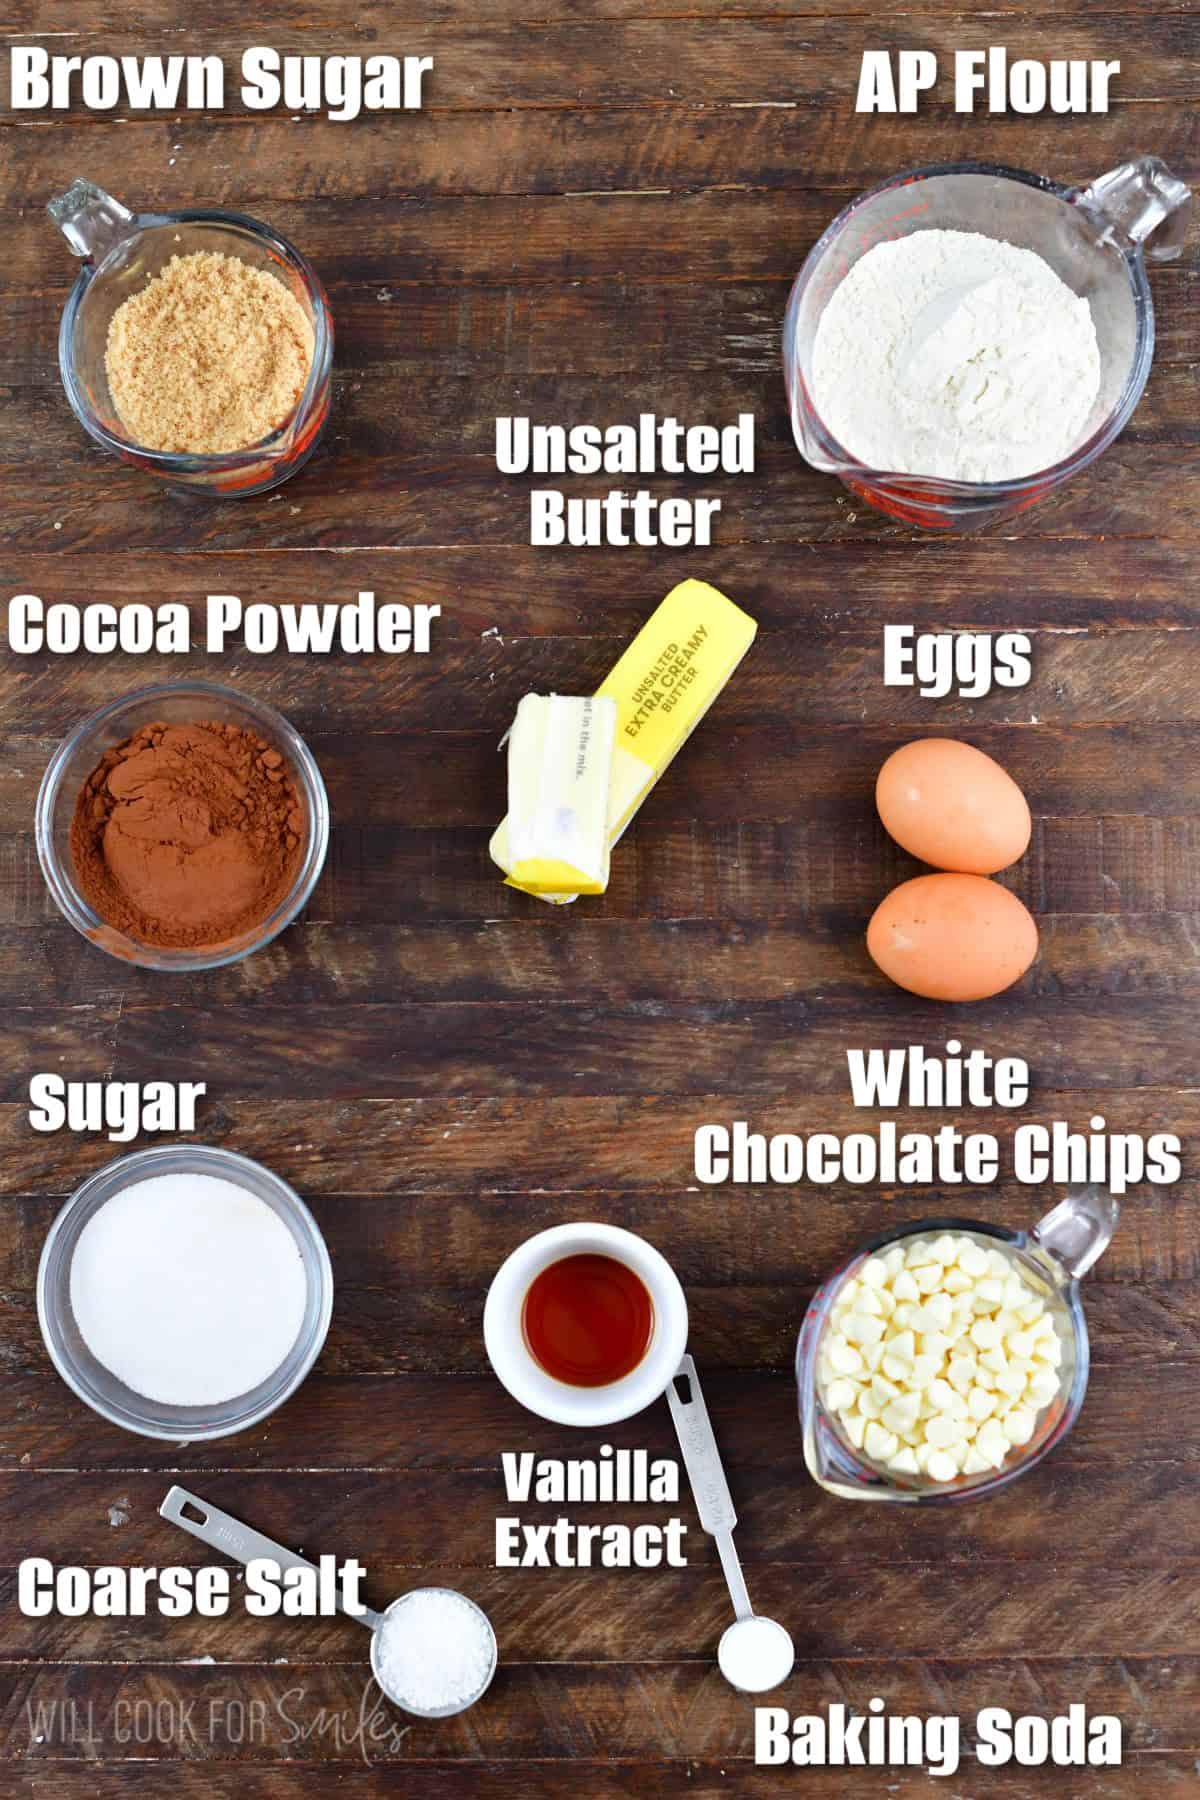
Unsalted Butter – Using unsalted butter lets you control the salt level perfectly.
Brown Sugar + White Sugar – The combination of both sugars gives you the best of both worlds – the moisture and chewiness from brown sugar and the crisp edges from white sugar.
Eggs (room temp) – Room temperature eggs incorporate much more smoothly into the brown butter mixture. Take them out of the fridge about 30 minutes before baking.
All-Purpose Flour – Standard all-purpose flour works perfectly here. Spoon it into your measuring cup and level it off, don’t pack it down.
Baking Cocoa Powder – I prefer to use Dutch-Processed cocoa powder. Dutch-processed cocoa powder gives cookies a darker, deeper, smoother flavor. Natural cocoa provides a more intense, slightly tangy taste. I prefer to use Dutch for fudgy results but natural works well if that’s all you have. Just make sure to use unsweetened (not cocoa mix).
Baking Soda – Baking soda is the best choice here because it reacts quickly with acids already in the dough and gives the cookies their perfect texture: soft and chewy in the middle. It keeps everything tasting rich and chocolatey without turning cakey.
Vanilla Extract – Always use pure vanilla extract, not imitation. The flavor difference is absolutely worth it, especially with brown butter.
White Chocolate Chips – The creamy sweetness of white chocolate pairs beautifully with the dark chocolate cookie base. Substitution: You can substitute semi-sweet chocolate chips, milk chocolate chips, or dark chocolate chips if you prefer!
Coarse Salt – The coarse salt on top creates that perfect sweet-salty balance. I use Maldon salt (flaky sea salt) or coarse kosher salt. Substitution: don’t like sweet and salty? Simply omit.
How to Make Brown Butter Chocolate Cookies
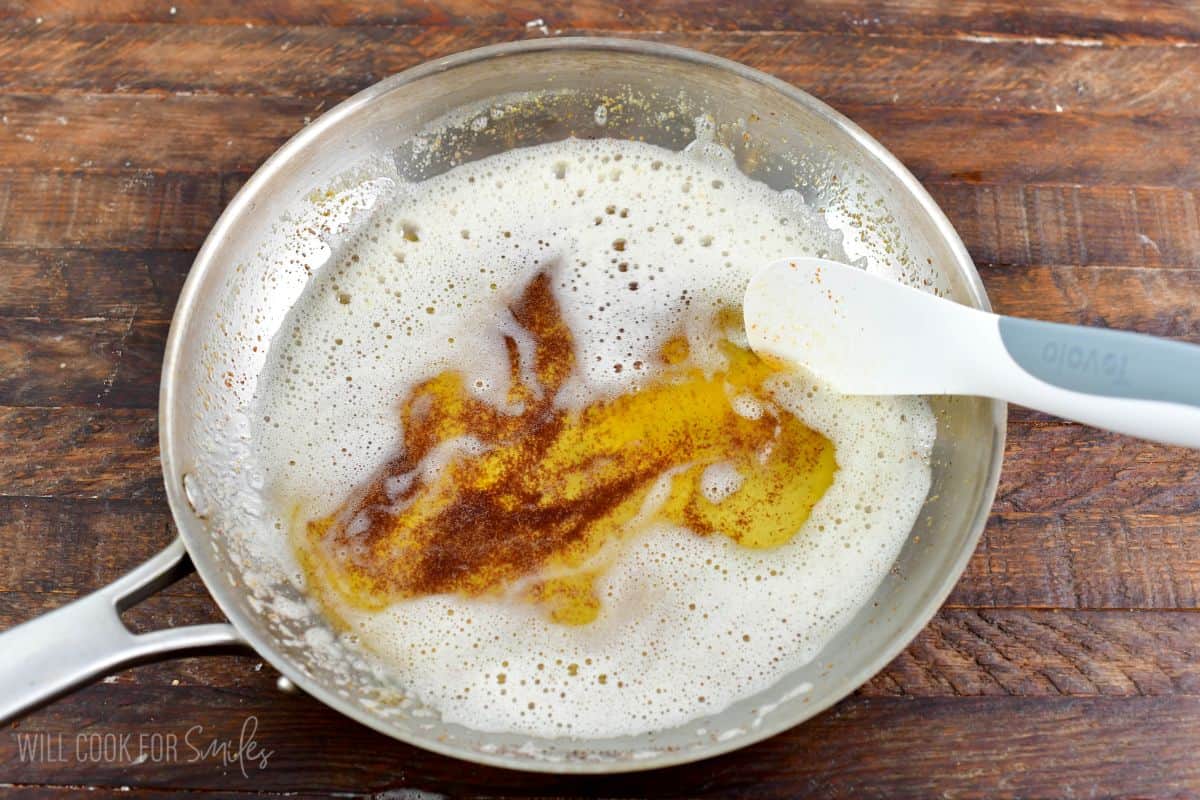
Step 1: Prepare and Brown the Butter. Heat 12 tablespoons of butter in a light-colored pan (easier to see the color change) over medium heat. Once melted, continue cooking while stirring constantly until it turns golden brown with a nutty aroma, 1-3 minutes. The butter will foam as it cooks – this is normal!
Expert Tip: Watch it closely; brown butter can burn in seconds. Transfer immediately to a large heatproof bowl.
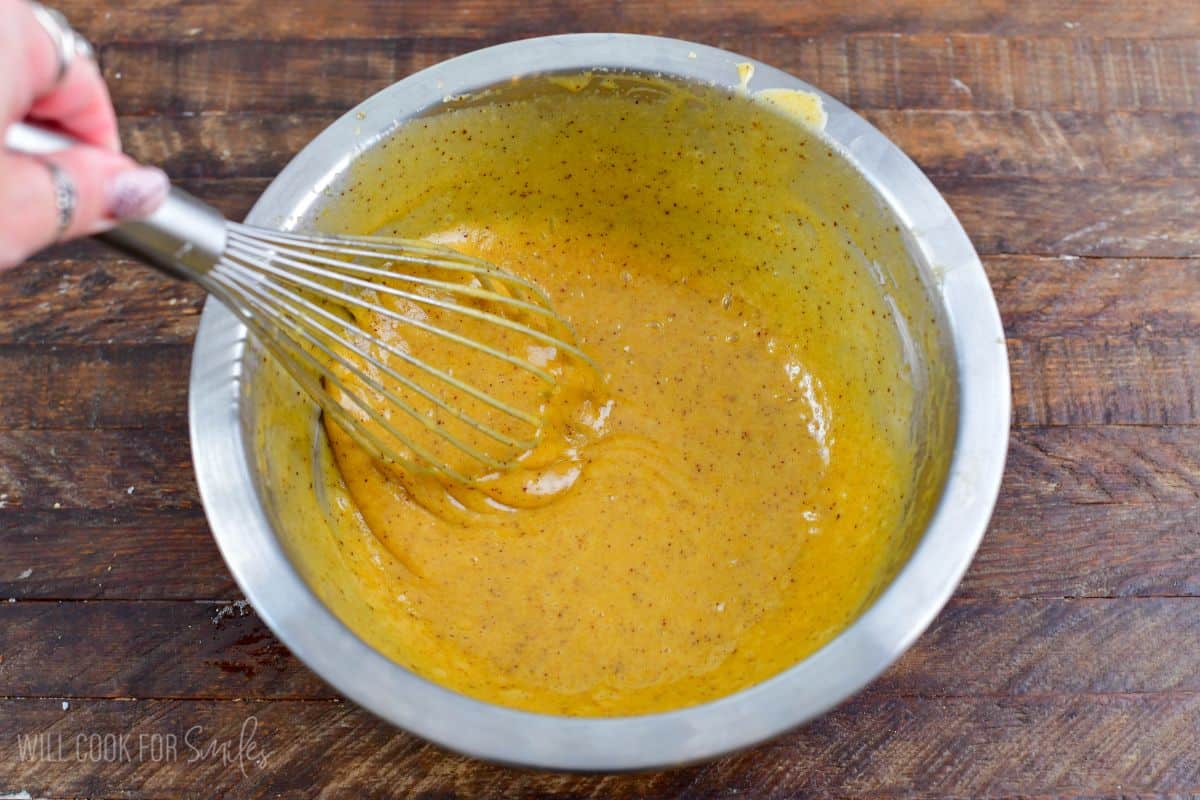
Step 2: Mix Wet Ingredients. Whisk both sugars and vanilla into the brown butter until fully incorporated. Now whisk in the eggs for 30 seconds until smooth, then let the mixture rest and whisk again for 30 seconds and repeat this rest-and-whisk process a couple more times.
Expert Tip: This technique dissolves the sugar completely and creates that thick, shiny texture that makes these cookies perfectly gooey.
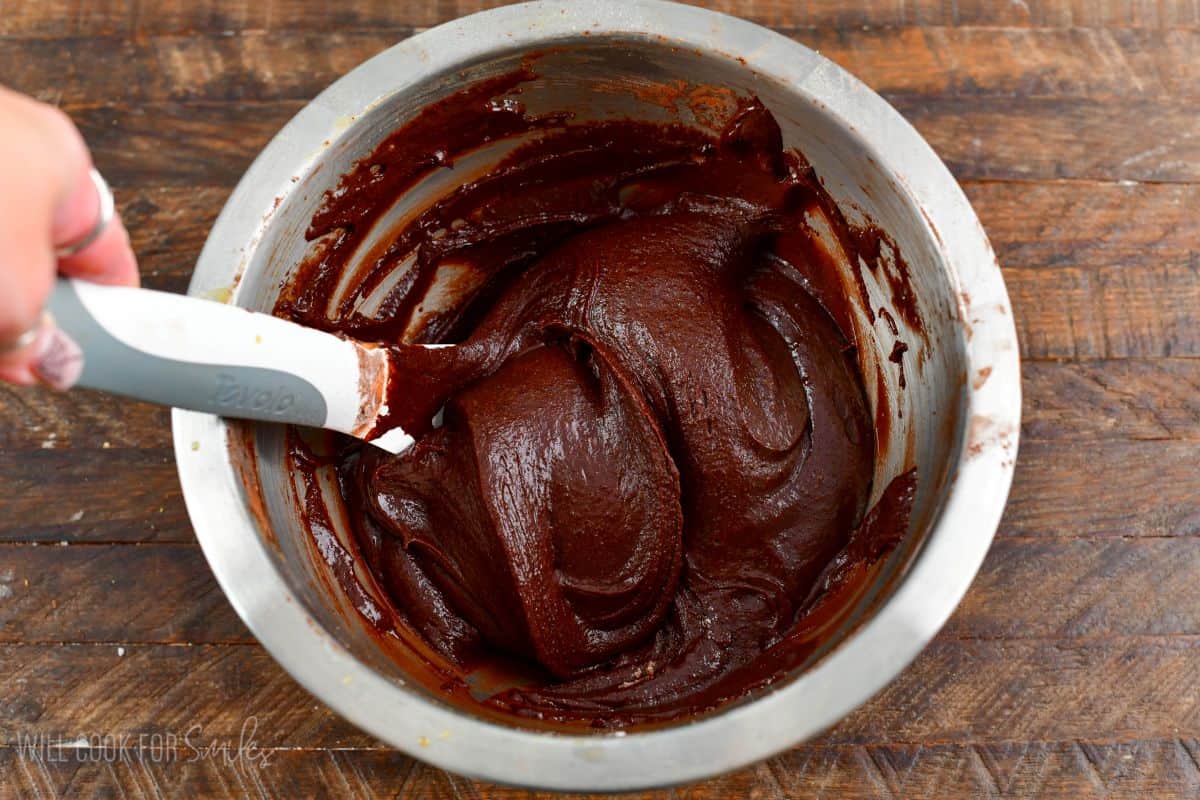
Step 3: Add Dry Ingredients and Chocolate. Using a rubber spatula, stir in the flour, cocoa powder, and baking soda until just combined, about 1 minute. The mixture will look thin at first but thickens as you stir – don’t overmix! Fold in the white chocolate chips until evenly distributed.
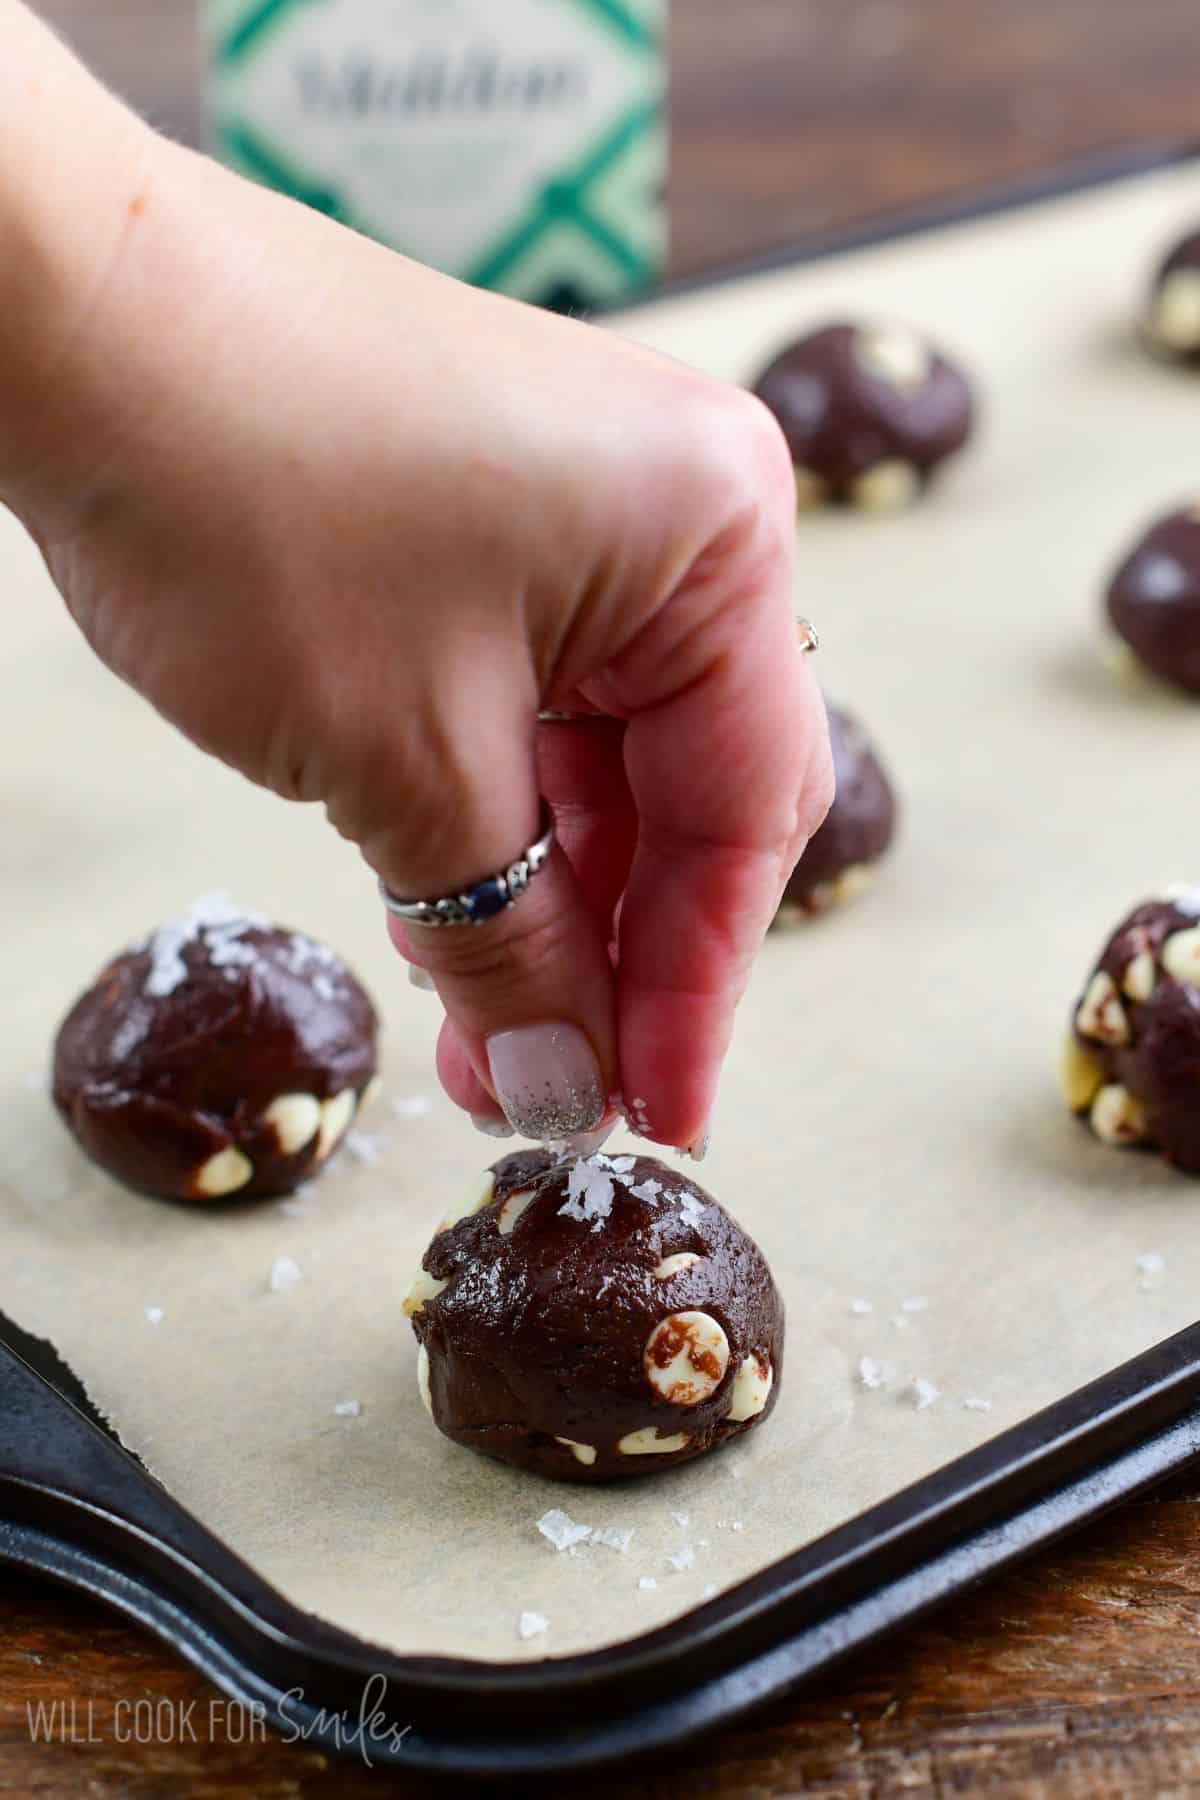
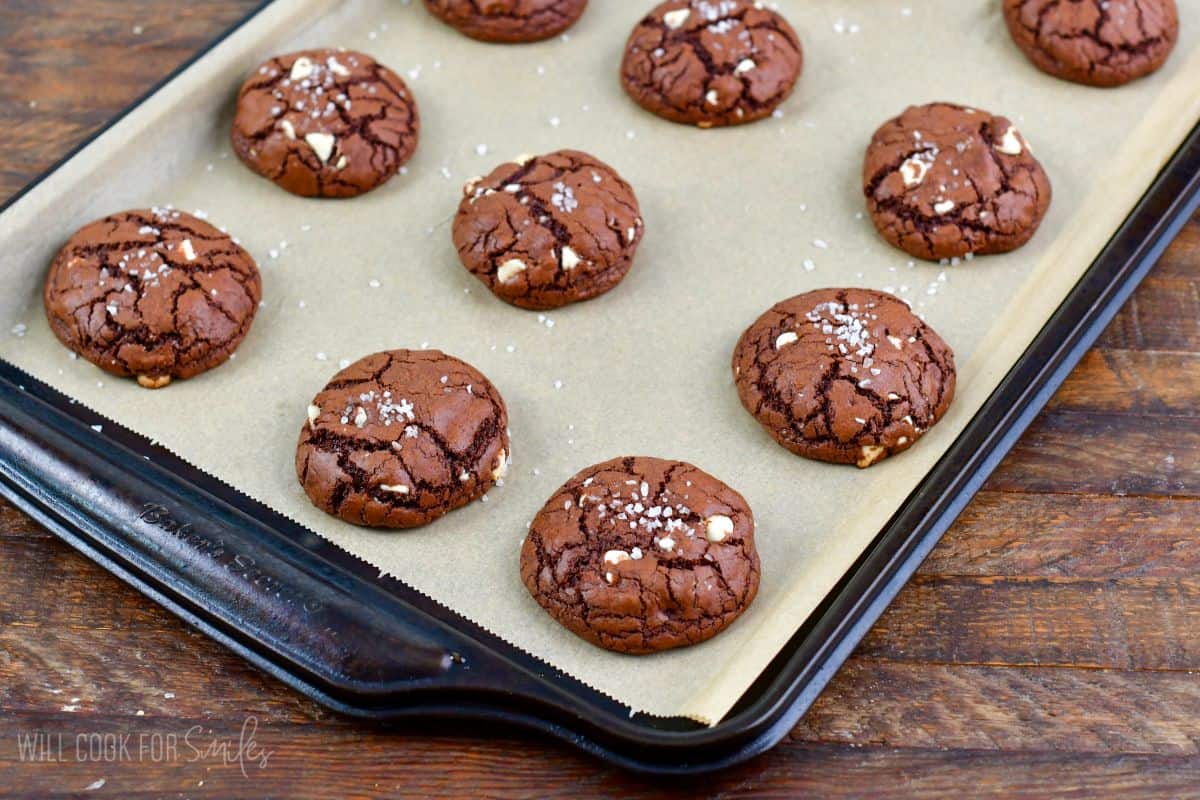
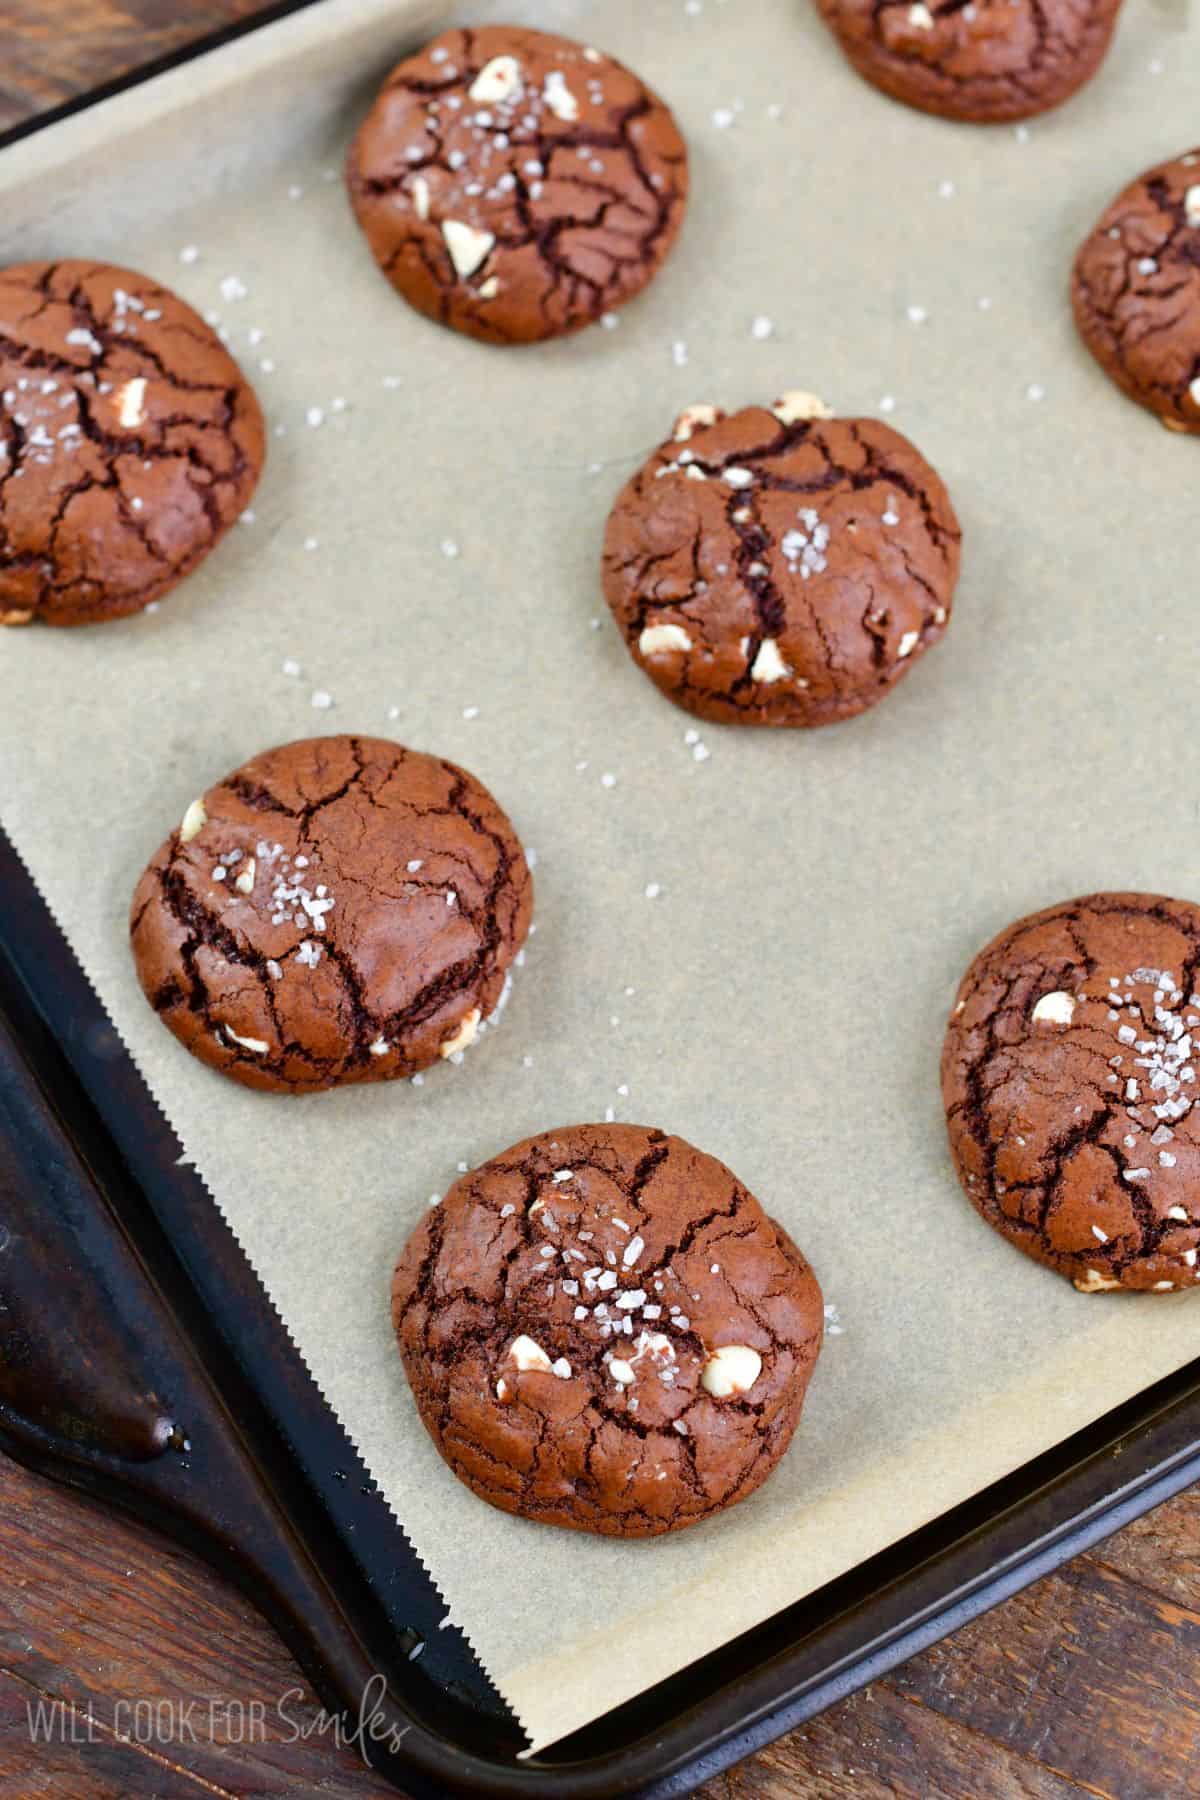
Step 4: Shape and Bake. Spray your hands with non-stick spray (the dough will be a little sticky!) and roll into 1-inch balls. A cookie scoop makes this faster and ensures even sizing. (I use #40 cookie scoop.) Place 2 inches apart on the prepared sheet, sprinkle with coarse salt, and bake for 8-10 minutes at 350F.
Find your perfect timing: I prefer 9 minutes for perfectly soft and gooey centers. 8 minutes gives you a more gooey texture, while 10 minutes more set throughout, less gooey in the center but still soft.
Step 5: Cool. Cool on a wire rack. The cookies continue setting as they cool but stay wonderfully soft and gooey inside.
Tips for Perfect Brown Butter Cookies
Watch your brown butter, don’t walk away, it can turn too brown and burn easily.
Cookie Size Matters: The 1-inch ball size is key for the 8-10 minute baking time. Larger cookies need more time.
Don’t Overbake: These cookies continue cooking on the hot baking sheet after you remove them from the oven. They should look slightly underdone when you take them out.
One Batch at a Time: For best results, bake one sheet at a time on the center rack. This ensures even baking.
The Brown Butter Temperature: Let the brown butter cool slightly (about 5 minutes) before adding the sugar. If it’s too hot, it can start cooking the eggs.
Make-Ahead, Freezing, and Storing Instructions
Make Ahead: You can prepare the dough ahead and refrigerate it for up to 3 days, covered air-tight. Let it sit at room temperature for about 30 minutes before shaping and baking. Cold dough may need an extra minute of baking time.
Freeze Unbaked Cookies: Shape the cookies into balls, place them on a baking sheet, and freeze until solid. Transfer to a freezer bag and freeze for up to 3 months. Bake from frozen, adding 1-2 minutes to the baking time.
Freeze Baked Cookies: Cool completely, then store in an airtight container or freezer bag for up to 3 months. Thaw at room temperature or warm in a 300°F oven for 5 minutes.
Room Temperature: Store cooled cookies in an airtight container at room temperature for up to 5 days. Tip: Place a piece of bread in the container to keep them soft (replace the bread daily). (Note that highly humid environments shorten storage time at room temperature.)
Recipe FAQs
The dough should thicken a few minutes after you stir in the flour mixture. If it’s still thin after mixing, refrigerate it for 15 minutes. The dough is naturally a bit softer than traditional cookie dough due to the melted butter, but it should still be scoopable.
You can, but reduce the coarse salt topping slightly. The brown butter flavor is best controlled when you start with unsalted butter and add your own salt.
This technique helps the sugar dissolve completely and creates a thick, shiny mixture that produces those beautiful crackled tops and gooey centers.
They may be overbaked. Try reducing the baking time by 1 minute. Also make sure you’re not overmixing the dough once you add the flour – mix just until combined. Make sure you don’t pack the flour when measuring (too much flour), and that you didn’t accidentally use baking powder.
Absolutely! For larger cookies, use 2-tablespoon sized balls and increase baking time to 11-13 minutes. Keep in mind that larger cookies may not have the same gooey center.
Absolutely! Either will work just fine just calculate measurements correctly. (If doubling, use large mixing bowl.)
Absolutely! Just add a little salt to the actual cookie dough when mixing (1/4-1/2 tsp).
More Cookies You Will Enjoy
If you love brown butter treats, try my brown butter snickerdoodle cookies. If you love soft and chewy cookies, try my soft sugar cookies, soft gingerbread cookies, chocolate soft gingerbread cookies and these gooey loaded peanut butter cookies, which have a similar soft, bakery-style texture.
DID YOU MAKE THIS RECIPE? PLEASE leave a 🌟 star rating! Let me know how you liked it by leaving the 📝 comment below or share and tag me on social media @willcookforsmiles. DON’T FORGET to subscribe to my newsletter!
Salted Chocolate Brown Butter Cookies Recipe
Ingredients
- 12 Tbsp unsalted butter
- 3/4 cup brown sugar
- 1/2 cup white granulated sugar
- 2 eggs room temperature
- 1 1/2 cups all purpose flour
- 1/2 cup baking cocoa powder
- 1 tsp pure vanilla extract
- 1/2 tsp baking soda
- 1 cup white chocolate chips
- 1-1.5 tbsp coarse salt for sprinkling on top
Instructions
- Preheat the oven to 350℉ degrees. Line a cookie baking sheet with parchment paper.
- Heat 12 tablespoons of the butter in a cooking pan, over medium heat, until melted. The butter will start to roar and bubble as the water cooks out and evaporates, then it will start to foam. (All normal!)
- Continue cooking butter, slowly stirring, until butter is turns to golden brown color and develops a nutty aroma, 1 to 3 minutes. Make sure to take off heat as soon as it turns amber brown (not dark brown.)
- Transfer browned butter into a large, heatproof mixing bowl. (Be careful touching a metal bowl as it will be hot at the bottom.)
- Whisk in both sugars and vanilla extract until fully incorporated. (Smell it…it smells incredible!)
- Whisk in eggs vigorously, until mixture is smooth with no lumps remaining, about 30 seconds. Let mixture stand a few seconds, then whisk for 30 seconds again. Repeat process of resting and whisking a couple more times until mixture is thickened, smooth, and shiny. (This is a baker-style arm workout.)
- Using rubber spatula, stir in flour, baking cocoa powder and baking soda until just combined, about 1 minute. (The mixture may look thin at first but it thickens as it cools while you stir.)
- Fold in white chocolate chips.
- Spray your hands with some non-stick spray because the cookie dough may be a little sticky and roll the cookie dough into about 1-inch balls.
- Place them onto the prepared baking sheet, about 2 inches apart.
- Sprinkle each cookie ball with some coarse salt and bake for 8-10 minutes. (8 minutes will make gooey center and 10 minutes will be more baked.)
- Cool baked cookies on a wire rack.
Notes
Nutrition
Would you like to save this recipe?
Categories:
Chocolate Recipes, Christmas Baking Recipes, Cookie Recipes, Dessert Recipes, Most Popular Recipes, Valentine's Day,All images and text ©Lyubov Brooke for ©Will Cook For Smiles. Please do not use my images without prior permission. If using my posts in collections and features, please link back to this post for the recipe.
Disclaimer: Nutrition information shown is not guaranteed to be 100% accurate as most ingredients and brands have variations.


Best cookie ever!!!
Wow! Thank you so much!! That is so kind! 🙂
Have you tried to freeze these
Hi Lil,
No, sorry, I haven’t tried freezing cookies before. They are usually gone so fast 🙂
wow what an amazing treat! these cookies are soooo delicious.
Thank you so much, Mel!
Oh my goodness! These look so moist and delicious! And they sure don’t look like “lazy” cookies. They are absolutely stunning! I really love it!
Awe, you’re too sweet!
Thank you so much, Maureen!
Lazy cookies? These look amazing! My fave bake time is about 9 minutes too. I like my cookies a bit undercooked.
They are the best a little gooey, aren’t they?!
Thank you so much, Tonia! 🙂
Oh my goodness, these look SO good! And trust me, they do not at all look like “lazy” cookies. They’re gorgeous! I love how pillowy and super decadent looking they are! I’m definitely adding this recipe to my list of things to bake! : )
Awe, thank you so much, Joan! I really hope you’ll try them. I think you’ll be pleased 🙂