
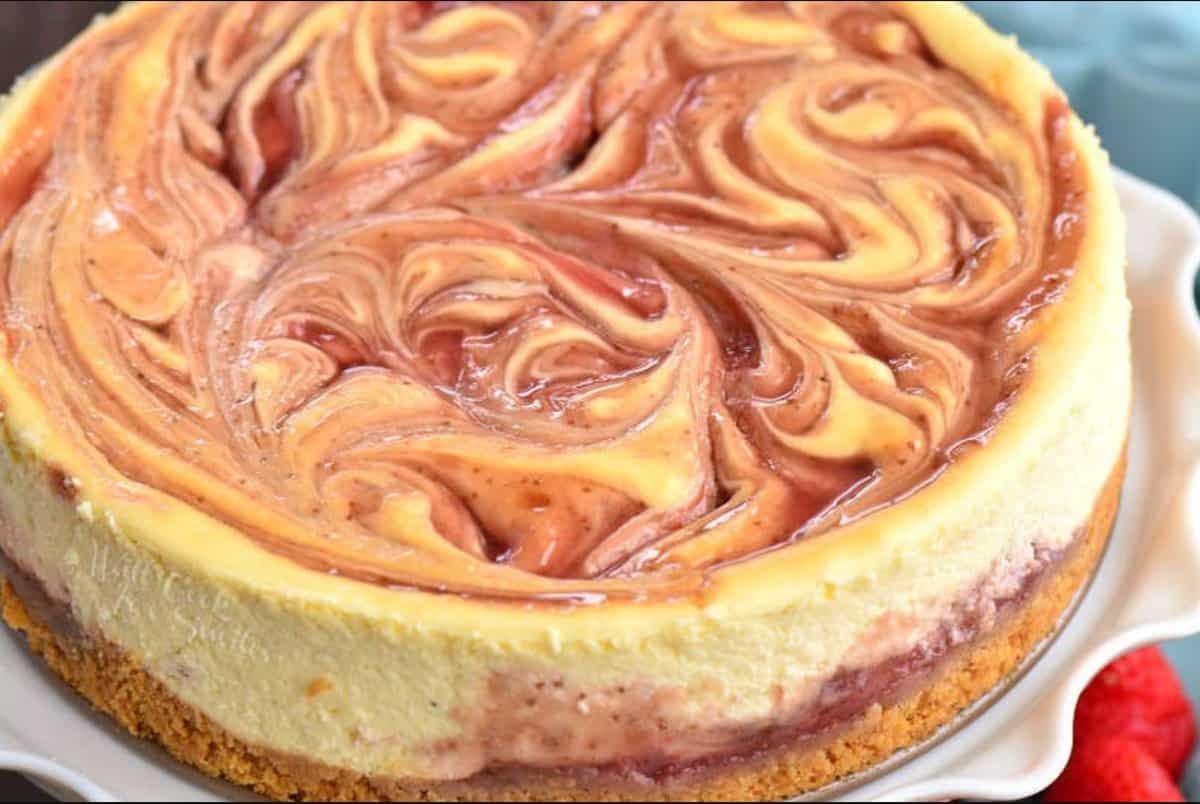
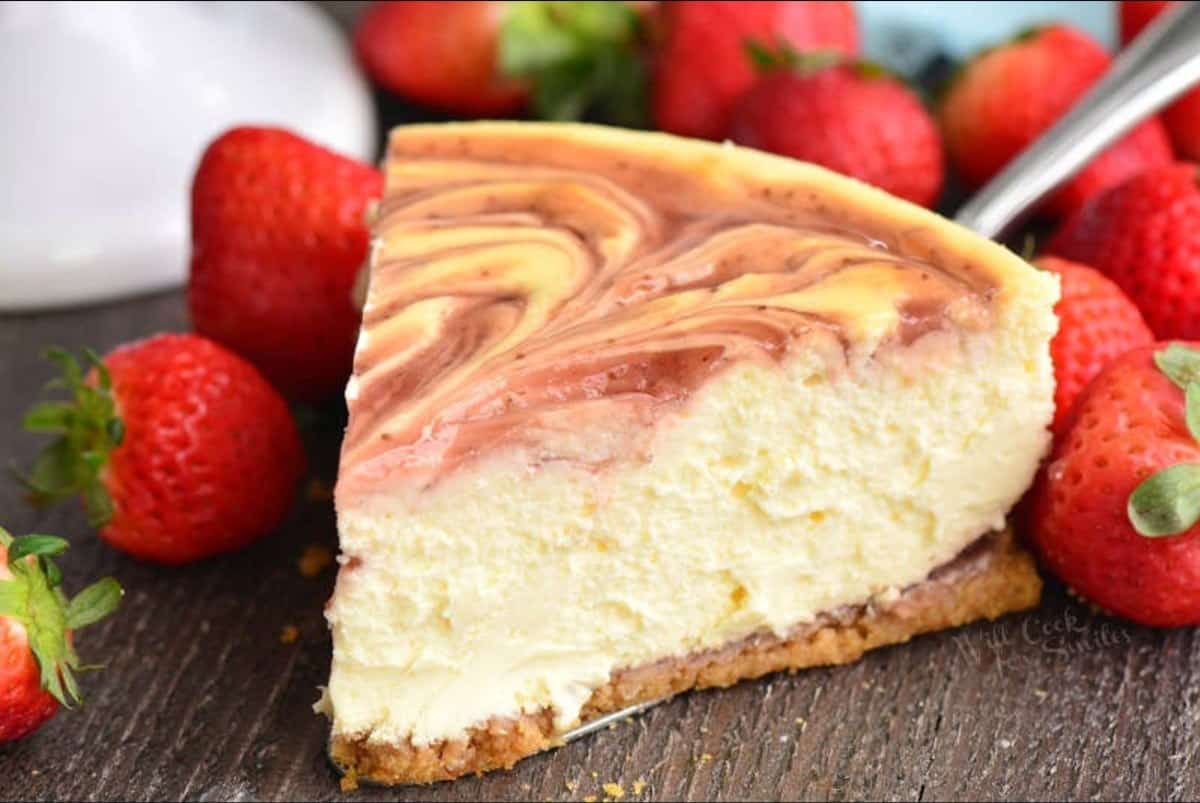
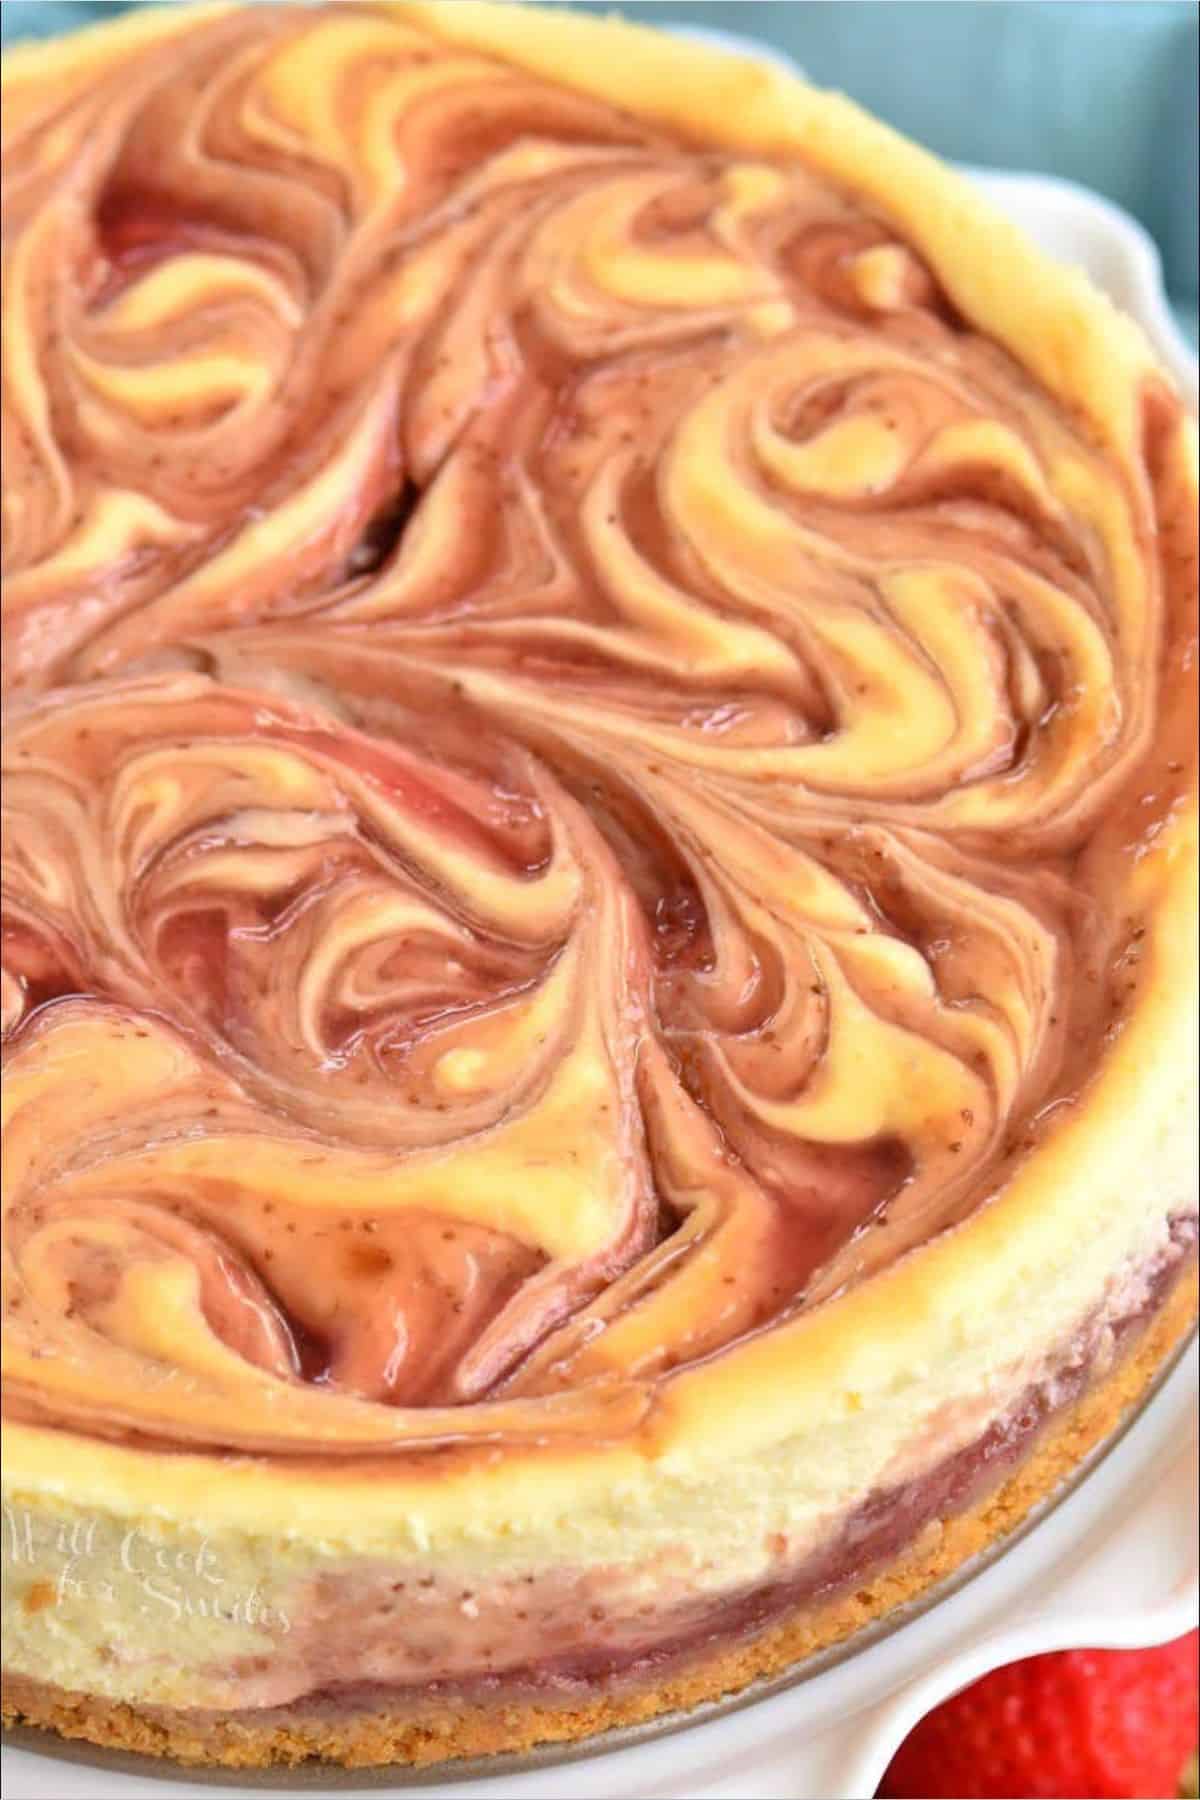
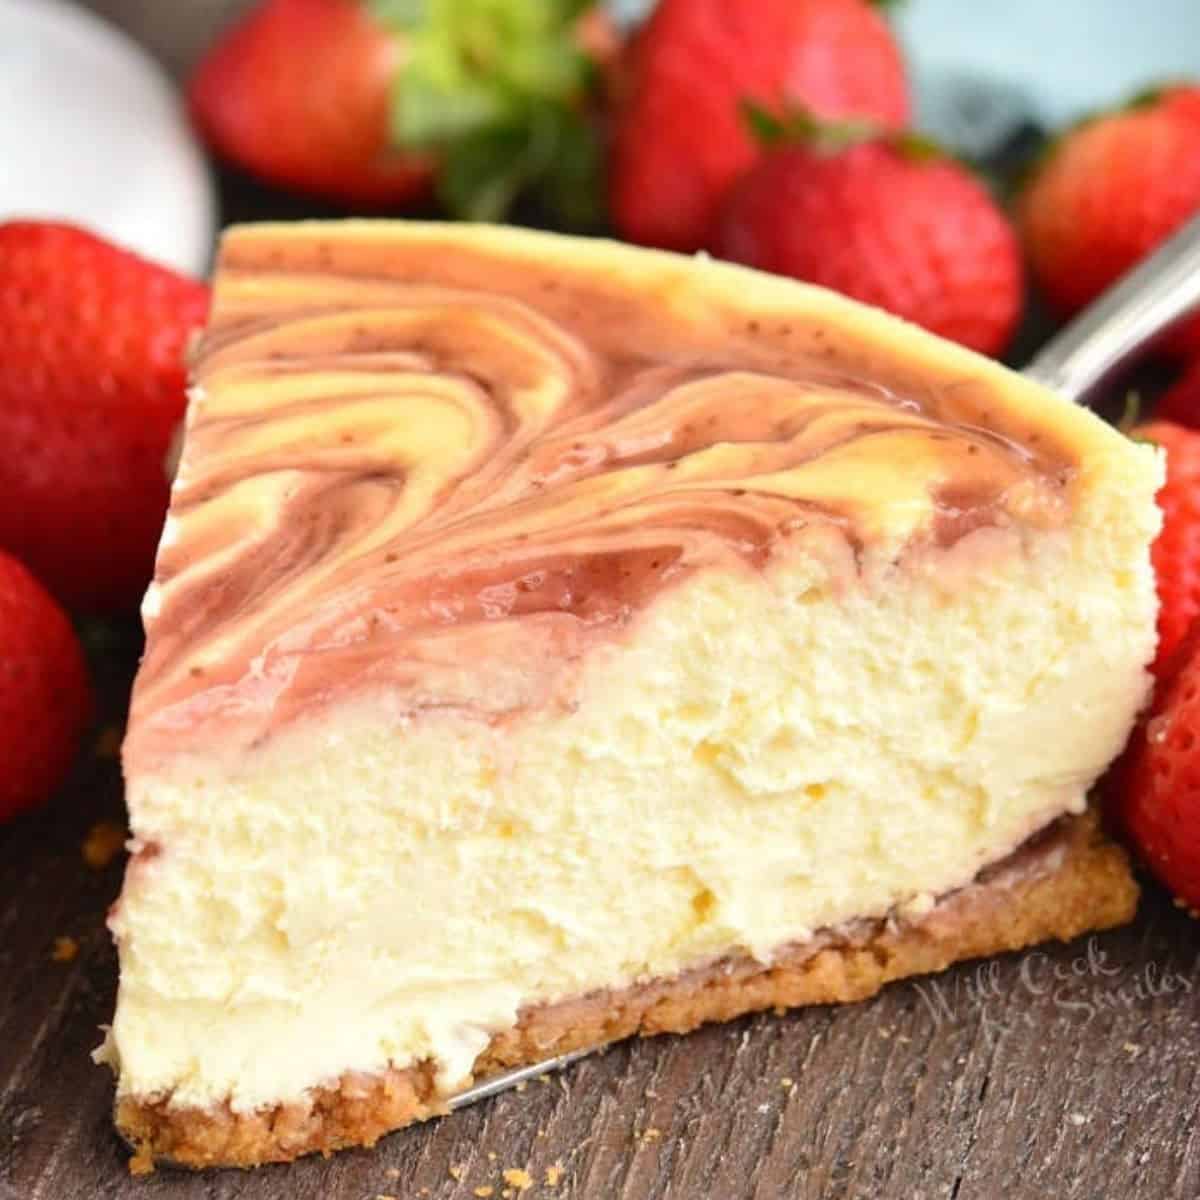
Strawberry Cheesecake
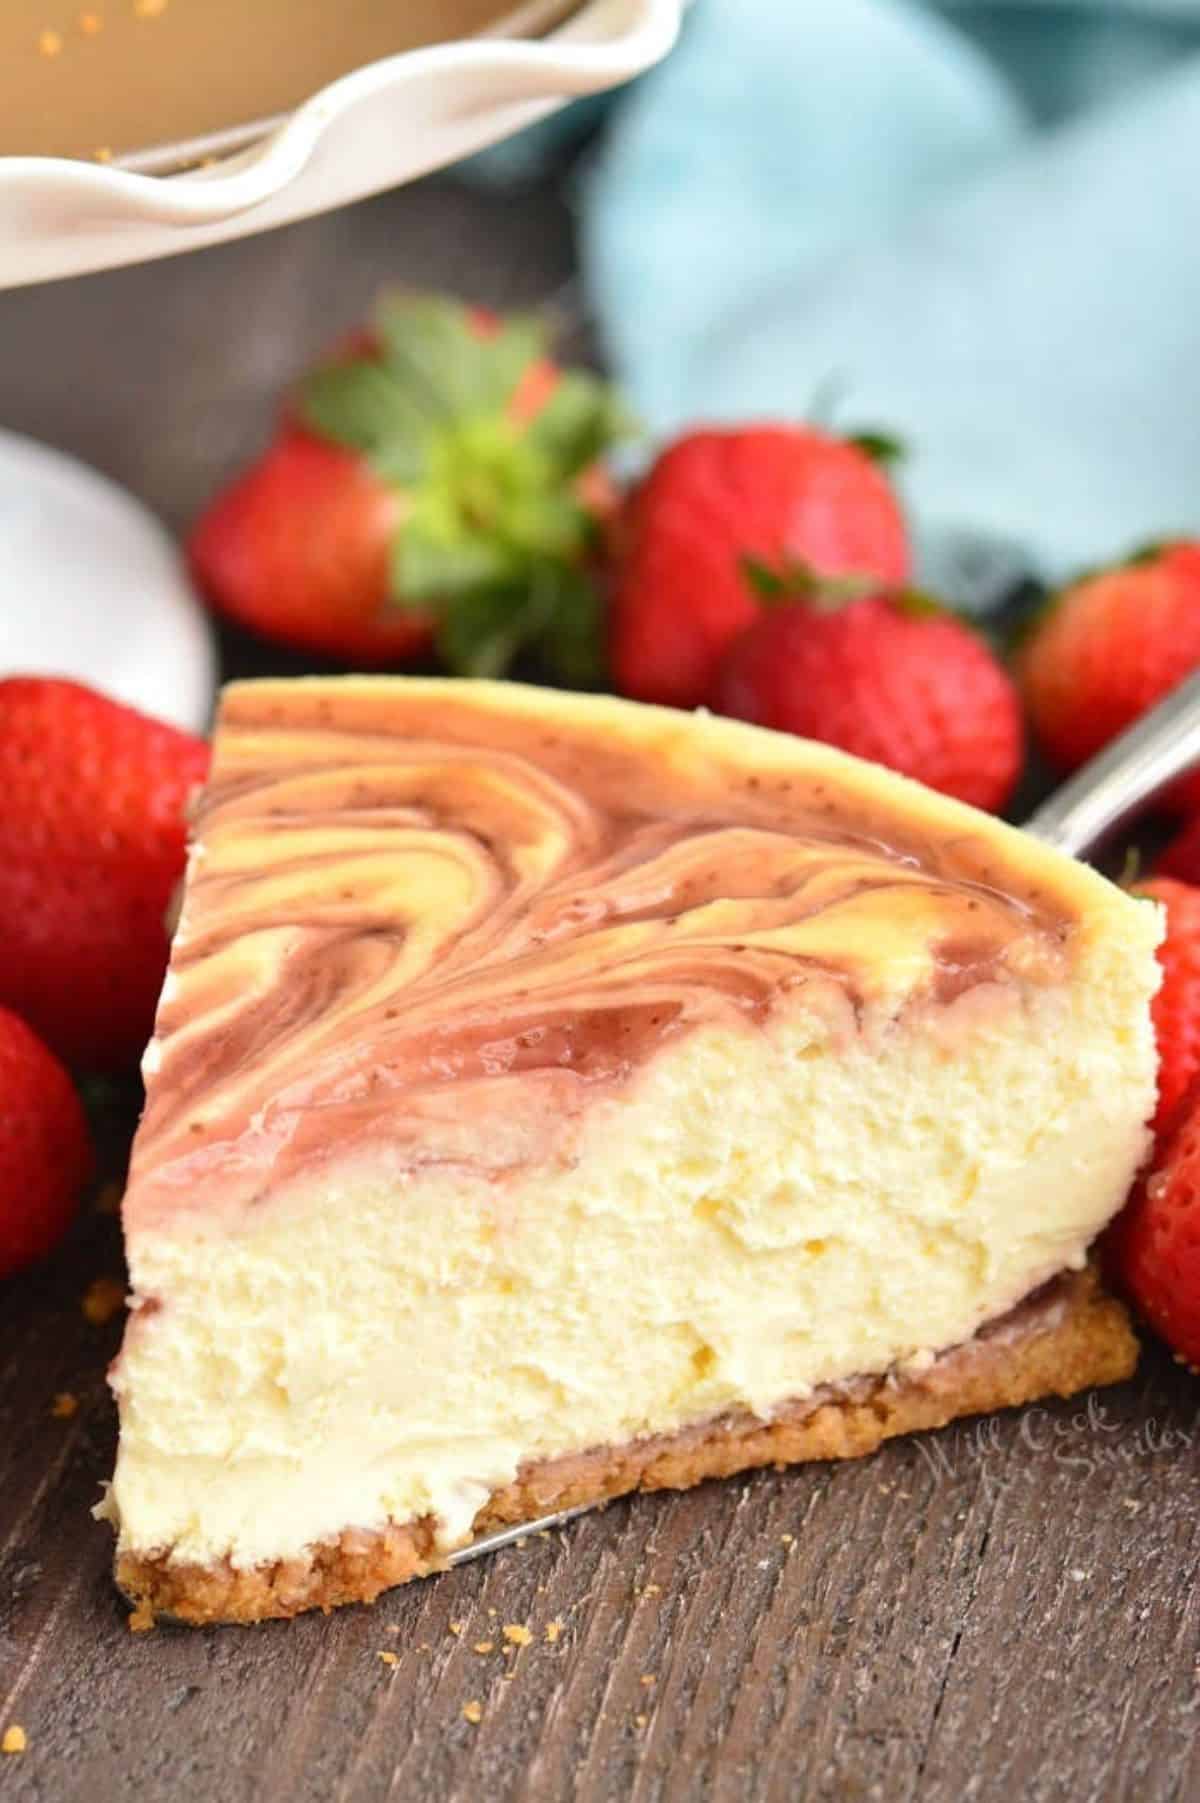
I love making crazy cheesecakes with frostings, and toppings, and different flavors! But there are days when the simplest route is truly the best way to go. This strawberry cheesecake recipe is pretty classic, and the fresh strawberry flavor makes it shine very bright. There’s no need for frosting or toppings because this cheesecake has the most beautiful strawberry sauce swirled top that’s equal parts vibrant and scrumptious!
I modeled this cheesecake after one of my favorites – White Chocolate Raspberry Cheesecakes. It just looks so pretty all swirled at the top and baked into a hypnotizing design. While you don’t want to cover it up with a frosting, you can save the extra strawberry sauce that will be left over for drizzling on top of the individual slices.
Tips for the Best Strawberry Cheesecake:
- You can prepare strawberry sauce ahead of time and store it in the fridge until ready to make the cheesecake. If you do make it ahead, make sure to warm up the sauce so it’s softer and easier to spread and swirl.
- There will be some sauce leftover from this recipe and that is on purpose. I make sure to make extra so that people can drizzle more sauce on top of their individual slice. There are always a couple of people that want to have a little more strawberry sauce on top.
- If you don’t have graham cracker crumbs for the crust, substitute Nilla wafers. Pulse about 40-50 wafer cookies in the blender until it’s crumbs and use it in the recipe. You may want to omit or use less brown sugar in the crust if substituting Nilla wafers.
- DO use a springform baking pan to make your cheesecake! You will not be able to take it out of the regular cake pan.
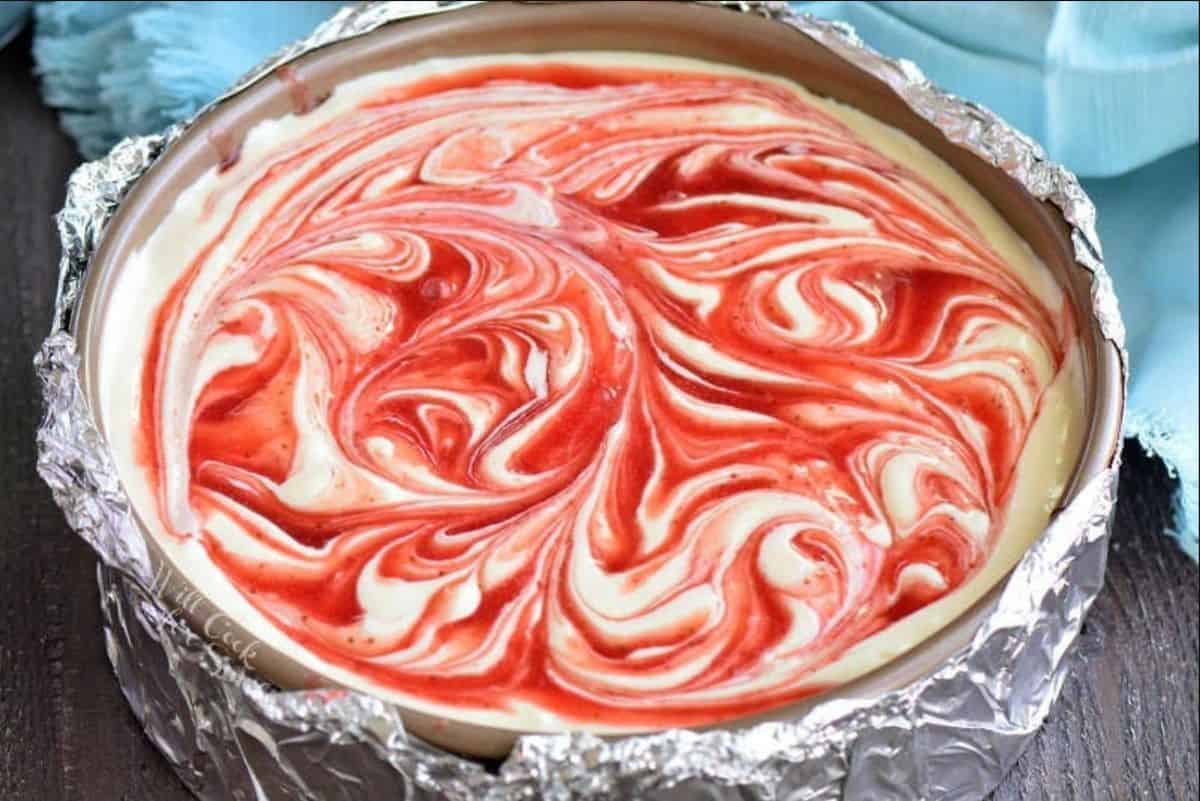
- Be careful swirling the strawberry sauce into the cheesecake. DO NOT mix, just swirl the sauce and cheesecake filling with a back of a spoon or another utensil with a thin handle. Don’t scrape the sides and don’t get all the way to the bottom so you don’t scrape the crust.
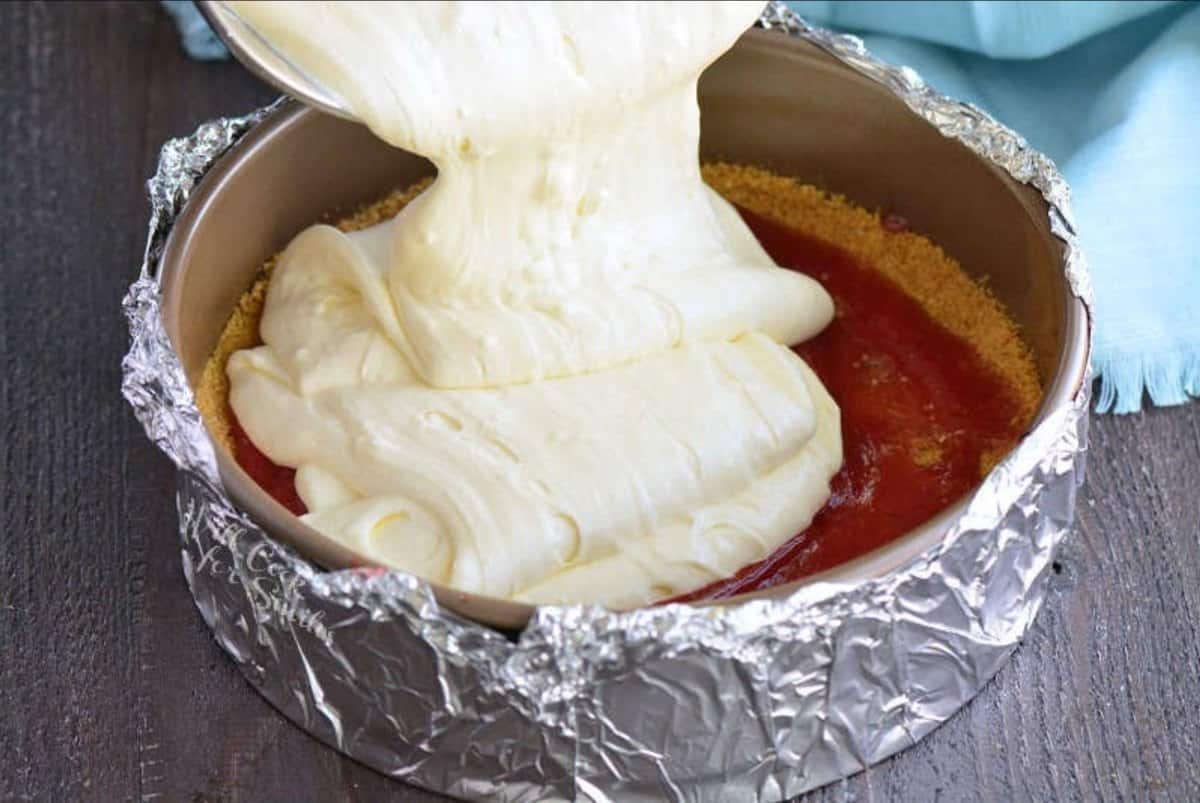
- I highly recommend that you wrap outside of the springform pan in heavy duty aluminum foil to prevent water seeping in from the water bath.
- That brings up to the water bath. DO use water bath to bake the cheesecake! The texture difference really is amazing, it’s well worth the extra step.
- You don’t actually have to take the cheesecake out of the pan until you’re ready to serve it. Cool it in the pan, chill it in the pan, and you can also store the leftovers in the same baking pan.
How To Freeze Strawberry Cheesecake?
- Once cheesecake has been cooled to room temperature, run a butter knife along the inside of the springform pan to separate the cheesecake from the pan. Place the pan with cheesecake in the freezer and freeze for about an hour.
- Carefully take off the side portion of the springform. You can either keep the bottom of the springform with the cheesecake or transfer it onto a piece of thick cardboard cake holder covered with aluminum foil. Wrap cheesecake and the bottom of the pan with plastic wrap, using 2-3 layers. Then, wrap the whole thing with aluminum foil.
- Make sure to date and label before placing cheesecake back in the freezer. Cheesecake will stay fresh in the freezer for about 2-3 months. To thaw frozen cheesecake, make sure to do it slowly. Place cheesecake from freezer into the refrigerator and slow-thaw overnight.
How To Take Cheesecake Out of the Springform Pan?
- Separate the springform side and bottom part. Then, take the bottom part of the pan and lay it down on a sheet of parchment paper. Use a pencil to trace around the bottom of the pan. Keep in mind that the circle will need to be just a little bigger than the bottom of the pan.
- Cut out the circle you traced and put the springform back together. Spray the springform with cooking spray and fit the parchment paper circle on the bottom. When you are ready to take the cheesecake out of the pan, make sure to use large, hard spatula. Have the serving dish or the cardboard cake circle ready and be careful!
- Slide the spatula in between the parchment paper and the bottom of the springform pan. Gently pull the cheesecake off of the springform and right onto the serving dish. Keep them side by side, and make sure you don’t tilt the cheesecake pan!
Why Is Water Bath Important For Baking Cheesecake?
- Baking in a water bath technique is called “bain-marie.” This technique is done to prepare delicate desserts like crème brûlée, custards, and cheesecakes. The main reason for using a water bath for these desserts is to keep direct heat away from baking dish.
- Because these desserts are heavy on the cream and eggs, if not baked evenly and slowly but exposed to direct heat, it would not be baked uniformly. The outside will be overdone and inside will still be gooey. Water bath ensures even baking throughout the whole dish by keeping layer of protection between the baking dish and oven heat.
- Without the water bath, cheesecake will be sagging in the middle, is likely to crack, and most importantly, it will be overcooked on the outside and under-cooked on the inside.
If you’ve made my Strawberry Cheesecake recipe and found a lot of good information here, PLEASE leave a 🌟 star rating! Let me know how you liked it by leaving the 📝 comment below as well. Don’t forget to subscribe to my newsletter!
Strawberry Cheesecake
Ingredients
Strawberry Sauce:
- 16 oz strawberries
- 1 cup white granulated sugar
- 1 tsp vanilla
- 1 tbsp fresh lemon juice
- 2 tbsp cornstarch
- 2 tbsp cold water
Crust:
- 1 1/2 cups graham cracker crumbs
- 1/4 cup brown sugar
- 4 tbsp salted butter melted
- 1 tsp vanilla extract
Cheesecake Filling:
- 32 oz cream cheese softened
- 1 cup white granulated sugar
- 3 eggs room temperature
- 1/2 cup heavy whipping cream
- 1/2 cup sour cream
- 2 tsp vanilla extract
- 2 tbsp cornstarch
Instructions
Strawberry Sauce:
- Wash strawberries and cut off the leaves. Chop clean berries and place them into a sauce pot.
- Stir in sugar, vanilla extract, and lemon juice. Bring it to simmer over medium heat and then lower the heat. Let it simmer over medium-low heat for about 20 minutes. Make sure to stir from time to time.
- In a separate little bowl, mix cornstarch and cold water together and stir that mixture into the sauce pot.
- Let the strawberry mixture thicken and then blend it with an immersion blender or in another blender.
Prepare the pan:
- Before making the cheesecake, prepare the springform pan by wrapping outside of it in aluminum foil. Many springform pans, especially ones that have been used quite a bit, have a chance of leaking some water inside. Wrapping outside of the springform in foil will help keep water out.
- Although, there is a chance that a small amount of water will leak in, this will NOT ruin the cheesecake.
- Preheat the oven to 325°.
Crust:
- Combine graham cracker crumbs, melted butter, vanilla extract, and brown sugar in a mixing bowl and mix very well.
- Spray inside of the springform pan with some cooking spray, making sure you get the sides too. Spread crumb mixture in the bottom of the prepared springform, evenly pressing it over the bottom and a little up the sides.
- Drizzle about 1/2 cup of the strawberry sauce over crust and gently spread it with a back of a spoon to even the layer.
Cheesecake Filling:
- In a bowl of an electric mixer, beat softened cream cheese on medium-high speed until smooth and fluffy. I give it a good 2-3 minutes of beating to get it soft and smooth. Scrape sides and bottom on the bowl.
- Pour in sugar while beating and add eggs, one at a time. Beat it until smooth. Stop to scrape bottom and sides of the bowl.
- Add sour cream, vanilla extract, heavy cream and beat, still on medium-high speed, until all mixed.
- Lower the speed and beat in cornstarch. Scrape sides and bottom of the bowl and mix for a few more seconds to make sure everything is evenly mixed.
- Carefully pour the batter over the crust and sauce and spread in evenly.
- Spoon several dollops of strawberry sauce over the top of the cheesecake filling and use a long, thin handle of a spatula or another utensil to gently swirl the sauce and filling. DO NOT mix, just swirl. Try not to scrape sides and don’t go too deep so you don’t scrape the crust. (Save remaining strawberry sauce to top off individual slices.)
Bake the cheesecake:
- Place a large roasting pan into the oven and place cheesecake springform inside the roasting pan. Carefully pour hot water into the roasting pan, about half way up the side of the springform.
- Bake for 85-90 minutes. Turn off the oven and open the oven door half way. Let cheesecake rest for 10-15 minutes and take it out of the oven. Take the foil wrap off the pan.
- Let it rest for 10 minutes on the counter and then gently run a butter knife between sides of the cheesecakes and the springform to carefully separate it. (You don’t actually have to take the cheesecake out of the pan until ready to serve.)
- Cool cheesecake for an hour and then cover the pan with plastic wrap and refrigerate for 6 hours or overnight.
Video
Notes
- Strawberry Sauce: note that can made the strawberry sauce ahead of time! Just make sure to refrigerate it in an air-tight food storage container. Warm up the sauce when you’re ready to make the cheesecake.
- Water Bath: remember, DO use the water bath technique, it does strongly affect the texture of the cheesecake for the better.
- How To Tell If Cheesecake If Done: You can tell the cheesecake is baked when the edges are set and the center is slightly soft and jiggly. As it cools in the oven and on the counter, the center will continue to set more and become more firm. DO NOT insert a knife or toothpick into the center since that may cause the dessert to crack.
- Cooling: DO cool the cheesecake is three steps: 10 minutes in the turned off oven, on the counter, and chill in the refrigerator.
Nutrition
More Spring Dessert Recipes to Try:
Would you like to save this recipe?
Categories:
Cheesecake Recipes, Dessert Recipes, Easter Recipes, Mother's Day Recipe Ideas, Strawberry Recipes, Valentine's Day,All images and text ©Lyubov Brooke for ©Will Cook For Smiles. Please do not use my images without prior permission. If using my posts in collections and features, please link back to this post for the recipe.
Disclaimer: Nutrition information shown is not guaranteed to be 100% accurate as most ingredients and brands have variations.


I love this recipe! I lightly alter it with lemon zest, and lemon juice, and frozen strawberries, but that’s about it! I’m about to try converting it into a coconut variation based on a few of her recipes to what I’m envisioning. Highly recommend!
I love how you’ve made it your own! Lemon and strawberry are such a fresh combo! And now I’m seriously intrigued by the coconut version—can’t wait to hear how it turns out!
This is the most amazing strawberry cheesecake recipe. Everyone loves it and it has a beautiful presentation. I wouldn’t change a thing!
I am so glad you liked it, Julie!
What can I replace the sour cream with?
Any idea how far in advance you can make these?
Made it and it was loved, now my some would like it for his wedding.
This cheesecake will last up to 4-5 days in the refrigerator you can also freeze it. I go over how above in the blog post under the Q&A section.
Amazing Cheesecake!!!
Thank you, Deb!