Spatchcock Turkey Recipe
Why Spatchcock Turkey is a Total Game-Changer?
Let me tell you why spatchcocking has become my go-to method for cooking turkey (and chicken). (My spatchcock chicken is fantastic!) After 25 years in professional and home kitchens, I’ve tried every turkey cooking method out there, and this one consistently delivers the best results.
The biggest benefits:
- Cooks in half the time – A 12-14 lb. spatchcock turkey takes just 1 to 1.75 hours instead of 3-4 hours.
- Even cooking throughout – When you flatten the turkey, all the meat sits at roughly the same level in the pan. This means the dark meat and white meat finish cooking at the same time.
- Crispier skin everywhere – The entire skin gets exposed to heat, creating that golden, crispy perfection.
- Easier to carve – No wrestling with an awkward whole bird and it stays sturdy without rolling the whole time.
PRO TIP: If you’re intimidated by spatchcocking, ask your butcher to do it for you! Most are happy to remove the backbone, and you’ll still get all the cooking benefits.
What is Spatchcocking?
Spatchcocking (also called butterflying) simply means removing the turkey’s backbone so you can flatten it before roasting. This technique might sound fancy, but it’s actually quite straightforward once you know the steps.
Simple Ingredients Is All You Need
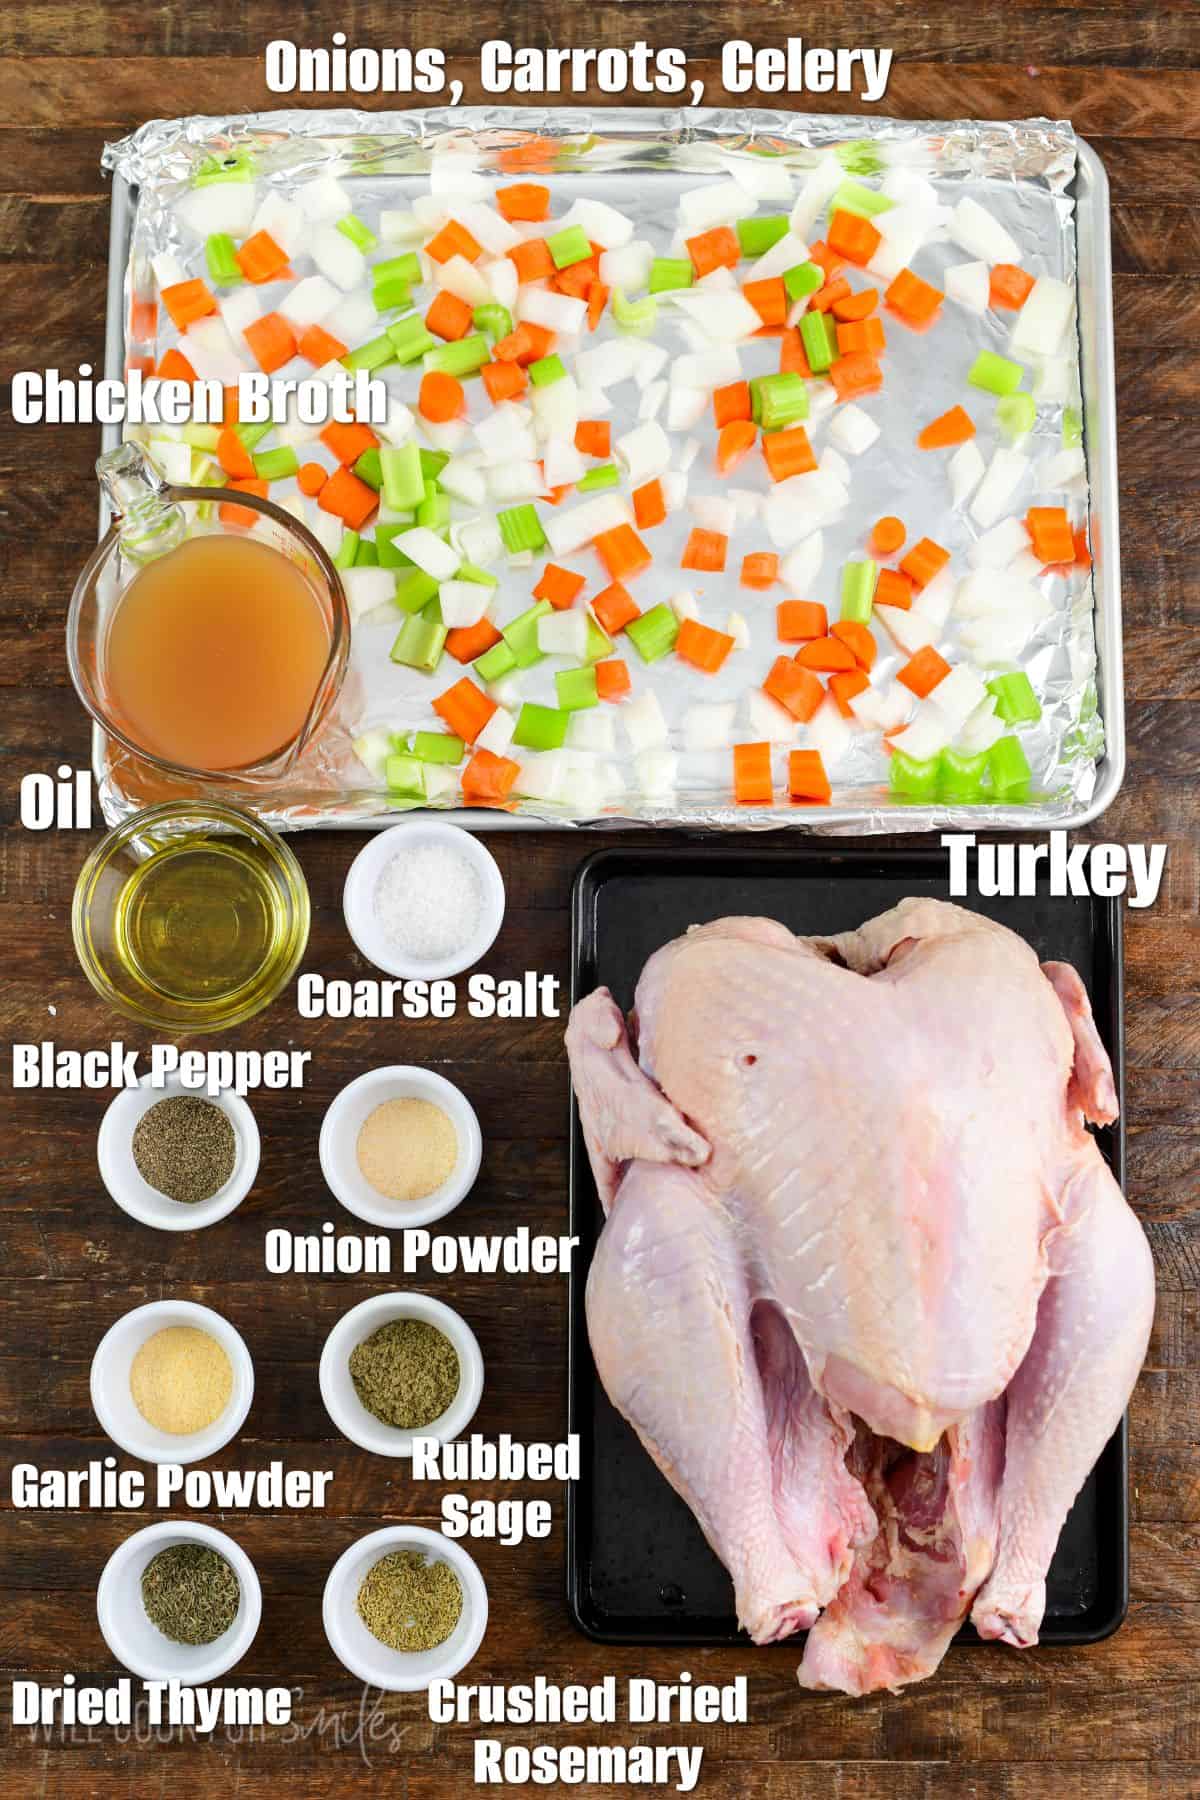
Choosing Your Turkey: most people get a 12-14 lb. turkey for this recipe but get one based on your needs. NOTE: Larger turkeys can work, but they become harder to fit on a standard baking sheet meant for home ovens.
The Oil: I use avocado oil but olive oil will work too just make sure to taste it first and make sure it’s one meant for cooking/roasting.
Seasonings: I use a classic turkey herb blend of coarse kosher salt, black pepper, garlic powder, onion powder, dried sage, dried thyme, and dried rosemary. Feel free to adjust the salt to your taste preference.
Vegetables for the Pan: Chopped onion, carrots, celery, and whole garlic cloves go under the turkey. These aren’t just for flavor – they also prevent your pan drippings from burning and create the most delicious base for gravy!
Chicken Stock: It will be added to the pan to keep everything moist, prevents burning, and to add to those flavorful pan drippings. Substitute turkey stock if you have any or vegetable stock.
For the Gravy: If you’re making gravy (and I highly recommend it!), you’ll need butter, all-purpose flour, and those incredible pan drippings. If you need to keep the recipe gluten free, use 1:1 gluten free all purpose flour.

How to Spatchcock a Turkey (Step-by-Step)
Before Starting: Thaw the Turkey Completely. Before you even start prepping, make sure your turkey is fully thawed. Plan on 24 hours of thawing time for every 4–5 pounds of turkey.
Step 1: Remove the turkey from the refrigerator 30–45 minutes before preparing to help it cook more evenly.
Step 2: Prep the Turkey. Remove the turkey from the packaging and take out the neck and giblets from the cavity. Save the neck for gravy or stock and if you like, save the giblets for the stock as well. (Note, that liver and heart have a very strong and somewhat bitter flavor.) Pat the turkey completely dry with paper towels, this step is essential for crispy skin.
In a small bowl, combine salt, black pepper, garlic powder, onion powder, sage, thyme, and rosemary. Mix well and set aside.
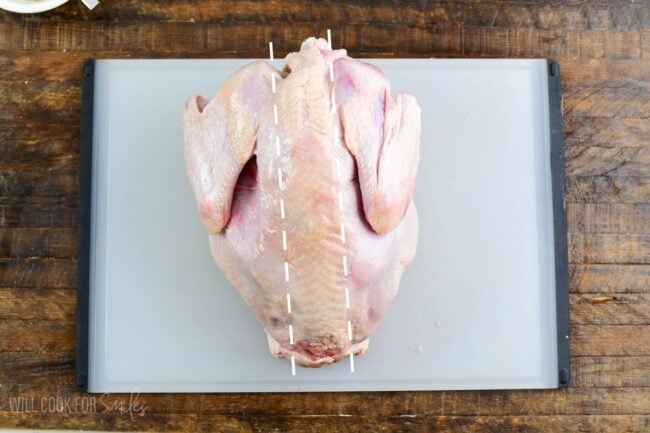
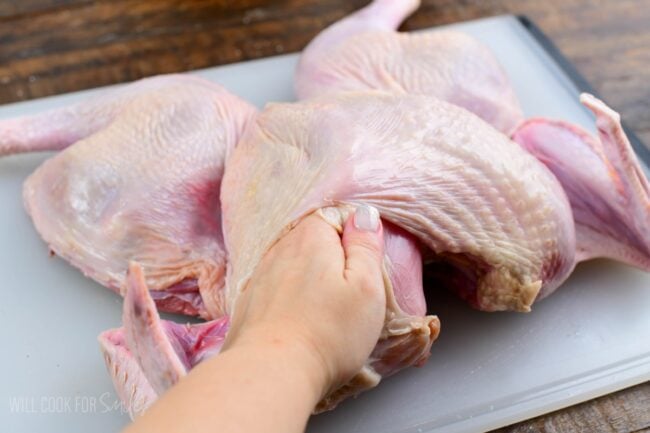
Step 3: Remove the Backbone. Place the turkey breast-side down on a large cutting board. Using sharp kitchen shears, cut along both sides of the backbone, starting at the tail and working toward the neck. Remove the backbone and reserve it for making stock.
Step 4: Flatten the Turkey. Flip the turkey breast-side up. Press firmly on the center of the breastbone with the heel of your palm until it cracks and the turkey flattens. You will feel the bones crack, that is your indication that it’s working.
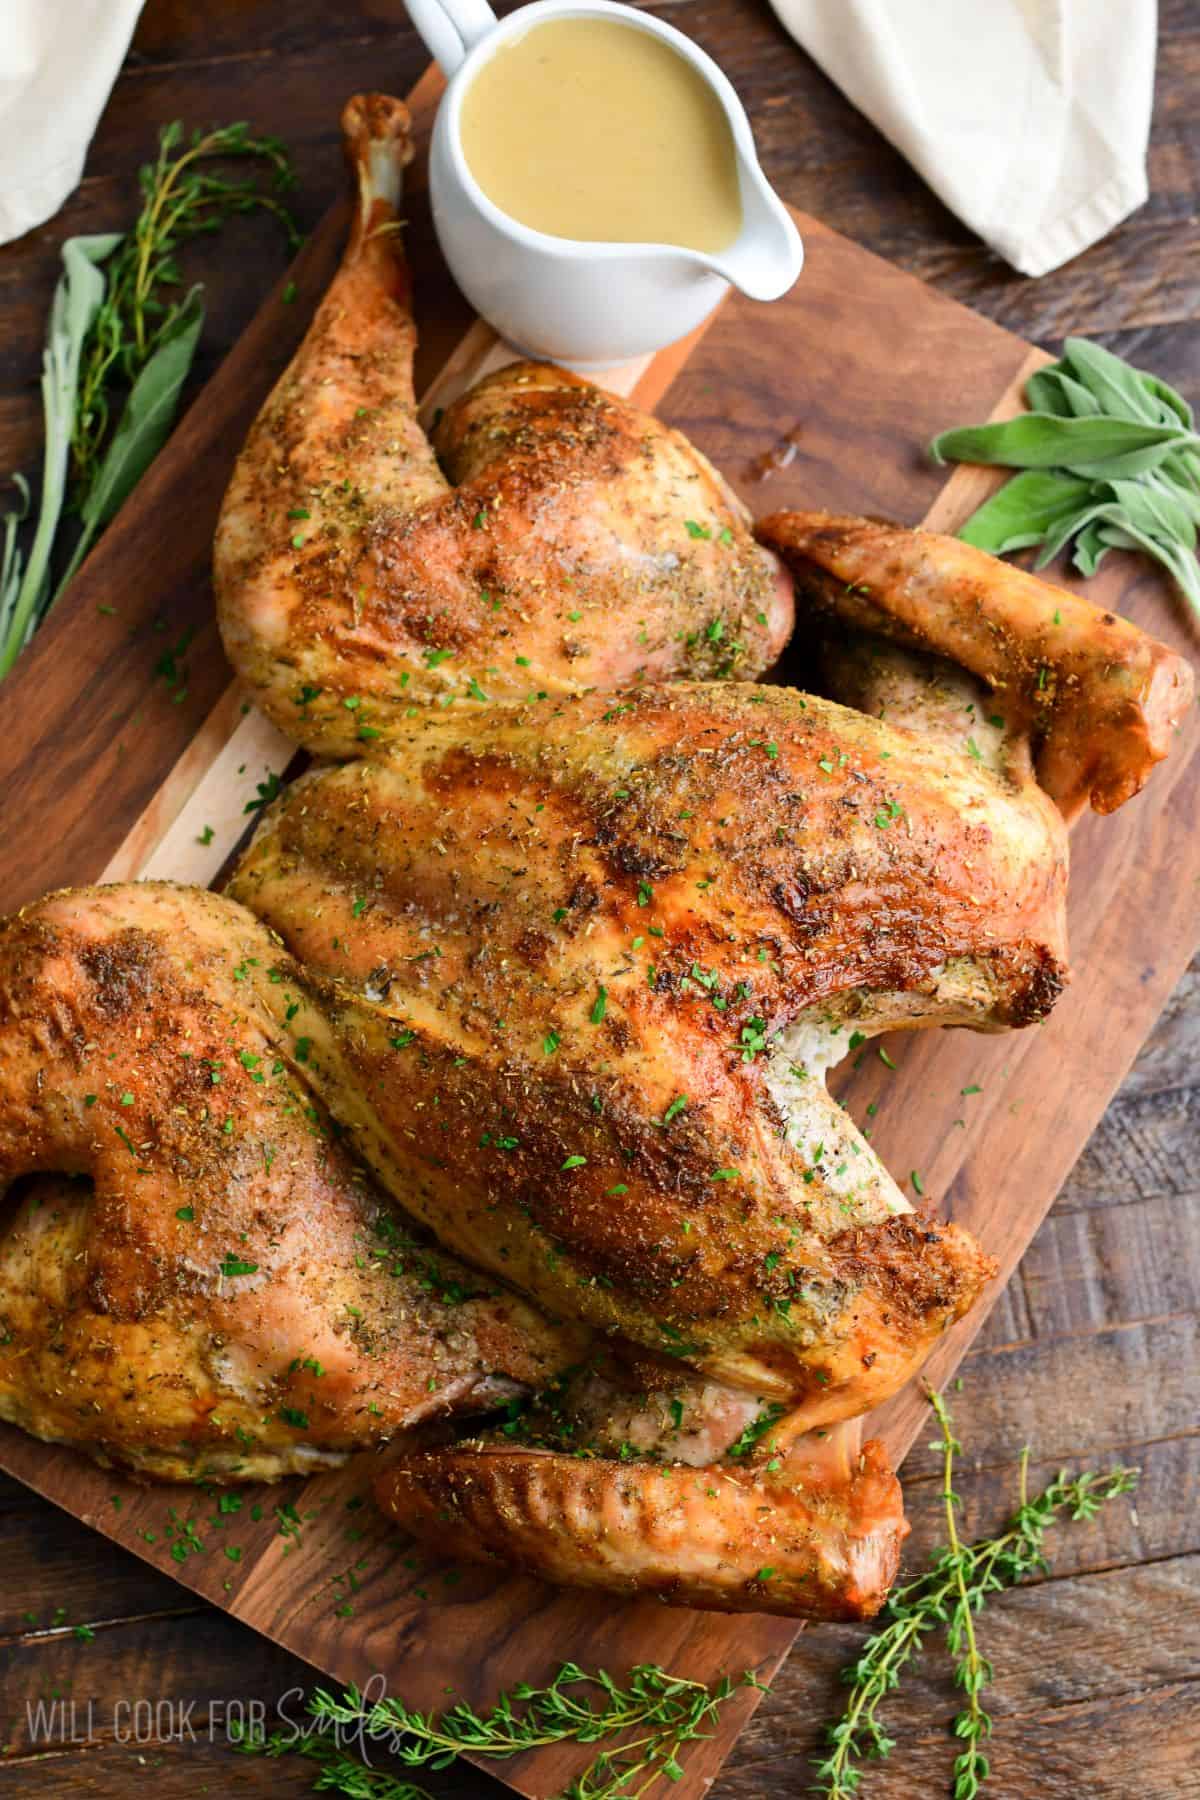
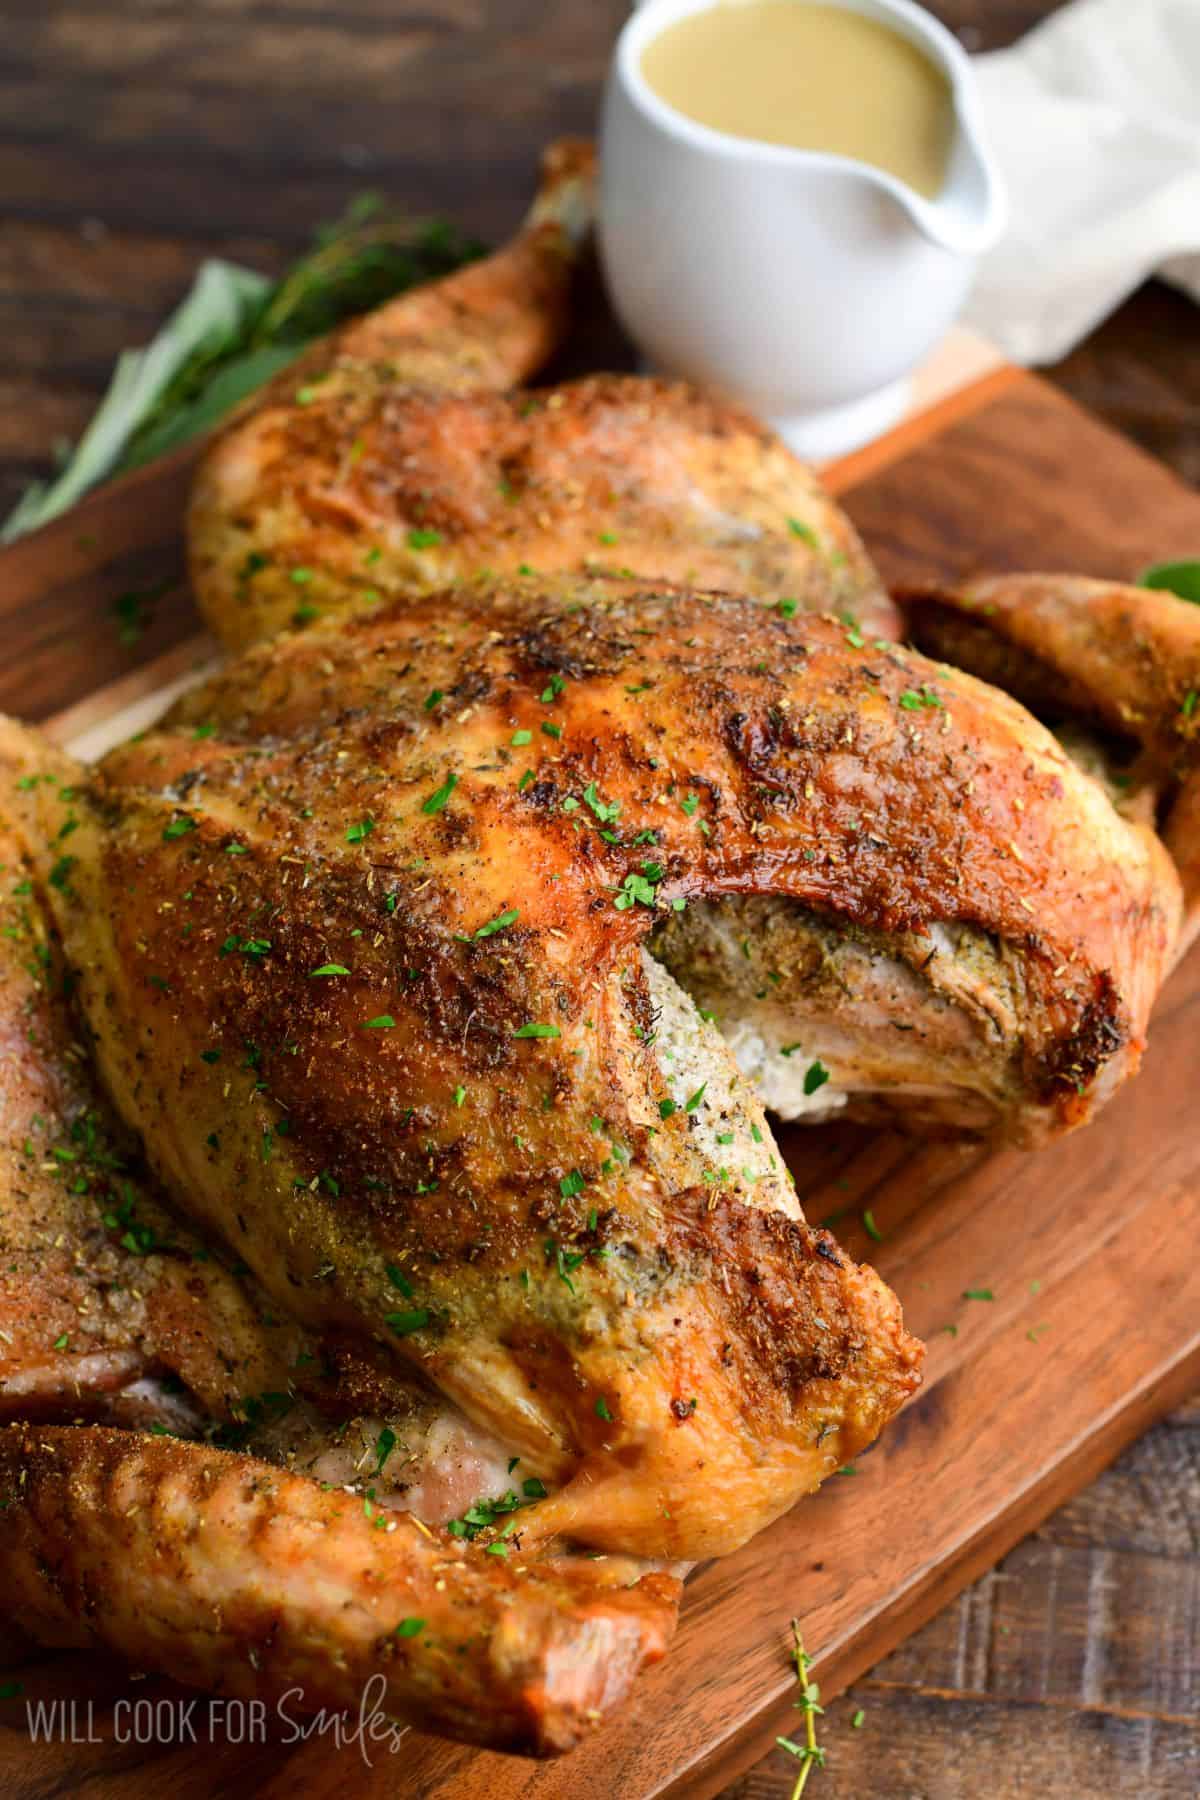
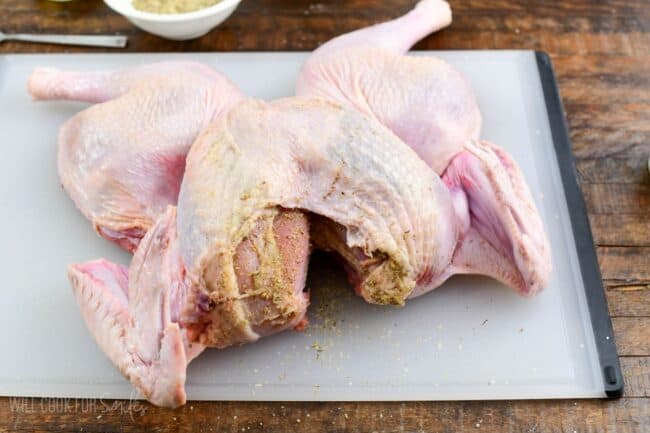
Step 5: Season the Turkey. Carefully loosen the skin over the breast meat and rub some of the seasoning directly underneath the skin. Brush oil all over the outside of the turkey, then season generously on all sides. Tuck the wing tips underneath to prevent them from burning.
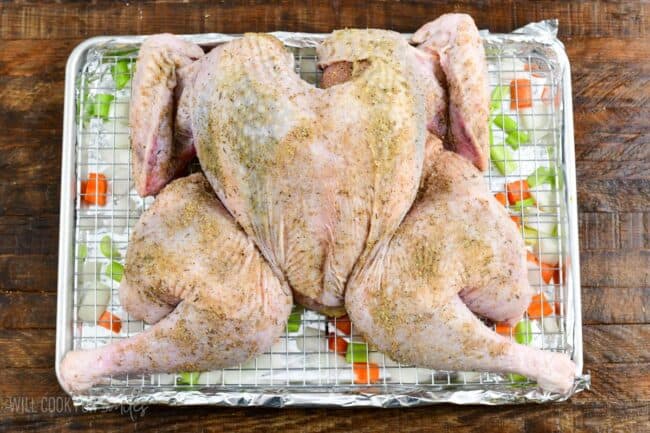
Step 6: Set Up for Roasting. Line a large rimmed baking sheet with foil. Spread chopped onion, carrots, celery, and garlic evenly on the pan. Place a greased wire rack over the vegetables and set the turkey breast-side up on top.
My Biggest Tip: For best results, insert a leave-in meat thermometer into the thickest part of the breast, from the top along the breastbone, without touching the bone.
Step 7: Roast the Spatchcock Turkey. Normally, spatchcocking method requires high heat cooking. Since turkey is much bigger that chicken, roasting it at high will not cook it through well. We will use a “starting high then lowering heat” method. Preheat the oven to 425°F with the rack in the middle. Place the turkey in the oven and carefully pour chicken broth into the pan around the vegetables (not over the turkey).
Roast for 20 minutes, then rotate the pan and reduce the oven temperature to 375°F. Continue roasting until:
- Breast reaches 160°F
- Thighs reach 165°F
Total cooking time is typically 1 to 1¾ hours, but always rely on temperature rather than time.
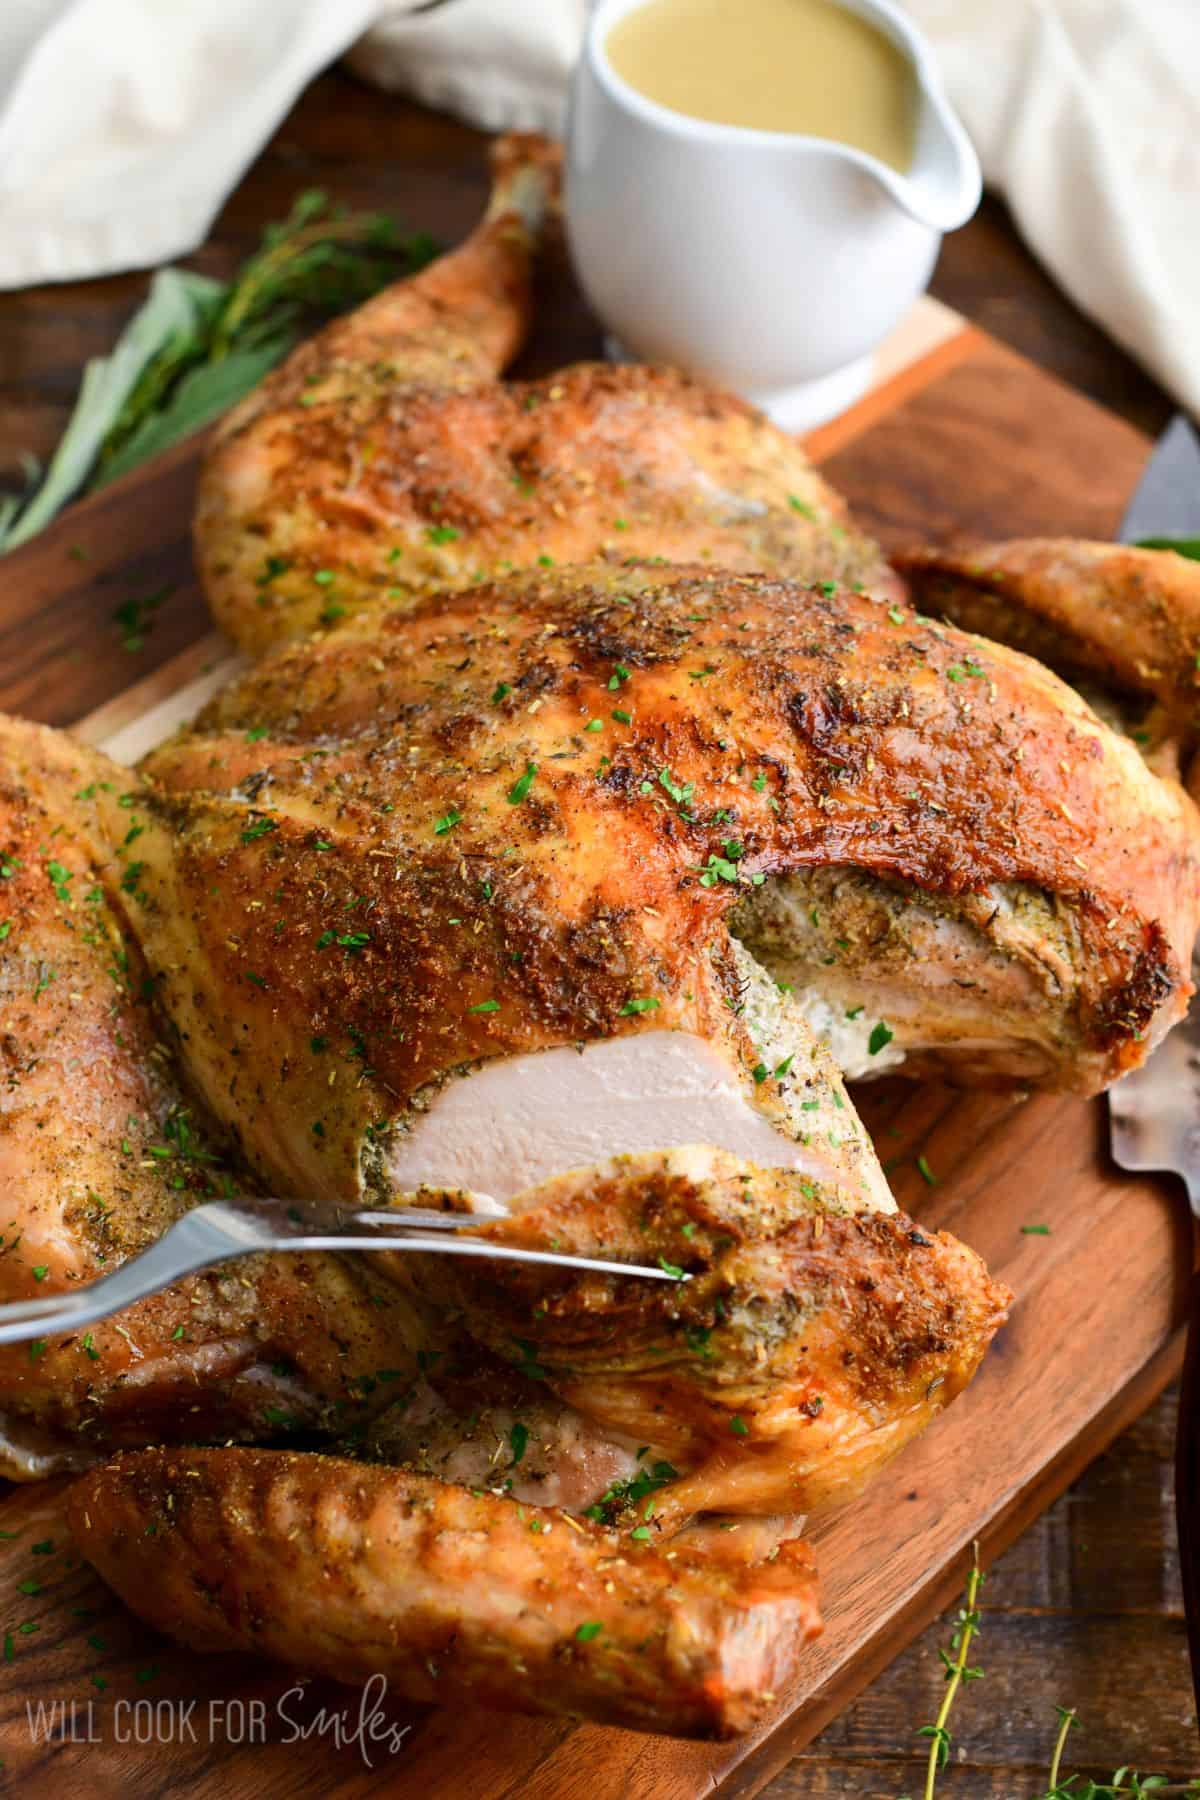
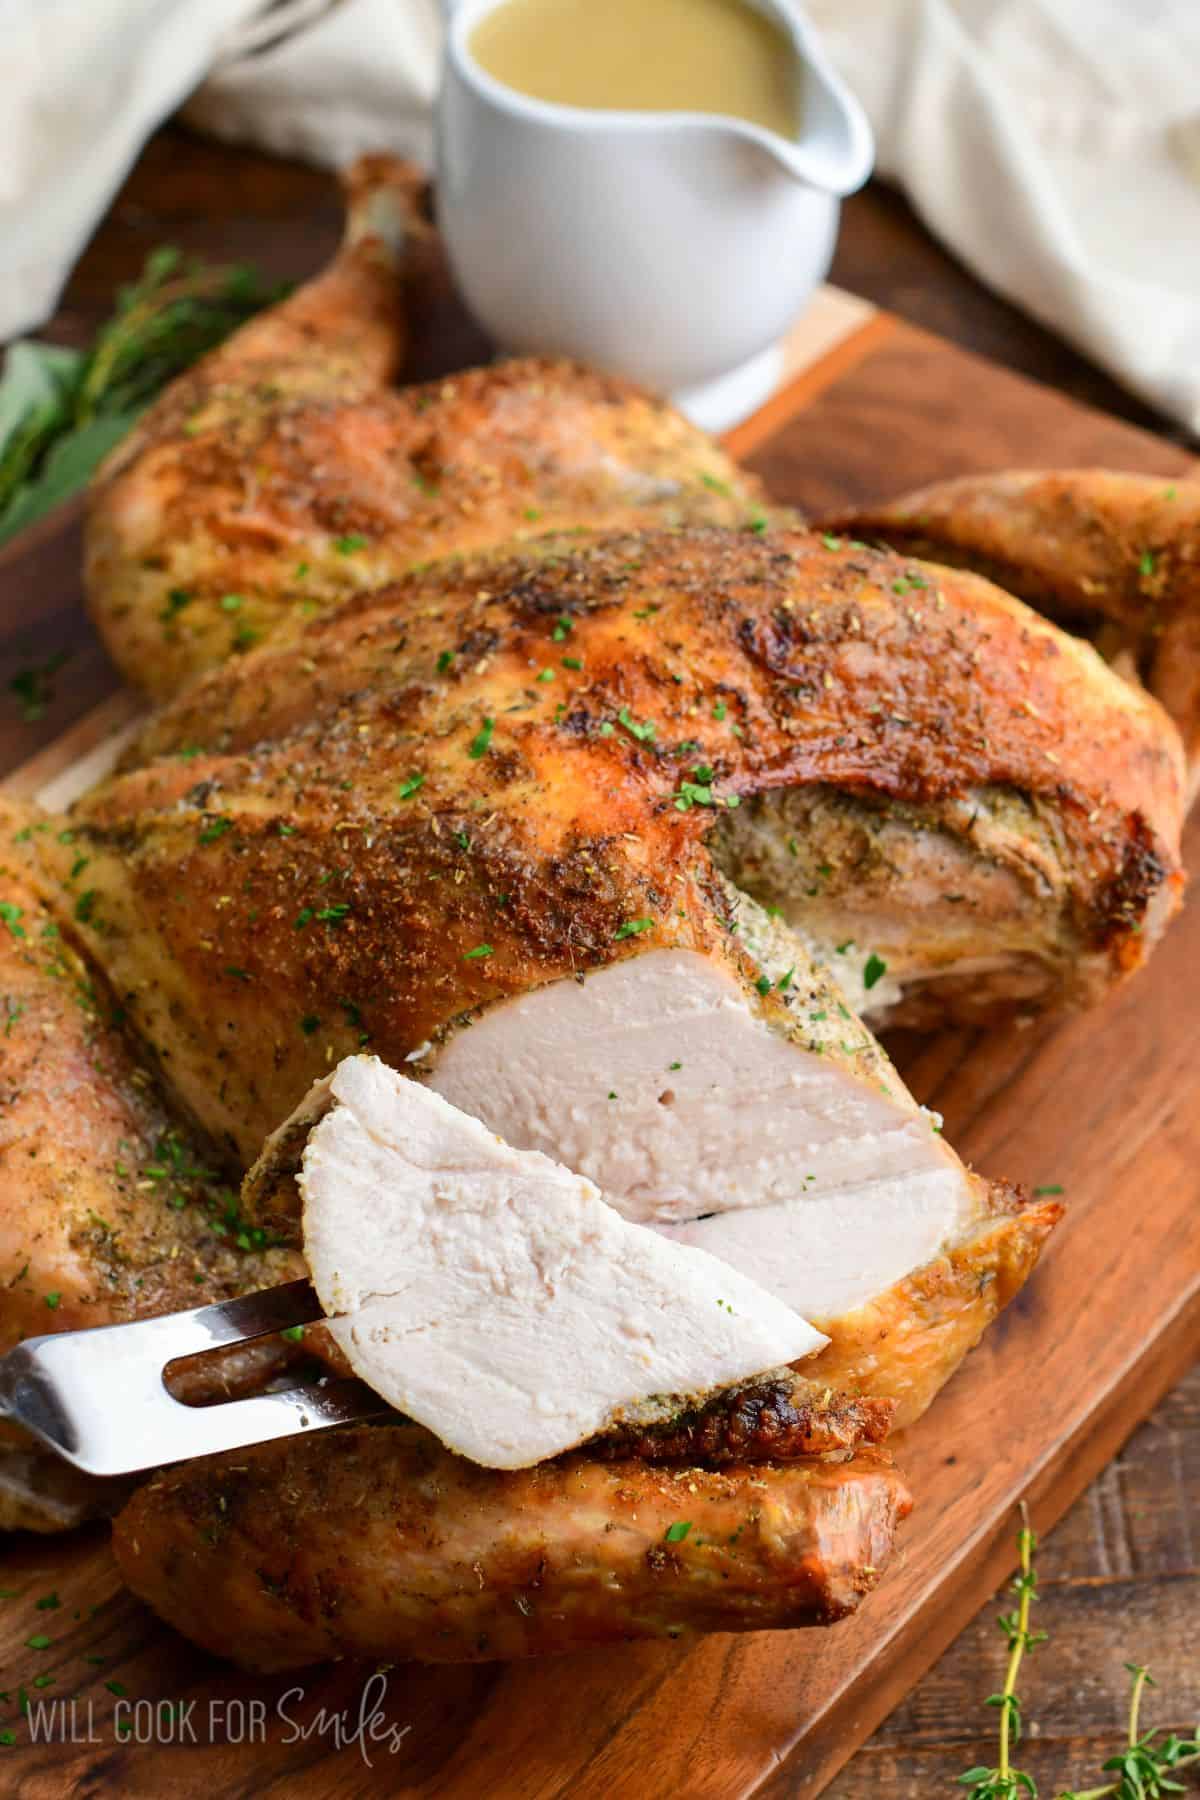
Step 8: Rest Before Carving: Remove the turkey from the oven and loosely tent with foil. Let it rest for 15-20 minutes before carving. Resting allows the juices to redistribute and ensures moist, tender turkey.
Optional: Make the gravy! I’ve included the gravy recipe in case you wish to use pan dripping for it. My pan drippings turkey gravy also has a lot of tips on this recipe. I must say, I always make the gravy, even when I’m only making roasted turkey breast.
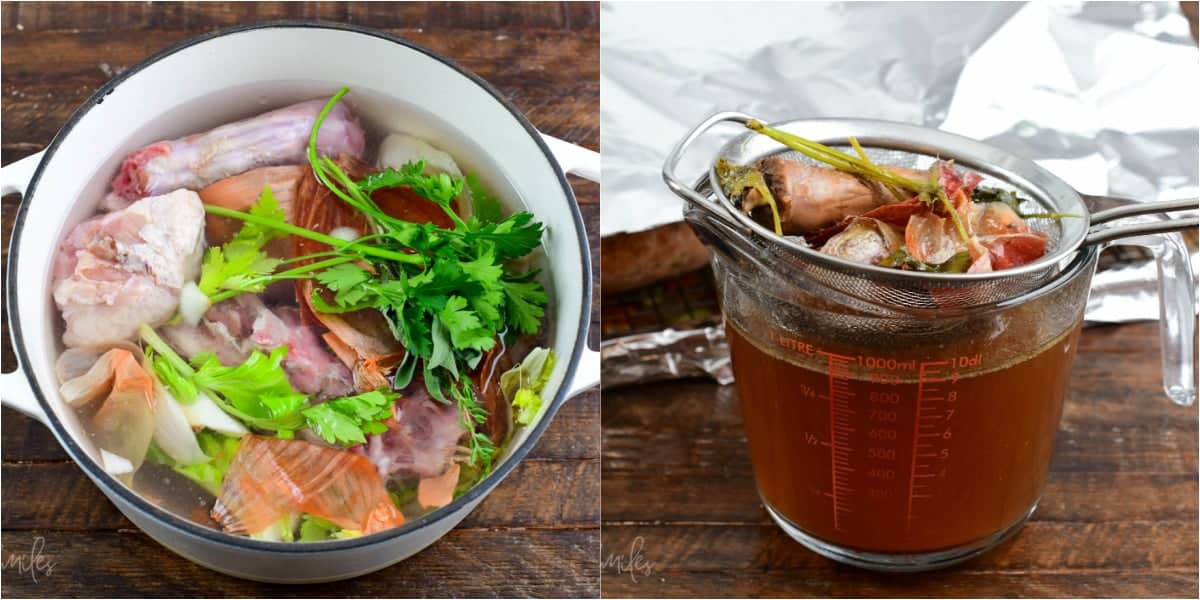
Quick Turkey Stock (Using the Neck & Backbone)
Don’t toss the turkey neck and backbone, they make an incredibly flavorful, simple homemade turkey stock that’s perfect for gravy, stuffing, and soups. Here is how to make It:
- Place the turkey neck and backbone into a large pot.
- Add 1 roughly chopped onion, 2-3 roughly chopped carrots, 2 roughly chopped celery stalks, 1 tablespoon whole peppercorns, 4-5 garlic cloves, and a few sprigs of fresh parsley and thyme (or 1 tablespoon of dried parsley and 1 teaspoon of dried thyme.)
- Add enough cold water to fully cover everything by about 1-2 inches.
- Bring the pot to a gentle boil, then reduce to a low simmer. Simmer uncovered for 1½ to 2 hours.
- Strain the stock through a fine-mesh strainer and discard the solids. Use right away or let cool and store in the refrigerator for 1-2 days or freezer for up to 3 months.
Frequently Asked Questions
How much turkey do I need per person? A good rule of thumb is about 1 to 1.5 pounds of turkey per person. A 12-14 lb turkey will feed about 8-12 people, depending on appetite and how many sides you’re serving.
What size baking sheet do I need? A standard half-sheet pan (18×13 inches) works perfectly for turkeys up to about 14 pounds. For larger birds, you’ll need a larger roasting pan or you might want to consider cooking two smaller turkeys instead. (16×22 inch baking sheet, known as a 2/3 sheet pan, can comfortably fit into most home ovens.)
Do I need to brine a spatchcock turkey? You don’t have to! Spatchcocking already helps keep the turkey moist by allowing it to cook more evenly.
What if my turkey is browning too quickly? If you notice the turkey browning too much, tent it loosely with aluminum foil. This will slow down the browning while allowing it to continue cooking through.
Can I stuff a spatchcock turkey? Since the turkey is flattened, traditional cavity stuffing isn’t an option. However, you can make my classic stuffing recipe in a separate baking dish, or my cornbread dressing to go along with the turkey.
What’s the best way to get crispy skin? Make sure to pat the turkey completely dry before seasoning, and don’t skip the oil! The oil helps the skin crisp up beautifully.
Troubleshooting Tips
Problem: The wings are burning
Solution: Tuck the wing tips underneath the turkey breast before roasting, or cover them with small pieces of foil if they start to brown too quickly.
Problem: The breast is done but the thighs aren’t.
Solution: This shouldn’t happen with spatchcocking, but if it does, you can tent the breast with foil and continue roasting until the thighs reach temperature.
Problem: My kitchen shears won’t cut through the bones.
Solution: If you’re having trouble with touch kitchen shears, try using a heavy chef’s knife (or kitchen cleaver) and gentle pressure to cut through the toughest spots, especially near the neck area.
Problem: There’s too much smoke in my oven.
Solution: This usually means your pan drippings are burning or something spilled in the bottom of the oven. Make sure you have enough liquid (chicken broth) in the bottom of the pan, and that your vegetables aren’t burning. Check halfway through and add more broth if needed.
Problem: I’m having trouble flattening the turkey.
Solution: You really need to press down hard! Use both hands, one on top of the other, and put your body weight into it. You should hear the breastbone crack – that’s what you want.
Make-Ahead, Storing & Reheating Tips
- Make-Ahead Options: You can spatchcock and season the turkey up to 24 hours ahead. Keep it covered air-tight in the refrigerator, then let it sit at room temperature for 30-45 minutes before roasting. This is a great way to save time on the big day!
- Storing Leftovers: Store leftover turkey in an airtight container in the refrigerator for up to 4 days. The turkey meat can also be frozen for up to 3 months in an air-tight freezer zip-top bag.
- Reheating: Reheat turkey slices in the oven at 325°F, covered with foil and with a splash of broth to keep them moist. You can also reheat individual portions in the microwave, just add a splash of broth and cover to prevent drying out.
DID YOU MAKE THIS RECIPE? PLEASE leave a 🌟 star rating! Let me know how you liked it by leaving the 📝 comment below or share and tag me on social media @willcookforsmiles. DON’T FORGET to subscribe to my newsletter!
Spatchcock Turkey Recipe
Equipment
- rimmed half sheet pan with a fitted wire rack about 18×13 inches in size
- kitchen shears
- Leave-in Meat Thermometer
Ingredients
- 12-14 lb turkey thawed
- 1/3 cup avocado or olive oil more for larger turkey
- 1 1/2 tbsp kosher coarse salt more or less to taste
- 1 tsp black pepper
- 1 tbsp garlic powder
- 2 tsp onion powder
- 2 tsp dried rubbed sage
- 2 tsp dried thyme
- 1 tsp dried crushed rosemary
To Roast:
- 1 yellow onion chopped
- 2-3 carrots chopped
- 2 celery ribs chopped
- 4-5 garlic cloves
- 2 cups chicken stock or broth
For Turkey Gravy:
- 4 tbsp unsalted butter
- 1/4 cup all purpose flour
- 2 cups pan drippings (+ turkey stock if needed)
- salt optional
- 1/4 tsp black pepper optional
Instructions
- Before starting to cook the turkey, make sure it is fully thawed. When thawing, you want to allow 24 hours for every 4-5 lbs. in the refrigerator. 12 to 16 lbs.: 3 to 4 days16 to 20 lbs.: 4 to 5 days
Prepare the Turkey:
- Take out the thawed turkey from the refrigerator 30-45 minutes before starting to prepare it so it warms up a bit.
- Take the turkey out of the package and take out the neck and giblets. Pat the whole turkey dry with a clean paper towel.
- Combine all the seasoning in a small mixing bowl and mix well. Set aide.
To Spatchcock the Turkey:
- Place the turkey breast down on a large cutting board. You will need kitchen shears and a large knife to remove the backbone. Use a knife to slice along both sides of the backbone. Using the kitchen shears, cut along the cuts, down the backbone, on one side from top to bottom and then on the other side of the backbone.

- Flip the turkey breast side up. Using the bottom part of your palm, put a lot of pressure in the center of the turkey breast, right between the two breasts. Push down to flatten the breast plate until the breast plate cracks under the pressure and turkey evens out and flattens.

Season the Turkey:
- Working from the top, carefully, separate the skin from the breast meat, be careful not to rip the skin. Slide your hand between the skin and breast to separate it.
- Using your hand, spread some seasoning on the breast, under the skin.
- Rub oil all over the outside of the turkey, don't miss all around the thighs and wings, and in the folds. Evenly season the turkey all over. Tuck the wings under so they are secure.
- Cover a large (half sheet, about 18×13 in.) rimmed baking sheet with aluminum foil for easy clean up. Spread chopped onion, carrots, garlic and celery on the baking sheet and fit a wire rack over the top. Use your hands to lightly grease the wire rack. Place the turkey breast side up onto the wire rack.
- I highly recommend a leave-in meat thermometer to track the temperature of the turkey. Insert the thermometer into the turkey breast, from the top side, along the breast bone but not touching the breast bone. The measurement should be taken at the center of the thickest part.
- Preheat the oven to 425℉ and place the oven rack in the middle of the oven.
- Place the baking sheet with turkey into the oven and carefully pour the chicken broth into the baking sheet with veggies.
- Roast the turkey for 20 minutes, rotate the baking sheet, and lower the oven temperature to 375℉.
- Cook the turkey for 1 to 1.75 hours (depending on size), until the temperature of the breast is 160℉ (internal temperature of the thighs should be at 165℉). Remember that the time is not as accurate indicator of doneness as temperature.
- Take the turkey out of the oven and tent is loosely with a sheet of aluminum foil. Let the turkey rest for 15-20 minutes. (Internal temperature will raise another 5℉ or so as it rests.)
- Carve and break it down as you wish!
To Make Pan Gravy:
- After turkey has rested for about 10 minutes, strain off the juices and broth from the baking sheet. Strain it through a fine mesh strainer. (If you have more than 2 cups of pan drippings, you can freeze the extra or use in other sauces. If you have less, add some turkey or chicken broth.)
- Have all the ingredients measured and ready on hand before starting to cook because this recipe will go fast.
- Melt butter in a cooking pan over medium heat. Once melted, whisk in flour until smooth and blended. Lower the heat to medium-low and let it gently simmer for just a few seconds.
- While whisking, start pouring in the pan drippings. Keep whisking until smooth. Taste first to see if you need to add any salt and pepper.
- Slowly stir as the gravy comes to simmer and thickens. Cook for a couple extra minutes, stirring slowly, and take off heat.
Notes
Nutrition
What To Make With Leftover Turkey Meat
Turkey Cranberry Brie Grilled Cheese
Would you like to save this recipe?
All images and text ©Lyubov Brooke for ©Will Cook For Smiles. Please do not use my images without prior permission. If using my posts in collections and features, please link back to this post for the recipe.
Disclaimer: Nutrition information shown is not guaranteed to be 100% accurate as most ingredients and brands have variations.