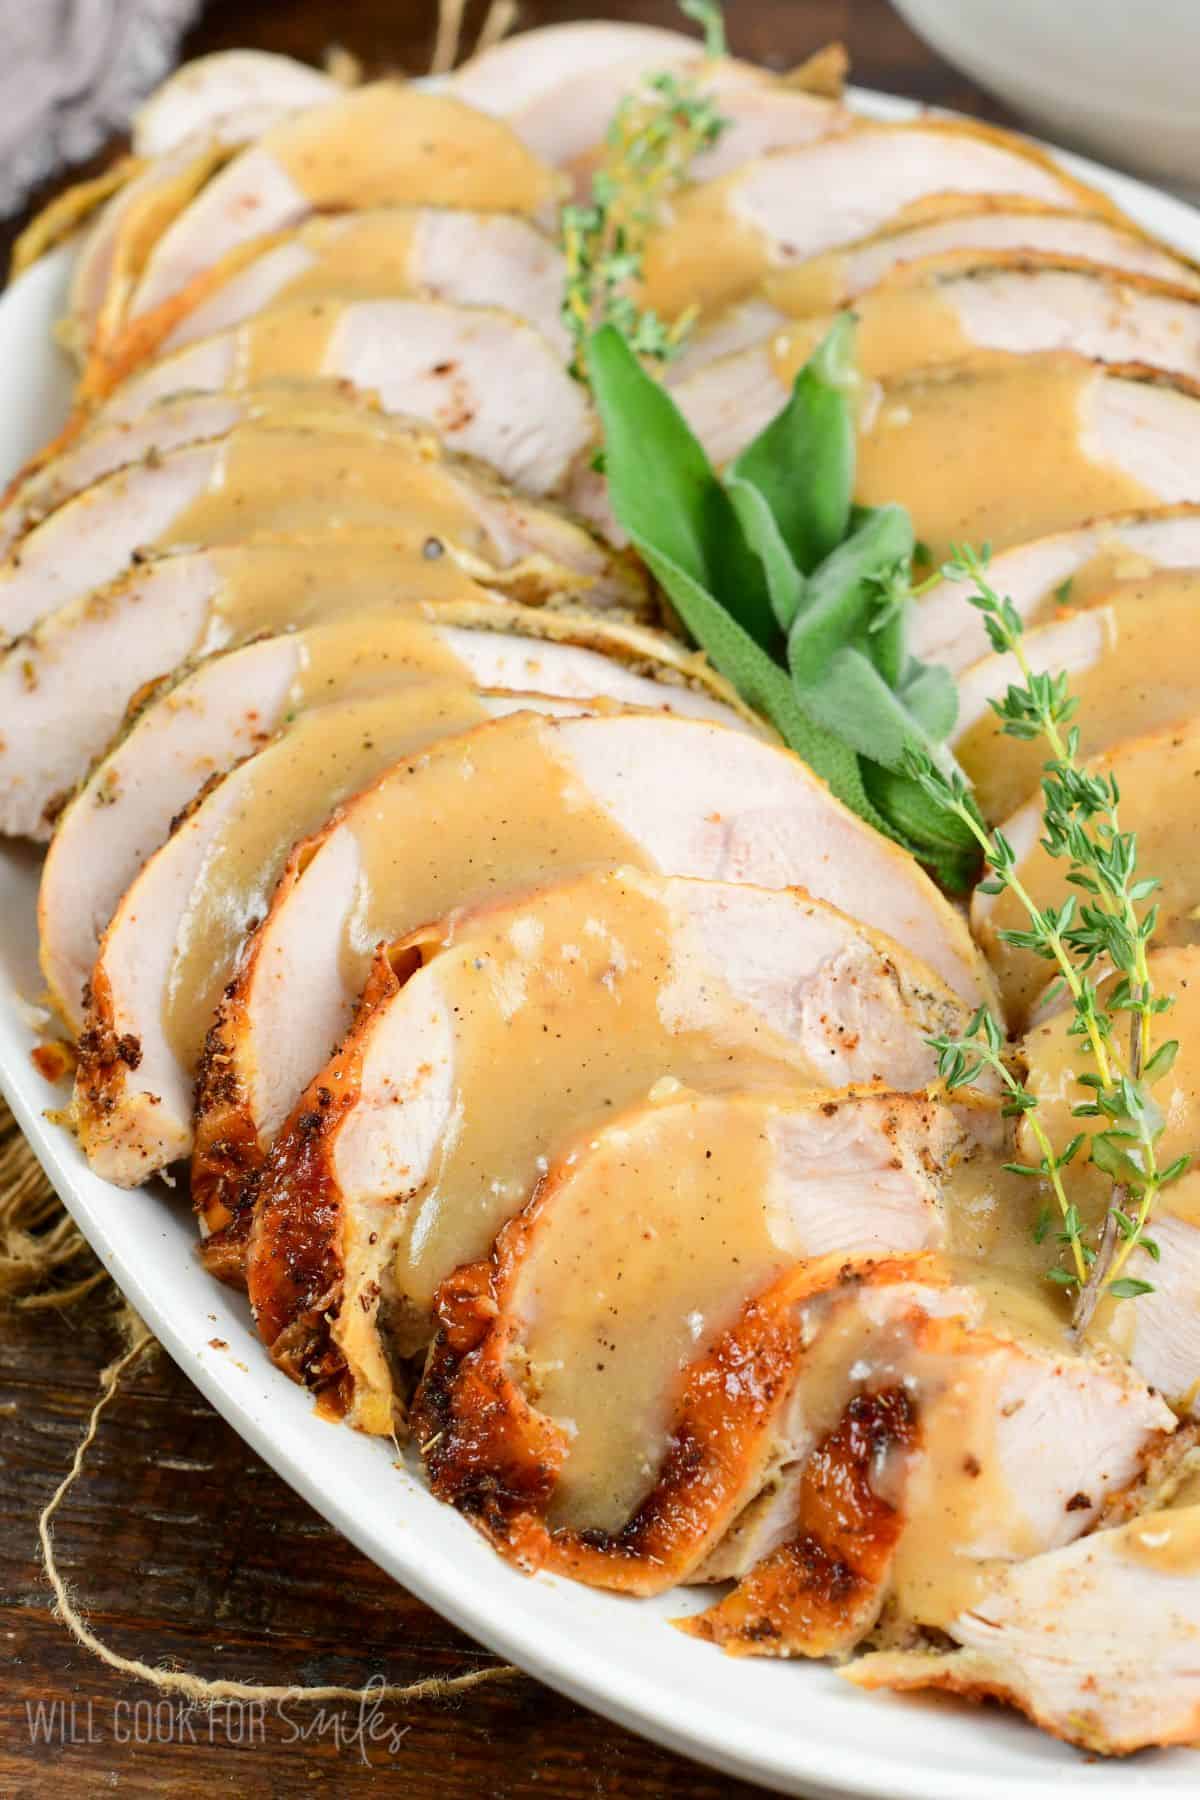
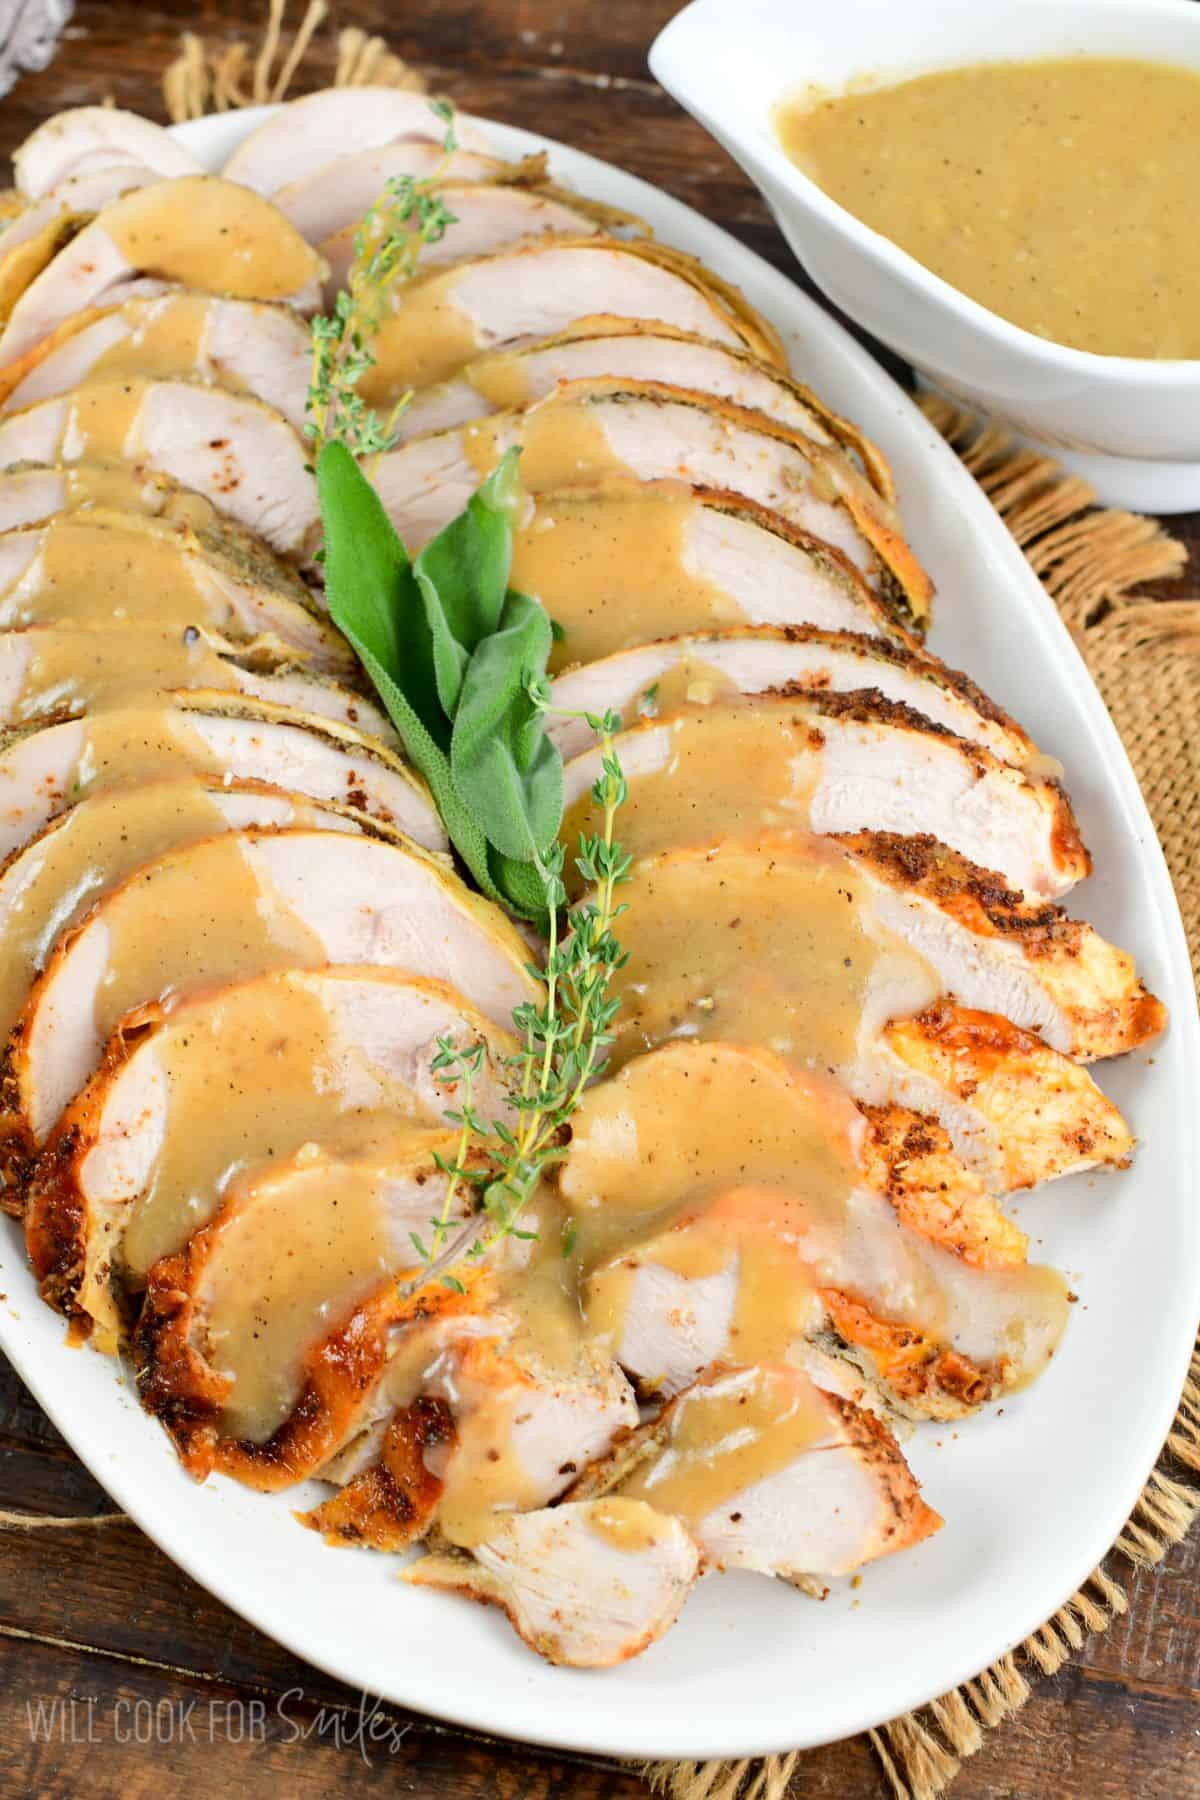
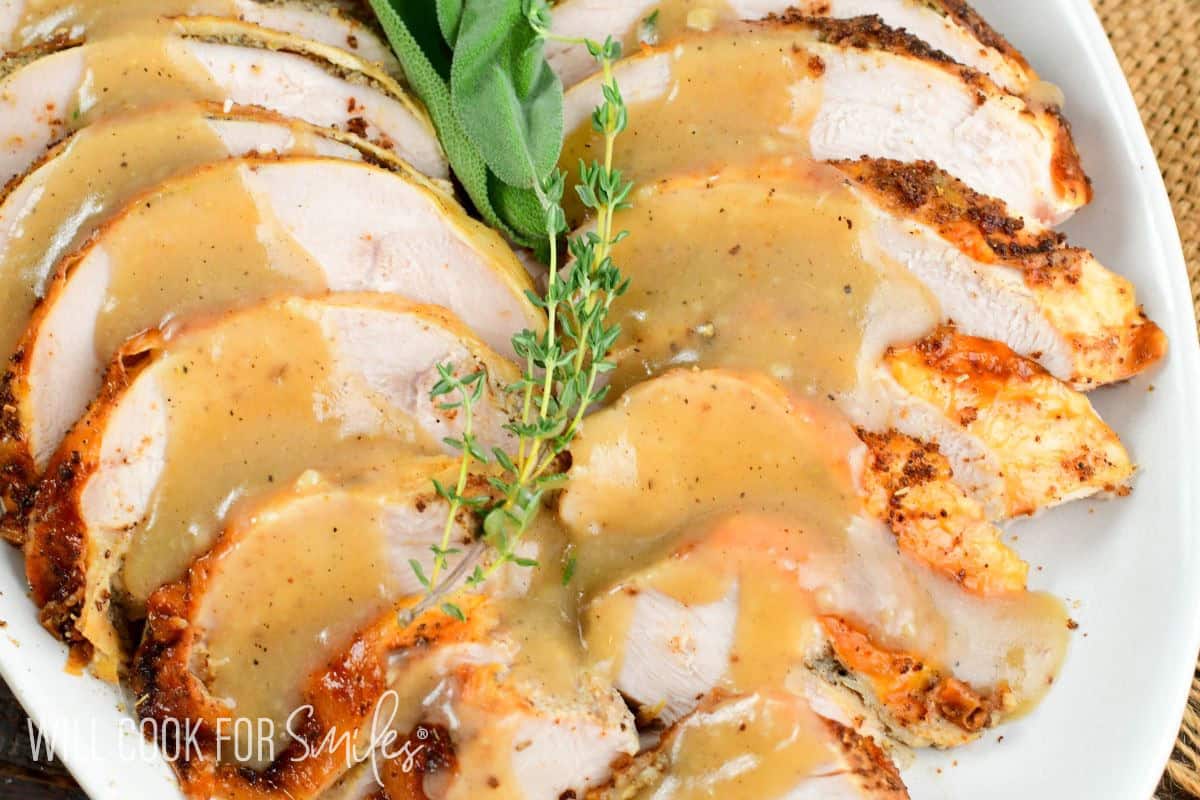
Roasted Turkey Breast with Herb Butter and Gravy
The herb butter melts into the meat, keeping it incredibly moist and flavorful. Best of all, the drippings combined with the roasted vegetables and broth will create the most delicious homemade pan gravy.
What Makes My Roast Turkey So Special
I’ve tested this recipe countless times and combining that with the years of experience of roasting meats at home and at restaurants, I have so many ways to make your turkey absolutely delicious and here’s what makes it stand out when all these techniques work together:
- Overnight dry brine: Seasoning under the skin and refrigerating for 12–24 hours infuses deep flavor and keeps the meat incredibly juicy, no more dry turkey breast.
- Self-basting roasting setup: Elevating the breast over vegetables and broth lets the drippings create a flavorful base for delicious gravy while keeping the turkey moist.
- Herb butter: Adds rich, savory flavor, helps the skin brown and crisp beautifully, and melts into the meat for herbaceous goodness in every slice.
- Practical and easy: A 6–8 lb. turkey breast is much simpler to handle than a whole turkey and cooks evenly, giving you perfectly cooked white meat without the fuss.
Key Ingredients and Tips
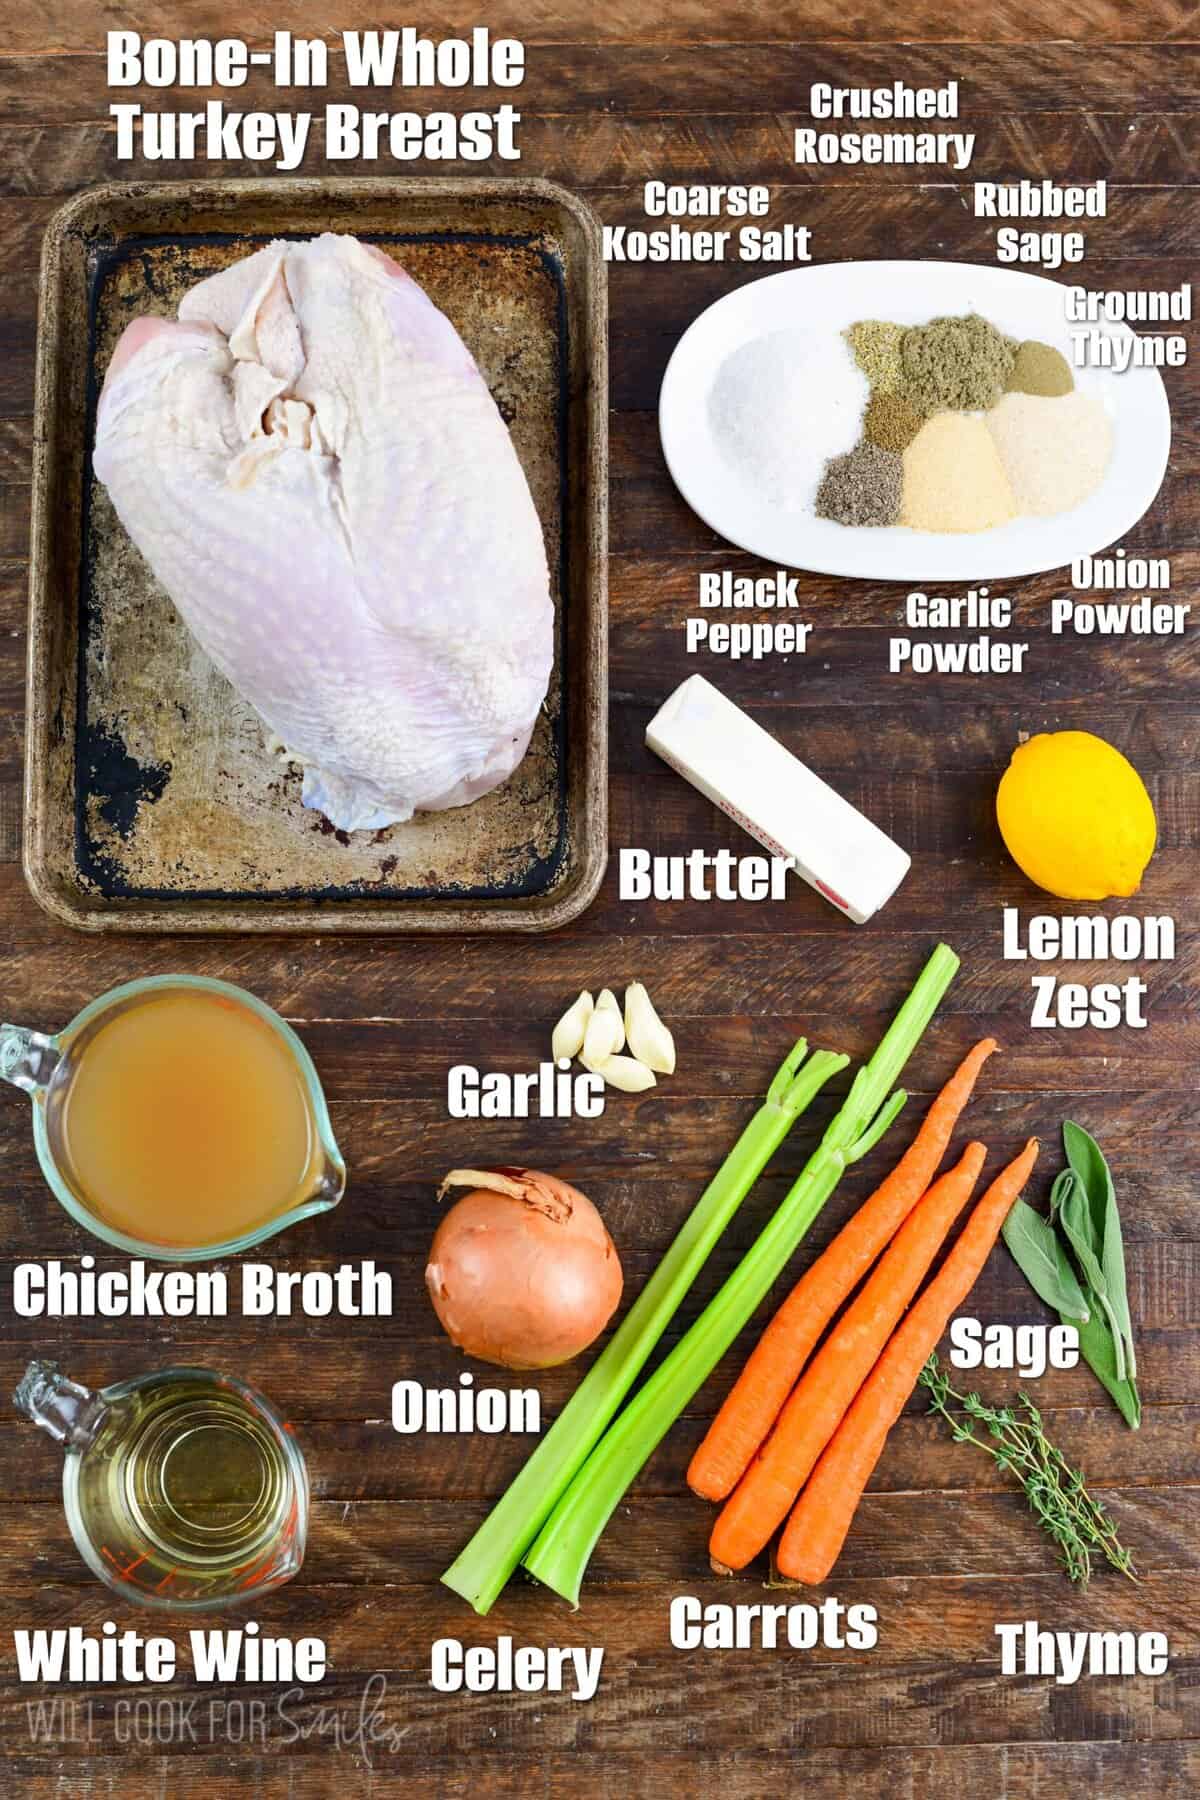
Turkey breast – make sure to get raw, skin on bone in turkey breast (not the already cooked turkey roast from the deli). The bone helps conduct heat and keeps the meat extra juicy.
Dried herbs and fresh herbs – I find that using dried herbs in seasoning the turkey is actually better but I do add fresh herbs into the pan underneath for the aroma. If you don’t have fresh herbs, no worries, just add some dried herbs to the veggies. Since dried herbs are more potent, use less.
Kosher salt – I use kosher coarse salt because the large granules are perfect for dry brining (the kosher process keeps the salt more pure, no additives, cleaner taste and faster to dissolve). If you’re using table salt or fine sea salt, reduce the amount to about 2 tablespoons since it’s more concentrated.
Wine – wine will give another layer of flavor to the pan drippings. Any dry white wine works beautifully here, I usually use Chardonnay, Sauvignon Blanc or Pinot Grigio (not a sweet wine). If needed, you can omit it. Simply add a little more chicken stock as well as a splash of apple juice or white grape juice.
Gluten-free option – Simply use gluten-free all-purpose flour for the gravy. The rest of the recipe is naturally gluten-free!
How To Make Roast Turkey Breast: Step by Step
STEP 1: Thaw Your Turkey Breast. This is crucial! Make sure your turkey breast is completely thawed before you begin. The best and safest way is in the refrigerator, which can take up to 2 days depending on size. Never thaw on the counter or sink! If there are giblets included, remove them and save for making stock if you’d like.
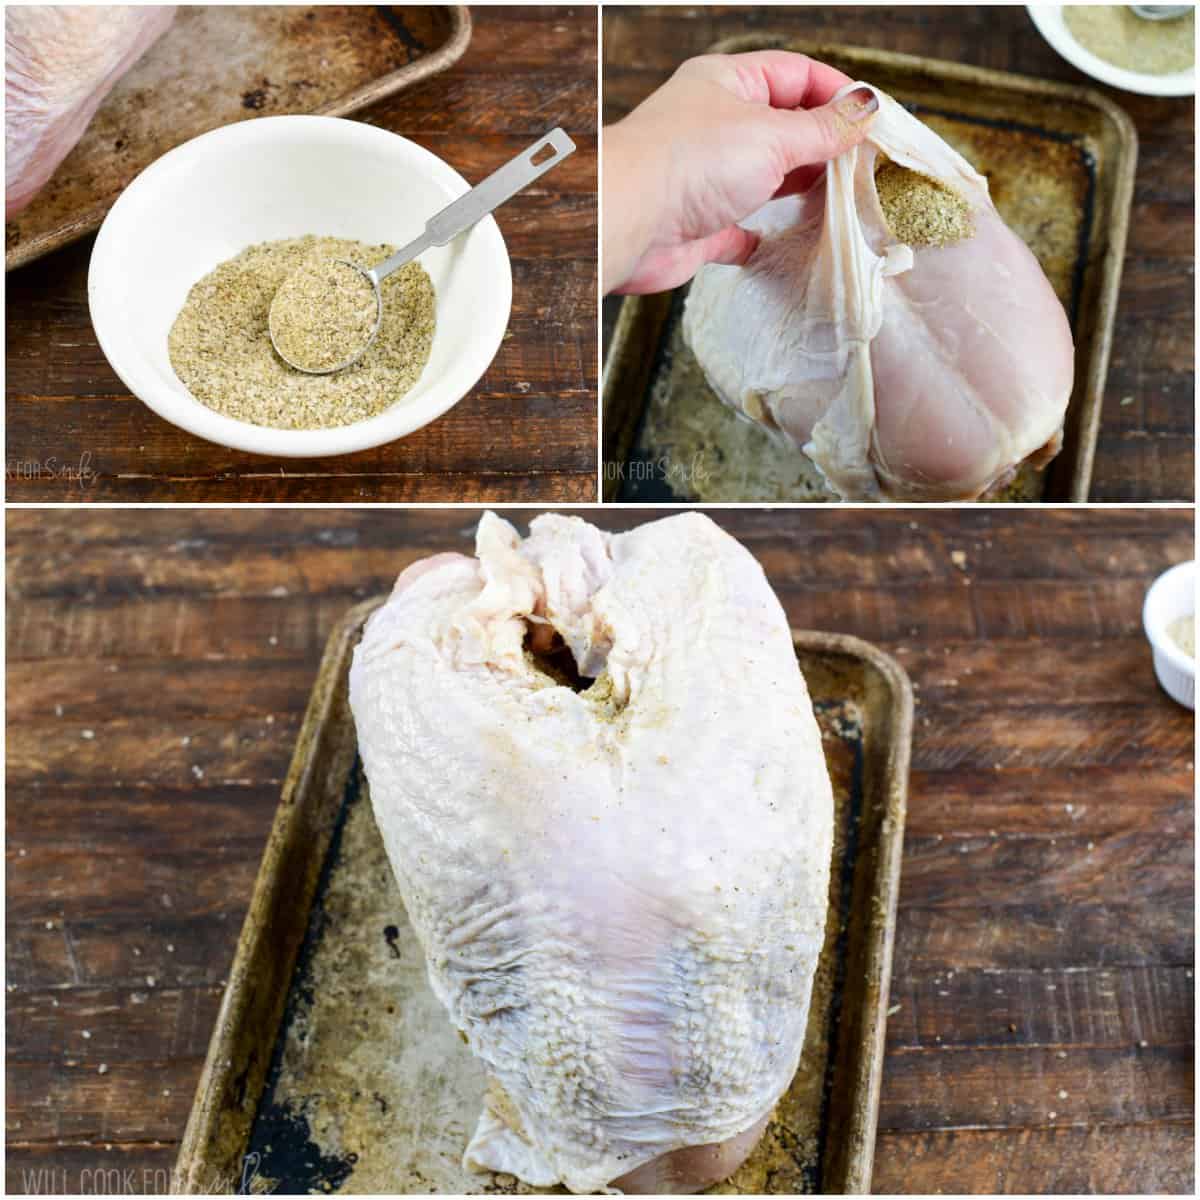
STEP 2: Prepare the Dry Brine. Mix all your dry brine seasonings together in a bowl. The combination of salt, pepper, sage, garlic powder, onion powder, thyme, rosemary, and celery seed creates the most incredible aromatic blend. Here’s the important part: set aside about 1.5 tablespoons of this seasoning mix for your herb butter later!
STEP 3: Apply the Dry Brine (The Game-Changer!) Place your turkey breast in a rimmed baking sheet and pat it completely dry with paper towels. This is important for the seasoning to adhere properly.
Very gently and slowly, slide your hand between the skin and the breast meat to separate them. Be patient and careful not to tear the skin. I recommend starting from the bottom, then working from the top, leaving just a little bit connected in the middle so the skin stays somewhat attached.
Using your hands, spread the dry brine seasoning generously all over the breast meat, getting it under the skin and also inside the cavity. Don’t worry about seasoning the outside of the skin yet – that’s where the herb butter will go!
STEP 4: Refrigerate Overnight. Cover the seasoned turkey breast tightly with aluminum foil or plastic wrap. Refrigerate for 12-24 hours. This resting time allows the salt to penetrate the meat, breaking down proteins and helping the turkey retain moisture during cooking. It’s like flavor magic!
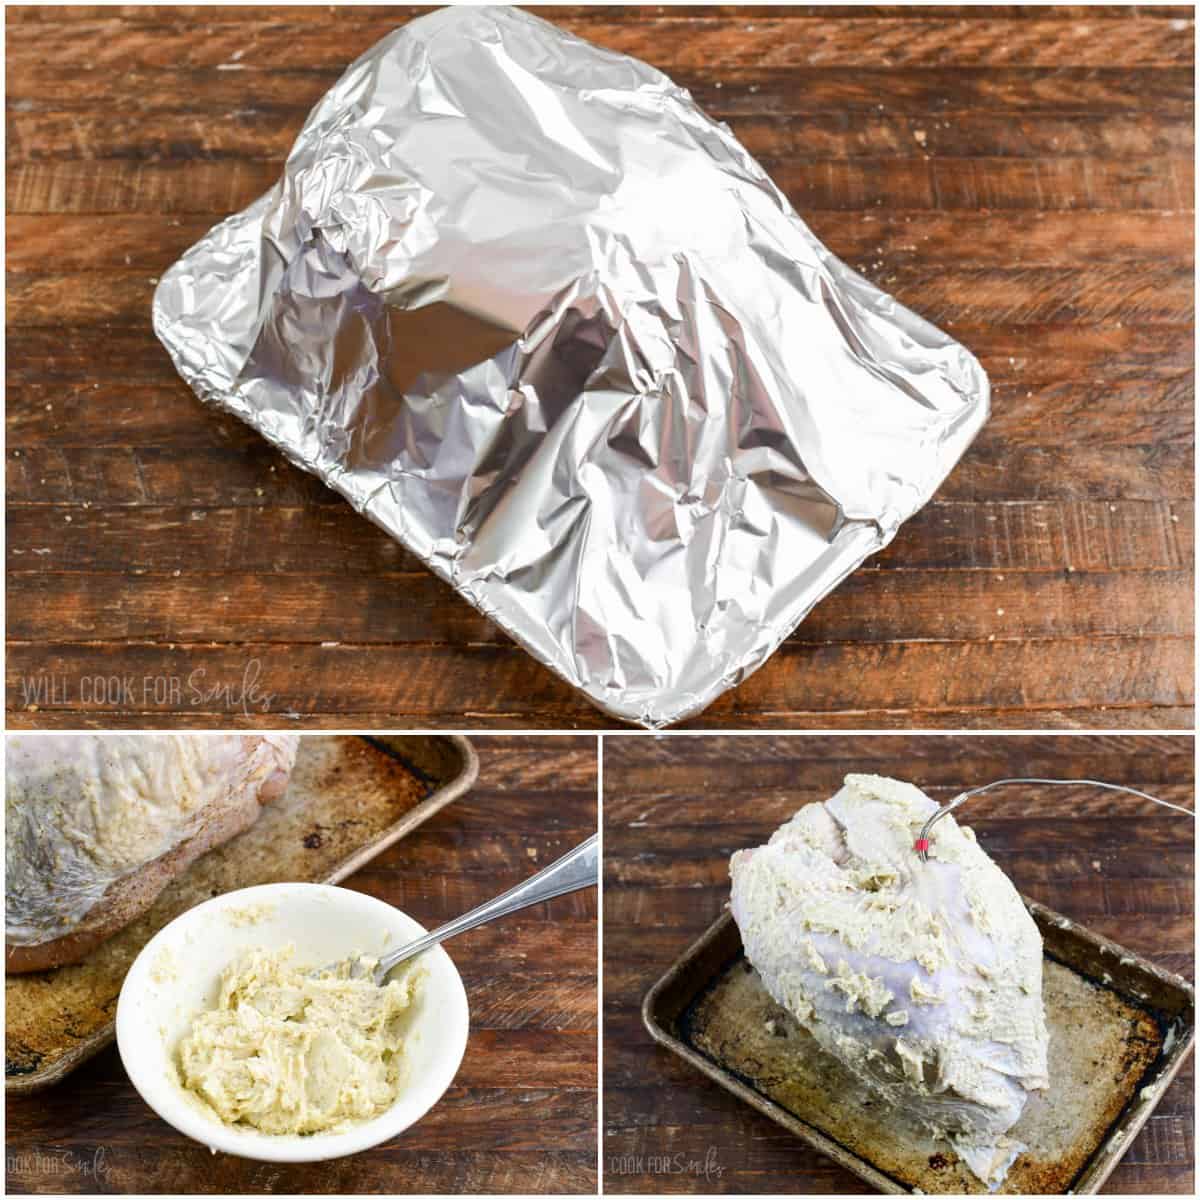
STEP 5: Bring to Room Temperature. About 30-45 minutes before you’re ready to roast, take the turkey breast out of the refrigerator. Let it sit at room temperature while you prepare everything else. Also, take your butter out to soften for the herb butter.
STEP 6: Prepare the Roasting Pan. Preheat your oven to 350°F. Line the bottom of your roasting pan with aluminum foil for easy cleanup later (trust me on this!).
Wash and chop your vegetables into large chunks. Spread them evenly across the bottom of the roasting pan. Add the garlic cloves, fresh thyme sprigs, and sage leaves. Pour the broth and wine over everything. Place your roasting rack over the vegetables.
STEP 7: Make the Herb Butter. Mix the softened butter with the reserved 1.5 tablespoons of dry brine seasoning and the lemon zest. Mix until everything is well incorporated and the butter looks uniformly seasoned.
STEP 8: Apply Herb Butter and Roast. Pat the outside skin of the turkey breast dry with a paper towel. Using your hands, spread the herb butter generously all over the outside of the turkey breast, getting into all the nooks and crannies. Place the buttered turkey breast on the rack in your prepared roasting pan.
For the best results, use a leave-in meat thermometer. Insert the probe into the thickest part of the breast, along the bone. If you don’t have a leave-in thermometer, you’ll need to check the temperature periodically (starting after an hour in the oven) by taking the turkey out and using an instant-read thermometer.
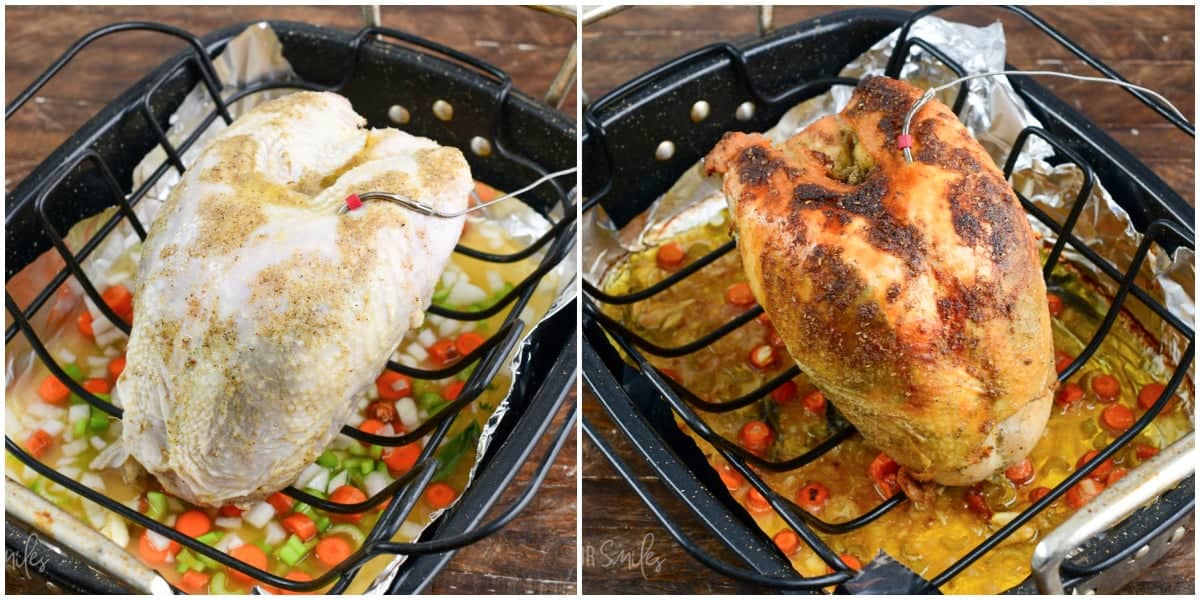
STEP 9: Roast to Perfection. Roast at 350°F for approximately 1 hour and 30 minutes to 1 hour and 45 minutes. The exact time will depend on the size of your turkey breast and your oven. You’re looking for an internal temperature of 160°F.
For smaller turkey breasts (around 5-6 lbs.), start checking the temperature after 1 hour, then every 10-15 minutes. Don’t open the oven too frequently or you’ll lose heat!
STEP 10: Rest the Turkey. When the thermometer reads 160°F, remove the roasting pan from the oven. Tent the turkey breast loosely with aluminum foil and let it rest for 10-15 minutes. During this time, the internal temperature will rise to about 165°F (the safe temperature for poultry), and the juices will redistribute throughout the meat, keeping it moist.
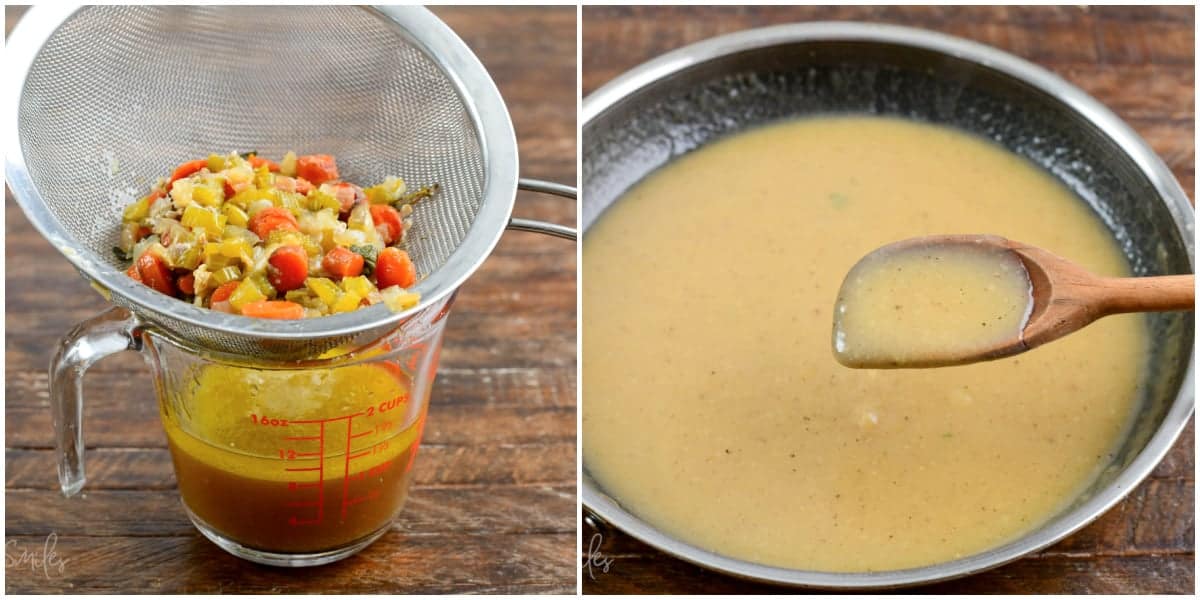
STEP 11: Make the Pan Gravy (The Best Part!). While the turkey rests, it’s time to make that incredible gravy! If your turkey breast has the back portion attached, tip it over to drain any juices from the cavity into the pan drippings before moving it to a cutting board.
Strain all the pan drippings from the roasting pan through a fine mesh strainer into a large measuring cup. Press gently on the vegetables to extract every bit of flavor, but don’t force it or your gravy will be murky. You should have about 2 cups of drippings. If you have less, add some chicken broth to reach 2 cups.
In a wide pan over medium heat, melt 4 tablespoons of butter. Once melted, whisk in the flour until smooth and blended. This creates a roux that will thicken your gravy. Keep whisking constantly as you slowly pour in the pan drippings. Keep whisking until everything is smooth and combined. The gravy will start to thicken as it comes to a gentle simmer.
Taste and adjust seasoning with salt and pepper as needed. Remember, your drippings already have some salt from the dry brine, so taste first! Let it simmer for a couple extra minutes, stirring slowly, then remove from heat. (You can find a lot more tips in my pan dripping gravy recipe post.)
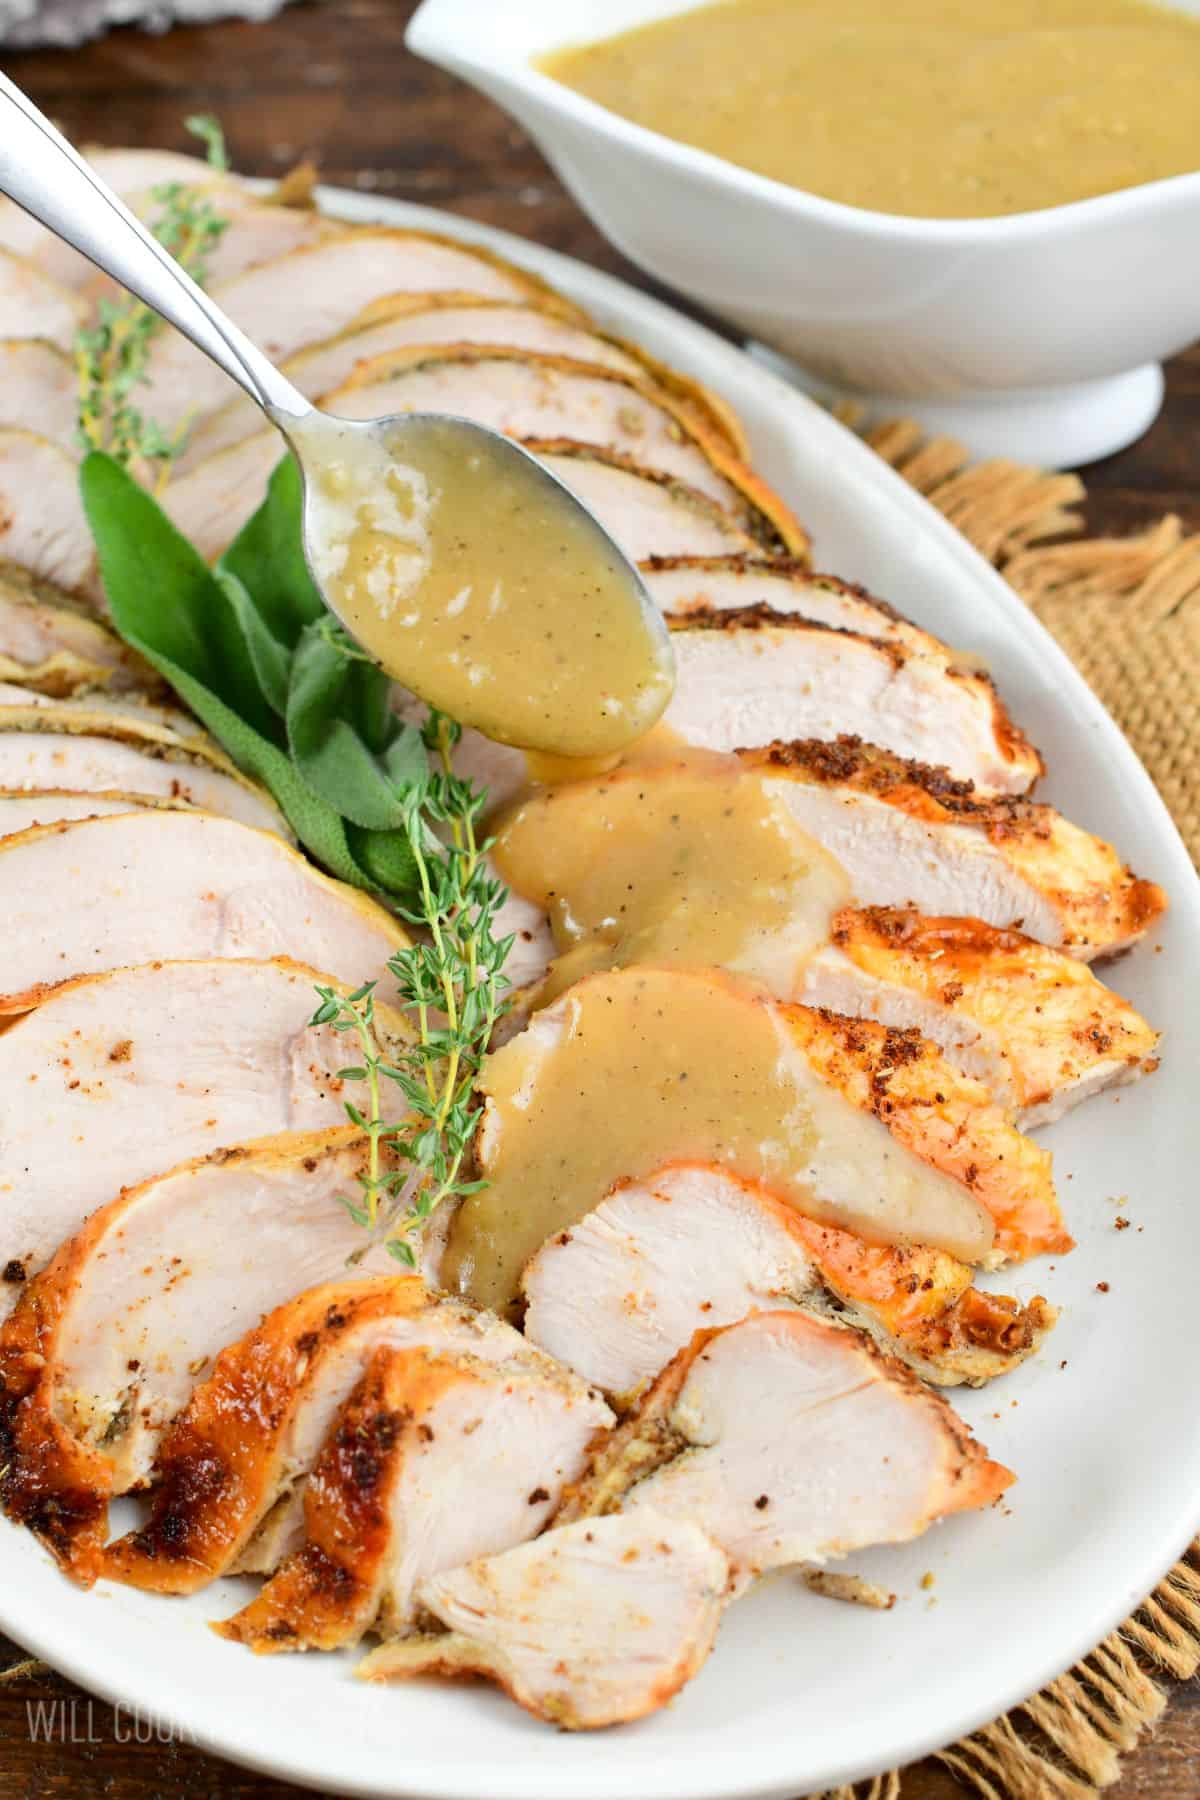
STEP 12: Carve and Serve. When ready to serve, carefully cut the breast meat off the bone using a sharp knife. Slice the meat against the grain into even slices. Arrange on a beautiful serving platter and serve immediately with the hot gravy.
Lyuba’s Tips For The Best Results
Temperature is everything: Invest in a good meat thermometer if you don’t have one. It’s the difference between perfectly juicy turkey and dry, overcooked meat. I use a leave-in probe thermometer so I never have to open the oven to check.
Don’t skip the dry brine: I know it requires planning ahead, but this overnight step is what makes the turkey incredibly flavorful and juicy. The longer it sits (up to 24 hours), the better!
Room temperature matters: Taking the turkey out 30-45 minutes before roasting helps it cook more evenly. Cold meat from the fridge will cook unevenly, with the outside overdone before the inside is ready.
Keep the vegetables chunky: Large chunks of vegetables won’t break down too much during roasting, which makes straining easier and keeps your gravy clean and smooth.
Save those drippings: Every single drop of those pan drippings is liquid gold! Make sure to strain them well to remove any solids, but capture all that flavor.
Let it rest: Don’t skip the resting time! Cutting into the turkey immediately will cause all those beautiful juices to run out onto your cutting board instead of staying in the meat.
Slice against the grain: This ensures tender slices rather than stringy ones. Look at the direction of the muscle fibers and cut perpendicular to them.
Serving Suggestions For Holidays and Dinner
This roasted turkey breast is the star of the show, but here’s how I like to round out the meal:
For Thanksgiving or holiday dinners:
- Classic mashed potatoes or garlic mashed potatoes
- My homemade cranberry sauce
- Green bean casserole or roasted Brussels sprouts
- Soft potato dinner rolls
- Traditional stuffing
For a Sunday dinner:
- Roasted root vegetables like roasted carrots, roasted potatoes, roasted honeynut squash
- A simple green salad
- Crusty bread to soak up the gravy
Expert Tip: Don’t forget to save that turkey breast bone! You can made a delicious turkey stock for soup later. Got leftovers? Turn them into my turkey noodles or turkey enchiladas or turkey pot pie.
Storing and Reheating Recommendations
Storing leftovers: Let the turkey cool completely, then store in an airtight container in the refrigerator for up to 4 days. Store the gravy separately in its own container for up to 4 days. Expert tip: For best results, slice only what you need and keep the rest in larger pieces to prevent drying out.
Freezing: Turkey meat freezes beautifully for up to 3 months. Wrap tightly in plastic wrap, then in aluminum foil. Freeze gravy in a freezer-safe container for up to 2 months. Thaw both in the refrigerator overnight before reheating.
Reheating: For moist turkey: Place slices in a baking dish, cover with gravy or a bit of chicken broth, cover with foil, and reheat at 325°F for about 20 minutes.
Reheating Gravy: Reheat gently on the stovetop over medium-low heat, whisking occasionally. Add a splash of chicken broth if it’s too thick.
Microwave method: While convenient, this can dry out the meat. If using microwave, cover the turkey with a damp paper towel and heat in 30-second intervals.
Frequently Asked Questions
Can I use a boneless turkey breast?
Yes, but it will cook faster and does require a slightly different cooking. No need for the rack in the roasting pan, you can place it right on the veggies. Use less seasoning, of course, and start checking internal temperature after 30-35 minutes.
Can I make this ahead?
The dry brining is actually done ahead! On the day of serving, you’ll need about 2.5 hours from start to finish (including resting time). The gravy can be made ahead and reheated.
What if I don’t have a roasting rack?
You can create a makeshift rack by placing the turkey on a bed of thickly sliced onions and celery. They’ll elevate the turkey enough to allow air circulation.
My gravy is too thick/thin, how do I fix it?
Too thick: Whisk in chicken broth a splash at a time until it reaches your desired consistency. Too thin: Make a slurry of 1 tsp. of cornstarch mixed with 1 tablespoon of cold water, whisk it in, and simmer for a few more minutes.
DID YOU MAKE THIS RECIPE? PLEASE leave a 🌟 star rating! Let me know how you liked it by leaving the 📝 comment below or share and tag me on social media @willcookforsmiles. DON’T FORGET to subscribe to my newsletter!
Roasted Turkey Breast
Equipment
- Roasting pan with a rack big enough to fit turkey breast but but too large
Ingredients
Turkey:
- 7 lb skin on, bone-in turkey breast thawed
Dry Brine Seasoning:
- 3 tbsp kosher coarse salt more or less if needed*
- 1 tsp black pepper
- 2 tsp dried sage
- 2 tsp garlic powder
- 2 tsp onion powder
- 1/2 tsp dried ground thyme
- 1/2 tsp dried crushed rosemary
- 1/2 tsp celery seed
Herb Butter:
- 1/2 cup unsalted butter softened
- 1 1/2 tbsp dry brine seasoning from above
- 1 lemon-zest only
For Roasting Turkey Breast:
- 1 yellow onion
- 2 celery ribs
- 3 carrots
- 4-5 garlic cloves
- 2 cups chicken or vegetable broth
- 1/2 cup dry white wine
- 4-5 fresh thyme sprigs
- 4-5 fresh sage leaves
For Turkey Pan Gravy:
- 4 tbsp unsalted butter
- 1/4 cup all purpose flour use GF flour if needed
- 2 cups turkey drippings and cooking liquid strained
- 1/2 tsp black pepper more or less to taste
- kosher coarse salt only if needed
Instructions
Before Preparing the Turkey Breast:
- Make sure to thaw the turkey breast first, before preparing it to dry brine. Remember that the best way to thaw meat is in the refrigerator. Depending on the size, it could take up to 2 days to thaw.If there are any giblets that were included with your turkey, take them out and set aside to use in a homemade stock (you can even freeze it for using later in a stock).
Dry Brining Turkey Breast:
- Combine all of the seasoning in a bowl and mix well. Set aside about 1.5 tablespoons of this seasoning mix to use in herbed butter later.
- Place turkey breast in a rimmed baking sheet and pat it dry inside and outside with a paper towel.
- Very gently and slowly, slide your hand between the skin and the breast meat to separate the skin. Be careful not to tear the skin. I recommend separating most of the skin from the bottom and then from the top and leaving just a little in the middle so the skin can still hold onto the meat in and not completely off.
- Using your hands, spread the seasoning all over the breast in between the skin and inside the cavity. No need to rub the outside of the skin because you will cover it with herb butter before baking.
- Cover the turkey breast in aluminum foil and then cover the turkey and the tray with foil as well to secure it. Place in the refrigerator to dry-brine for 12-24 hours.
Roasting the Turkey Breast:
- Take the turkey out of the refrigerator and take off the aluminum foil. Let it sit and warm up a little while preparing the oven and the roasting pan. Take out the butter as well and let it warm up for 30-45 minutes.
- Preheat the oven to 350℉.
- To prepare the roasting pan, cover the bottom in aluminum foil for easy clean up later.
- Wash and chop the vegetables. Spread them in the prepared roasting pan. Add garlic, herbs, broth, and wine. Fit the rack in the roasting pan.
- To make the herb butter, simply mix softened butter with the lemon zest and seasoning that you set aside before brining. Mix well, until well incorporated.
- Pat the outside skin of the turkey breast with a paper towel and rub softened herb butter all over the outside of the turkey.
- Place the seasoned turkey breast on the rack fitted in the roasting pan. To best keep track when the turkey is done, use a leave-in meat thermometer. Insert the probe into the breast from the top, along the bone.If no leave-in thermometer, take the turkey out of the oven to check the internal temperature. Always check the thickest part.
- Roast turkey breast at 350℉ for about 1 hour and 30 minutes to 1 hour and 45 minutes, until internal temperature reads 160℉. (Note that smaller turkey breast will take less time, start checking the internal temperature every 10-15 minutes after 1 hour in the oven.)
- Take the roasting pan out of the oven and tent with aluminum foil. Let it sit for 10-15 minutes. It will gain about 5℉ more as it rests.
- Once the turkey breast is rested (if cooking one that has a back included), tip it over to drain off juices with the rest of the drippings. Set it aside on the cutting board to carve. When ready, cut the breast meat off the bone and slice it against the grain.
Pan Gravy:
- Strain the pan drippings from the roasting pan into a measuring cup through a fine mesh strainer. Press on the vegetables gently to get some trapped juices out. (If you have less than two cups of pan drippings, add some chicken broth.)
- Measure and prepare all the gravy ingredients first because this is a fast cooking recipe. Melt butter in a wide cooking pan over medium heat. Once melted, whisk in flour until smooth and blended.
- Keep whisking and start pouring in the pan drippings. Keep whisking slowly but constantly until smooth. Taste to see if you need to add any salt and pepper. Slowly stir as the gravy comes to a gentle simmer and thickens. Cook for a couple extra minutes, stirring slowly, and take off heat.
Notes
- Salt – note that kosher coarse salt is large granules, if using any other or finer salt, use about 2 tbsp.
- Gluten free – use gluten free all purpose flour to make the gravy gluten free.
- Serving amount – a 6-8 lb. bone-in turkey breast will serve 6-8 people, depending sides and appetite.
Nutrition
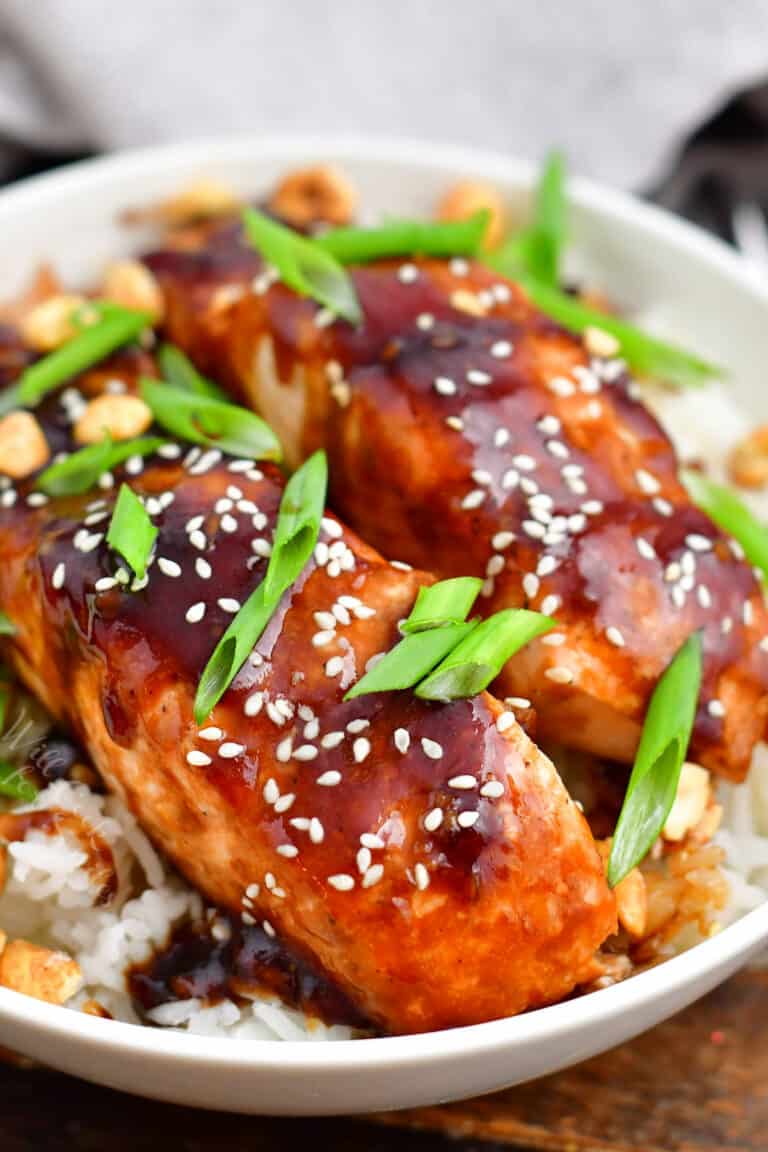
Some More Holiday Main Dish Ideas
If you enjoy this roasted turkey breast, try some of my other easy, flavorful mains like my turkey tenderloin roasted in the oven, roasted pork loin, or roasted pork tenderloin with pork rub. For simple weeknight comfort, my roasted chicken and classic meatloaf are always reliable favorites. Each recipe uses everyday ingredients and delivers the same cozy, home-cooked flavor your family will love.
Would you like to save this recipe?
Categories:
Christmas Dinner Recipes, Dinner Recipes, Gluten Free Recipes, Thanksgiving Dinner Recipes, Turkey Recipes,All images and text ©Lyubov Brooke for ©Will Cook For Smiles. Please do not use my images without prior permission. If using my posts in collections and features, please link back to this post for the recipe.
Disclaimer: Nutrition information shown is not guaranteed to be 100% accurate as most ingredients and brands have variations.