
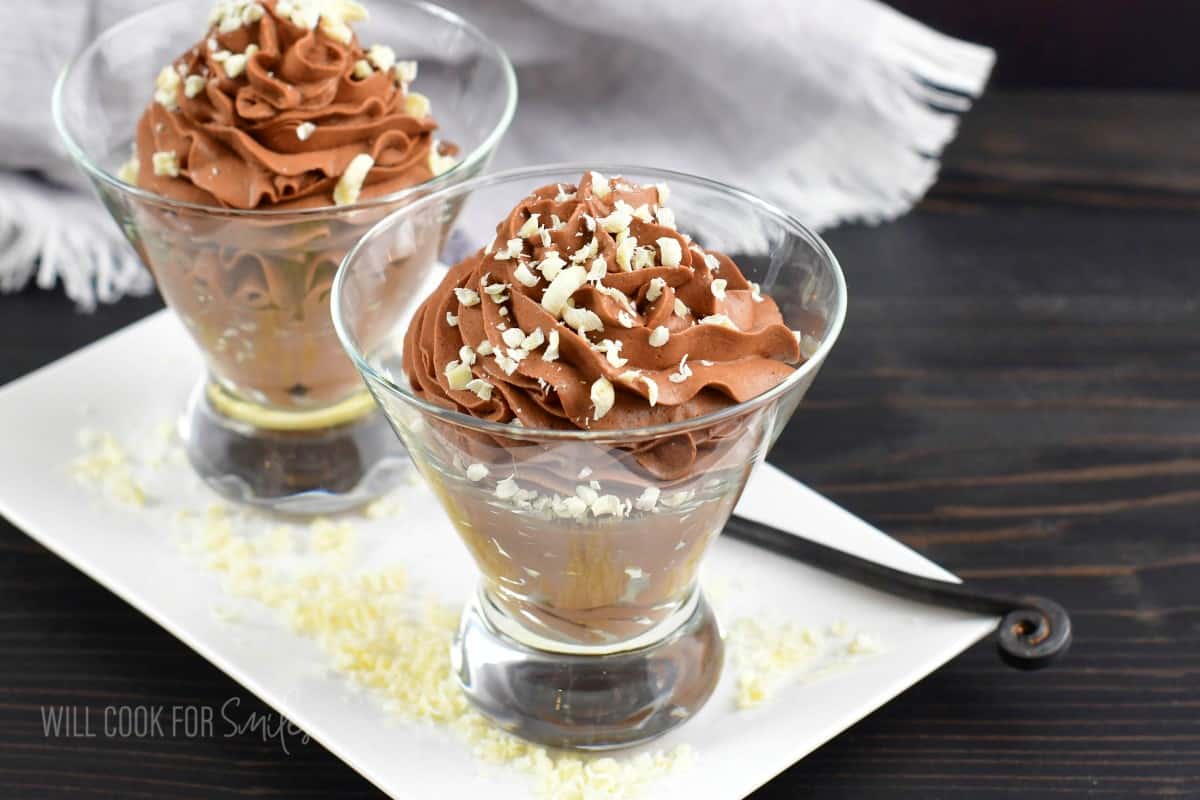
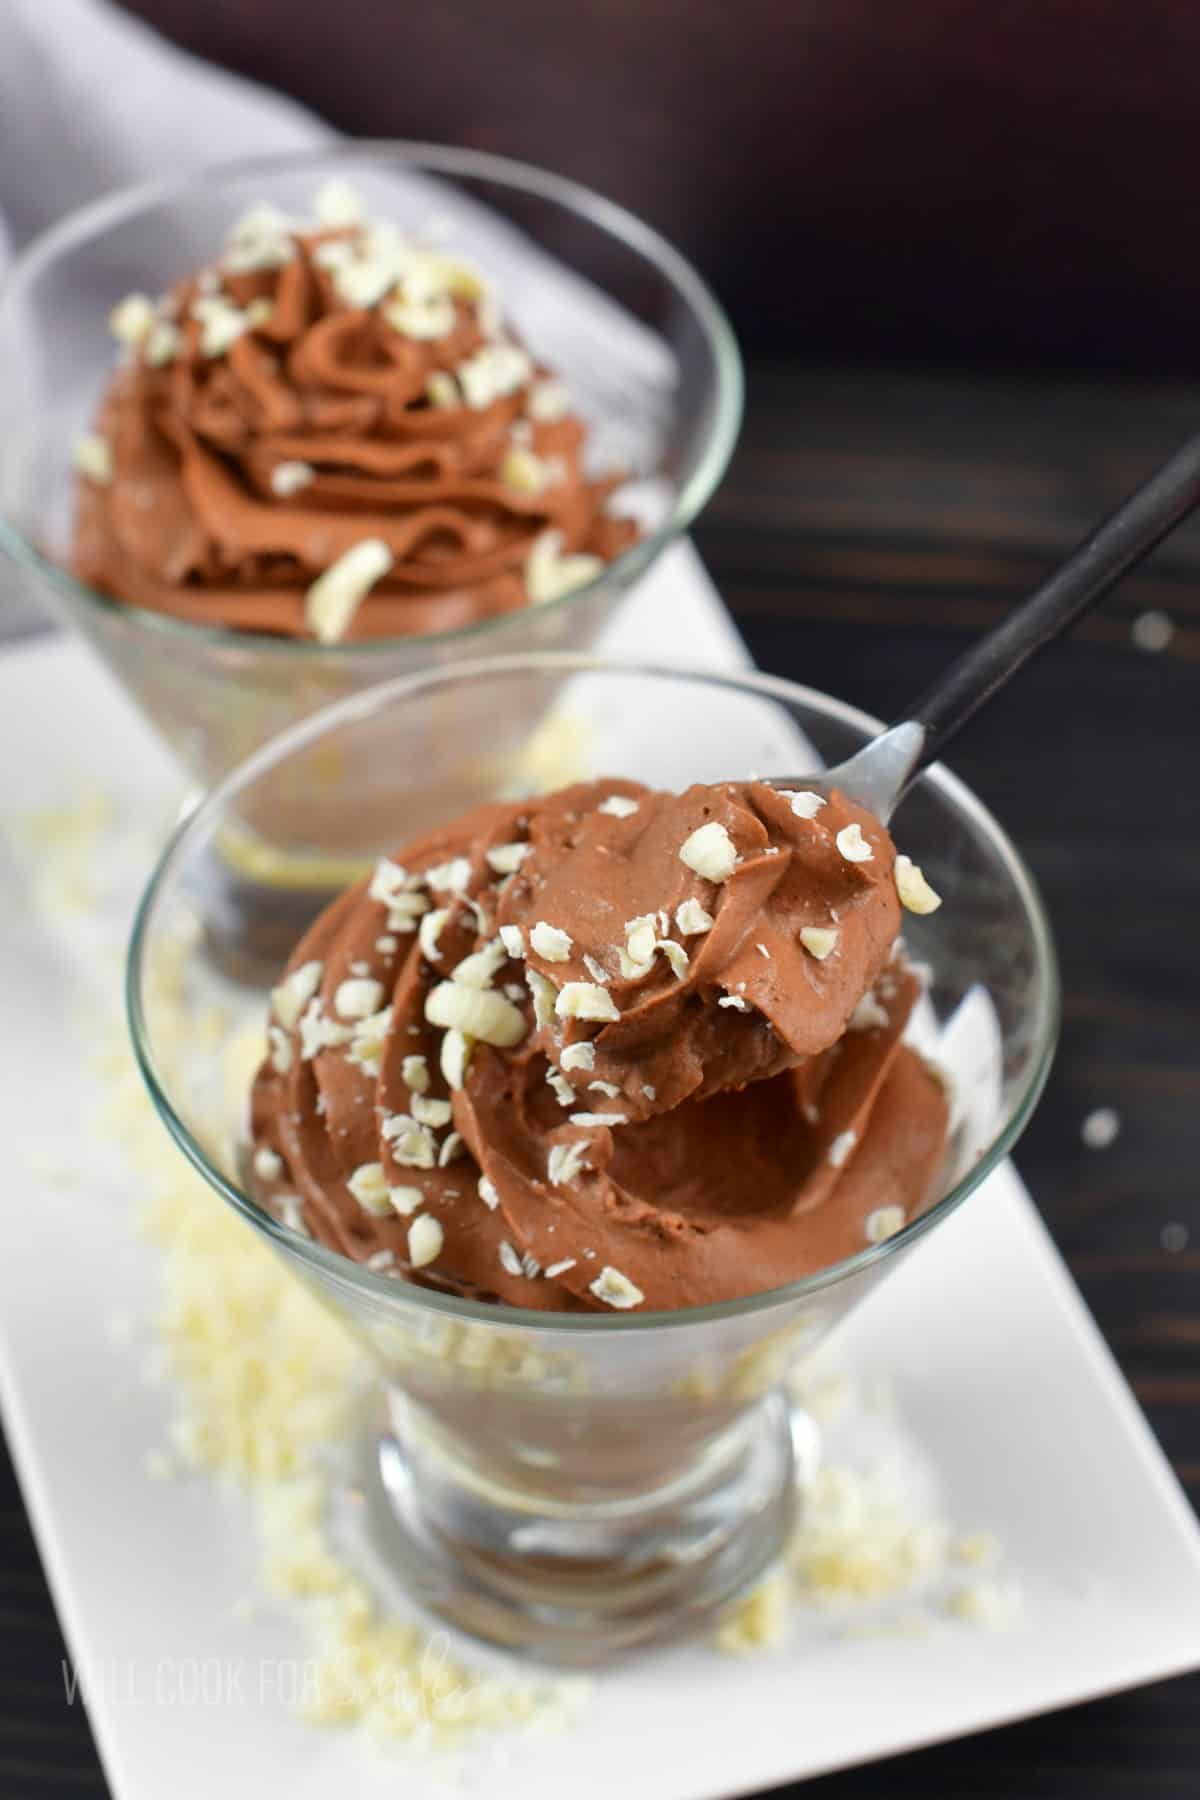
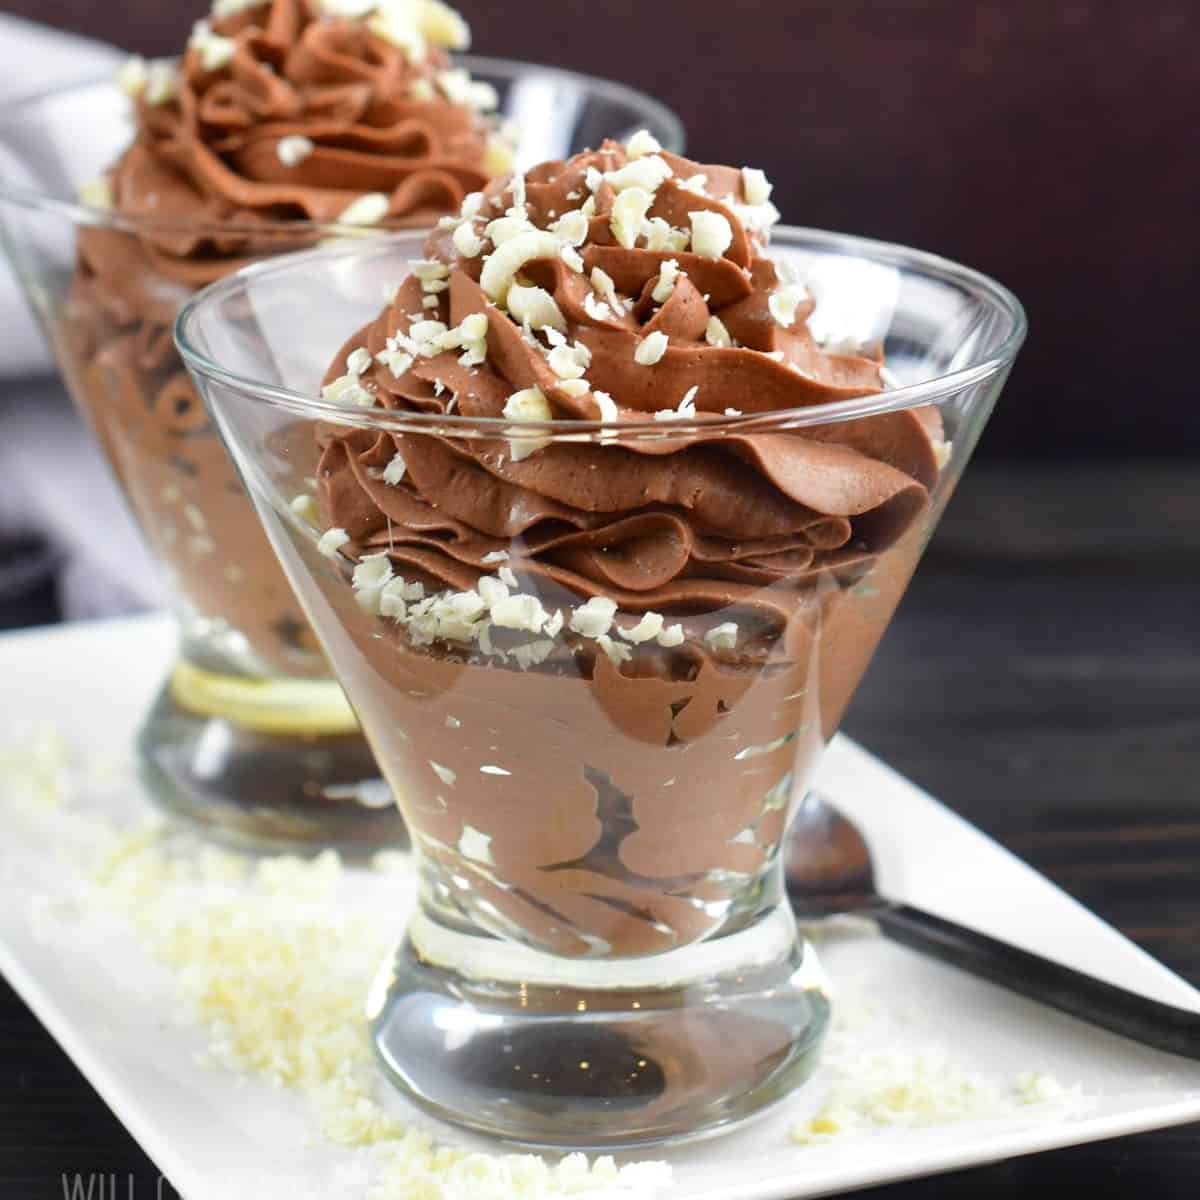
Chocolate Mousse Recipe
rave reviews
My daughter and I love this recipe and are resolved to eat more of it this year! Your photos are as decadent as your recipe! ~Lucinda
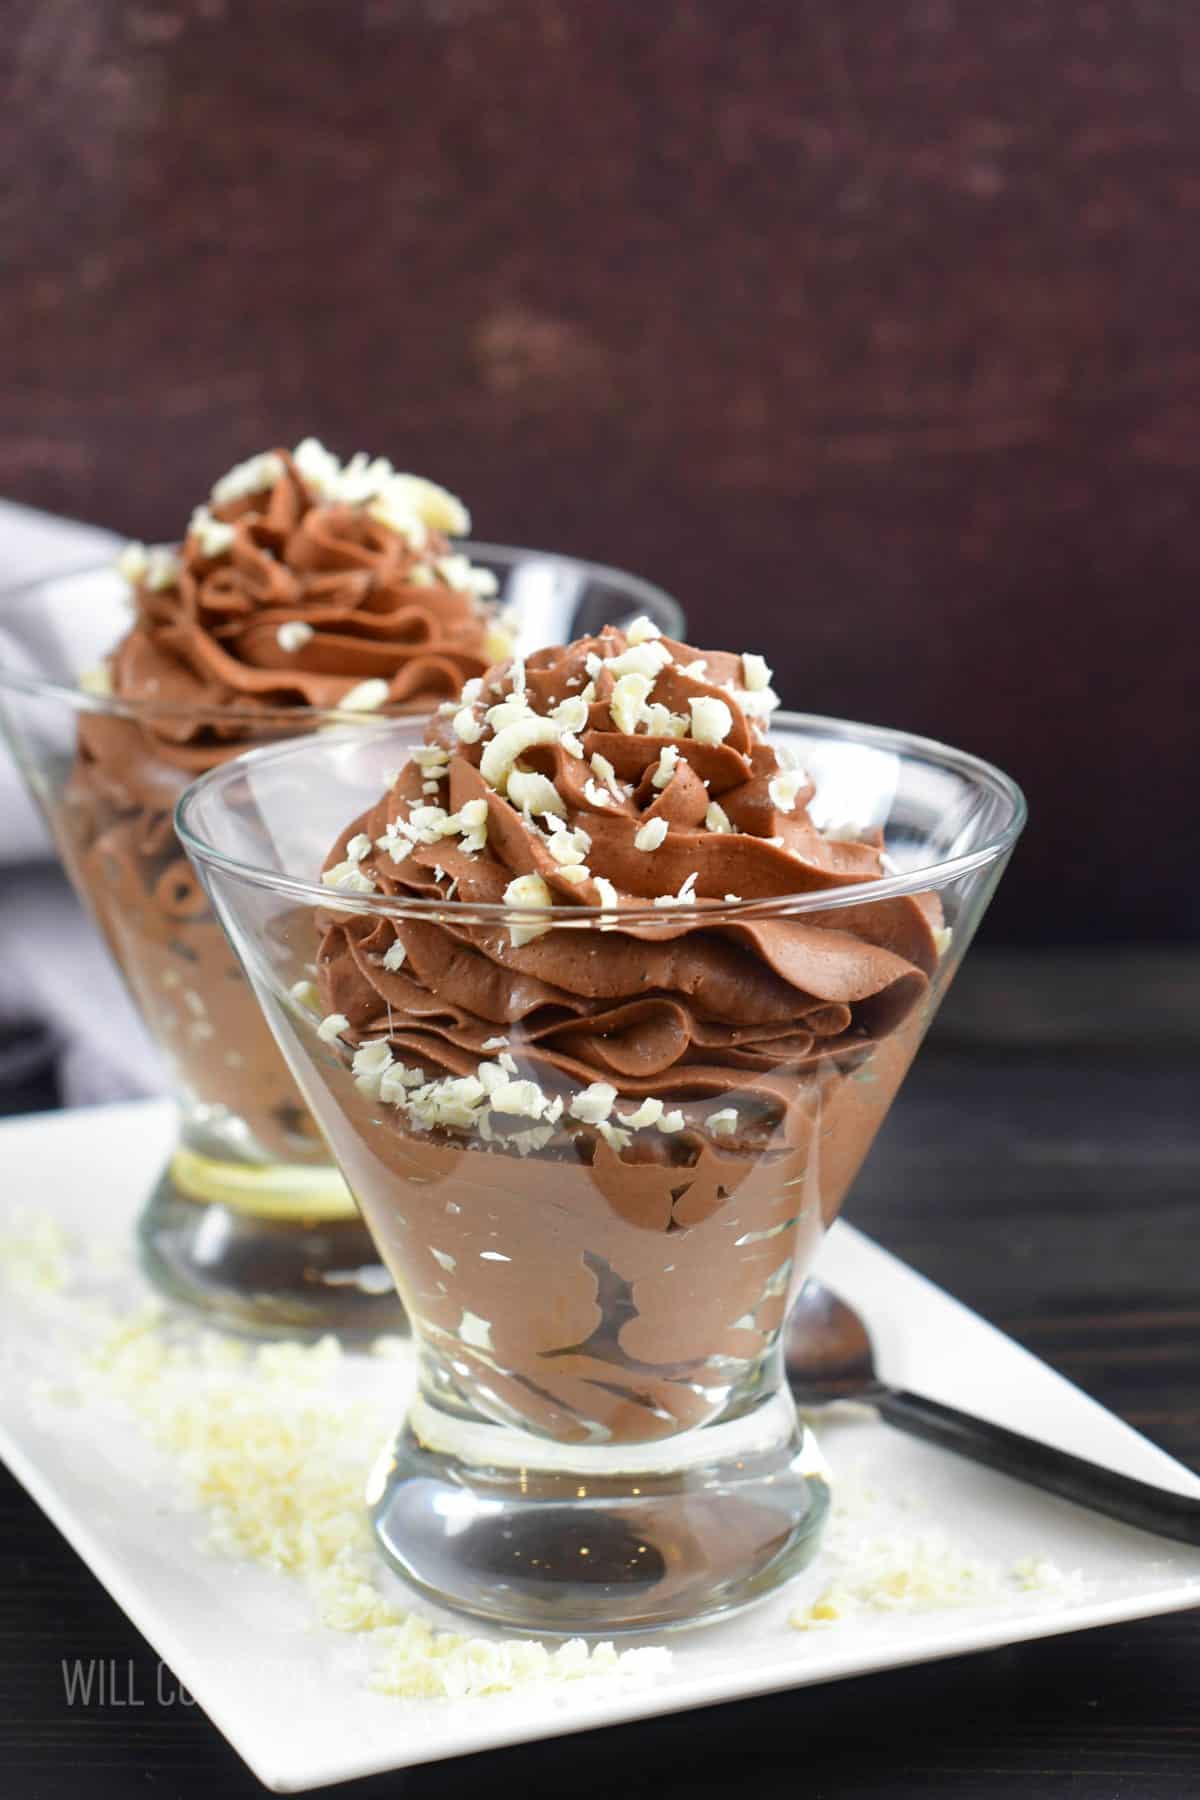
Why I’ve Been Making This Chocolate Mousse for 20 Years!
This is my absolute favorite recipe for a chocolate mousse made from scratch. Homemade mousse is so much better in texture and flavor, it’s worth a little extra effort that you have to put in.
- It’s really not a difficult process, it takes about 30 minutes to prepare and then it’s just chill time.
- Much like the classic tiramisu recipe, this is an easy make ahead recipe where you just follow the steps to put it together, and then just wait for it to set in the refrigerator.
- No baking, and no need to go back and forth to work on it.
- MOST Importantly: I make sure to get the egg yolks to a safe temperature first! I’ve gotten many “thank you” messages for this safety step.
Table of Contents
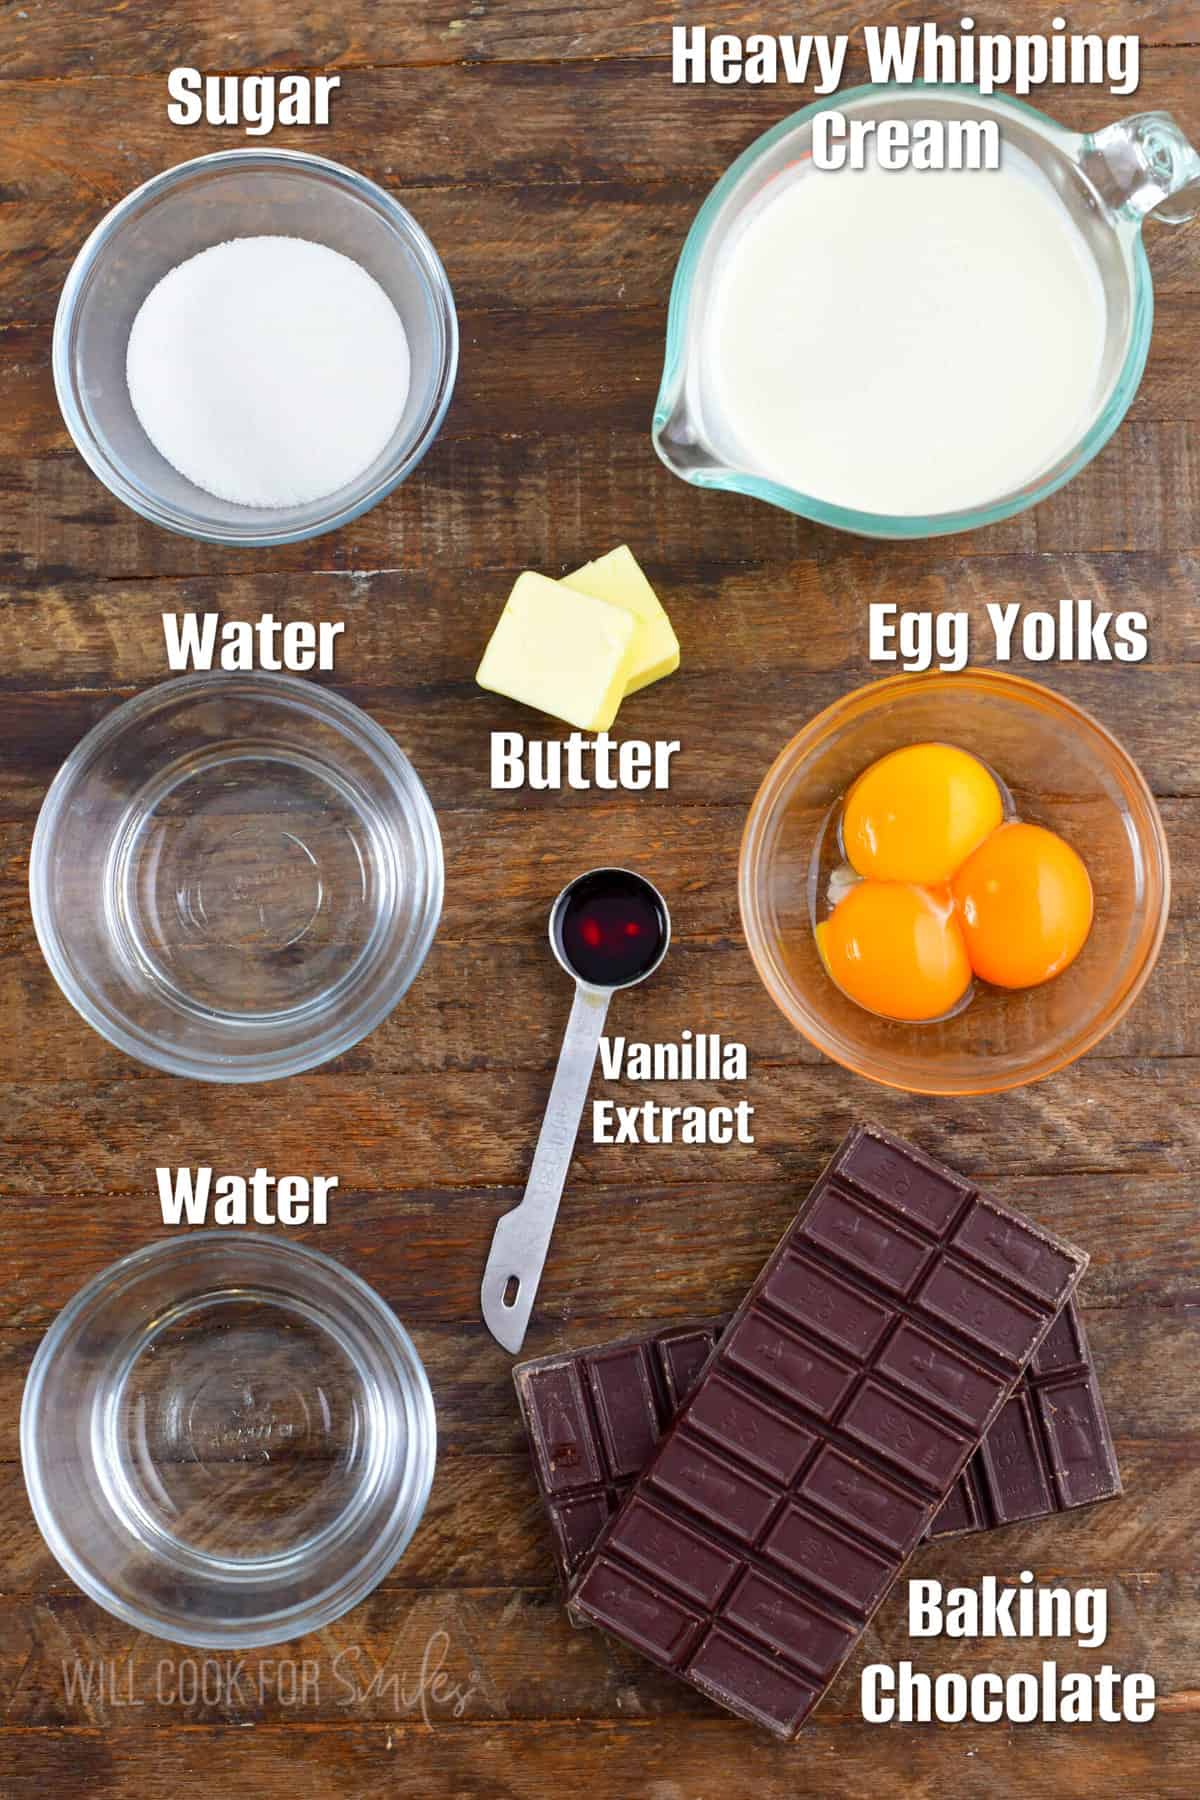
Key Ingredient Notes
- Chocolate (60-70% cacao, baking BAR) – For the best balance of deep chocolate flavor and gentle bitterness, use bittersweet or dark baking bars in the 60–70% cacao range. Chop the bar finely so it melts smoothly. If using a higher % bar (70%+), the mousse will taste more intense and slightly less sweet. (You can balance it with a touch more sugar.)
- Avoid chocolate chips (I will repeat that I do NOT recommend it) their stabilizers resist melting and can make the mousse grainy. It’s also prone to breaking when trying to melt.
- Heavy whipping cream (NO substitutes) – Use heavy whipping cream only, it has about 36-40% milk fat, and this is what whips to stable, silky peaks.
- Do not substitute half-and-half, light cream, or milk; they won’t whip properly and will deflate the mousse. For fastest, fluffiest peaks, keep the cream very cold and chill the bowl and beaters for 10 minutes before whipping.
Equipment (Minimal Gear)
- Hand mixer or stand mixer (whisk attachment) – for whipping cream to soft/medium peaks.
- Double boiler or a heatproof bowl + saucepan (to create a simple double boiler for gently melting chocolate).
- Instant-read thermometer – to confirm egg yolks reach 160°F for a safe custard base.
- Silicone spatula – for folding without deflating the mousse.
- Knife & cutting board – to finely chop baking-bar chocolate for even melting.
- Optional: piping bag + 1M large star tip (for neat swirl).
How To Make Chocolate Mousse: Visual Step-by-Step
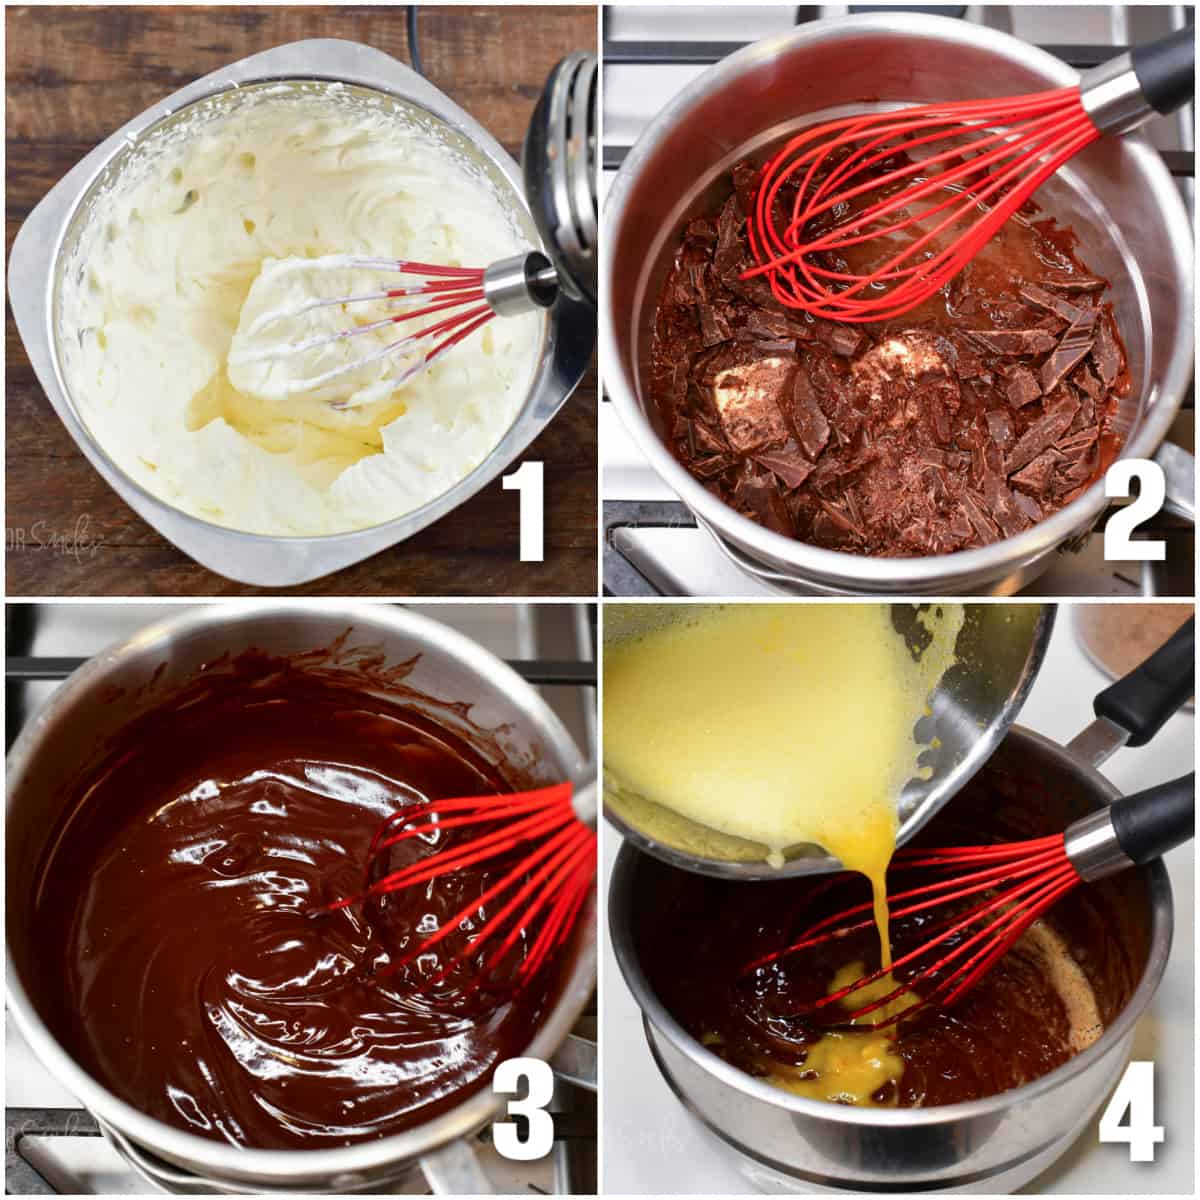
- Make whipped cream: Using a cold whisk attachment, beat cold heavy cream in the cold bowl of an electric mixer, until soft peaks appear. Soft peaks are gentle and not sharp looking but still hold up and don’t deflate (image 1). Set it in the fridge until ready to use.
- Melt chocolate: Preheat water in the double boiler over medium heat. Add chocolate, 1/4 cup of water, butter, and vanilla extract. Let it start melting and then stir with a silicone covered whisk until just melted, smooth and glossy (image 3). Take off heat and set aside.
- Egg yolks: In a small, heavy-bottom sauce pot, over medium-low (to low) heat, whisk egg yolks, 1/4 cup of water and 1/4 cup of sugar together. Cook stirring slowly but constantly, until the mixture reaches 160°F in the center. This could take up to 10 minutes but don’t walk away or stop slowly stirring or you will cook your eggs. The eggs will be still completely liquid, bright yellow, and smooth, just warmed to a safe temperature. Take them off heat.
- Stir egg mixture into chocolate mixture until all combined and smooth (image 4).
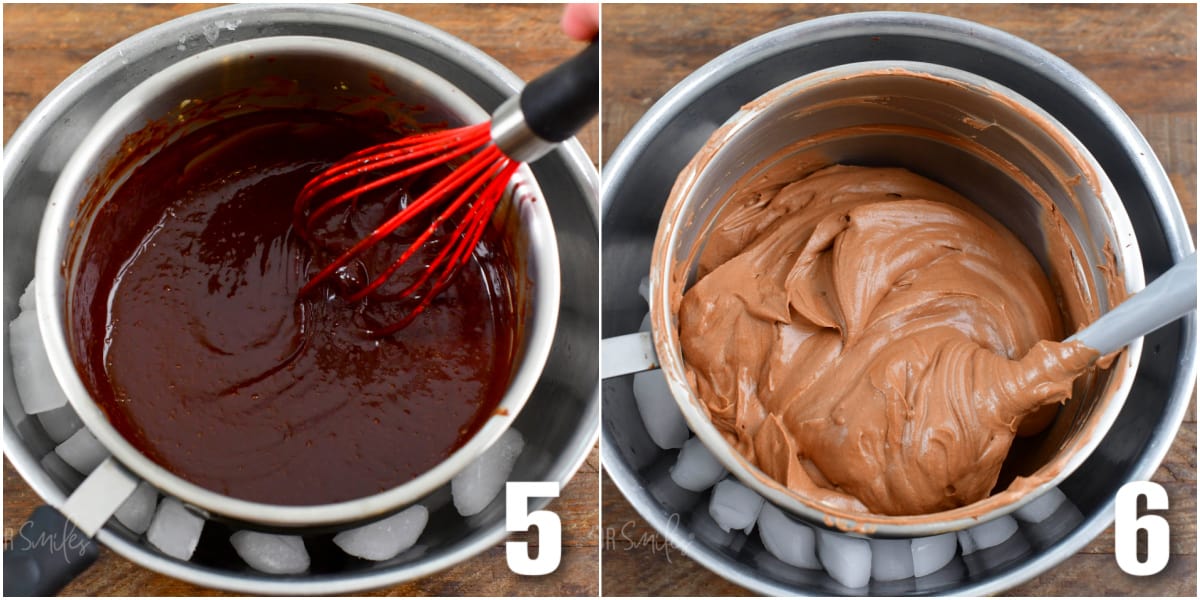
- COOL the mousse: Place some ice into a large mixing bowl. Set the sauce pot in the ice bath. Let chocolate cool, while slowly stirring from time to time, for 5-7 minutes (image 5). Make sure chocolate is cooled before adding whipped cream!
- Finish: Gently fold whipped cream into cooled chocolate mixture until all smooth and no more white or dark streaks are showing (image 6). Don’t rush! Take you time folding with a spatula, you don’t want to whip or it will flatten.
Tips To Make The Best Chocolate Mousse
- Chocolate Mousse has been my go-to recipe for many celebrations and holidays. It’s always a crowd-pleaser and I love the fact that it can be prepared ahead of time. It’s so nice when you can get dessert out of the way the night before you have a party planned.
- This recipe may seem like a lot of steps and that it might take a long time, but it really is not that complicated and it will take you about 30 minutes to make it. Just remember to take it one part at a time because each one demands your attention.
- Use a double boiler to melt your chocolate, if available. Every time I try to take a microwave shortcut while melting my chocolate, it ends in disaster. I end up wasting two bars of baking chocolate and have to start all over. So don’t take that chance and use a double boiler.
- If you don’t have a double boiler, set a glass mixing bowl over a pot filled about half way with water. Water should not be touching the bowl on top. Melt chocolate in and butter in the glass bowl once the water starts to simmer.
- Make sure to bring the egg yolks mixture to a safe temperate of 160°-165°. Use a thermometer to track the temperature while cooking the eggs. Cook them low and slow and remember to stir constantly so you don’t end up with scrambled eggs.
Storing Chocolate Mousse
- Storage: Use individual jars or small, airtight containers, (you can also press plastic wrap directly onto the surface). Make sure to store it in the refrigerator and air-tight. Properly stored, it will last 5-7 days.
- To freeze: Portion into (freezer-friendly) ramekins or a lidded container. Press plastic wrap directly onto the surface, seal, and freeze up to 1-2 months.
- Thawing: Move from the freezer to the refrigerator overnight (8-12) hours. Avoid heating it, because this will break down the texture.
- Texture: While freezing is safe, it may cause some air bubbles to deflate and there will be a slight textural difference once thawed.
- Revive texture: If slightly loose after thawing, whisk by hand 10-20 seconds or fold in 1-2 tsp of cold whipped cream.
Recipe FAQs
Absolutely! Feel free to stir in a tablespoon or two of amaretto, Kahlua, Bailey’s or crème de cocoa. Make sure to stir the liqueur into the egg yolk mixture, after you’ve brought it to temperature and before mixing it with the melted chocolate mixture.
For this recipe, stick with baking/cooking bars for the smoothest melt because chips often contain stabilizers that resist melting and can make mousse grainy or break down while melting.
Aim for 60–70% cacao (bittersweet/dark) for balanced sweetness and depth.
It’s the food-safe temperature that sets a custard base for silky texture with no raw eggs.
Two common culprits: over-whipped cream (grainy mouthfeel) or seized chocolate from using chocolate/chips. Keep cream at soft–medium peaks and use cooking/baking chocolate.
About ½ cup per serving is a helpful benchmark for portioning.
Some More Recipes To Try
If you love this mousse, try a few more chocolatey favorites from my site:
- my ultra-smooth chocolate cheesecake with an Oreo crust,
- the nostalgic brownie bottom chocolate mousse pie that layers fudgy brownie with mousse.
- the Oreo Double Chocolate Mousse Parfaits (plus a fruity twist in the Raspberry White Chocolate Mousse Parfait) for easy make-ahead cups.
- for a classic chocolate mousse pie, try my French Silk Pie.
- and another chocolate fan-favorite, is my hot chocolate cake roll or death by chocolate cake roll.
DID YOU MAKE THIS RECIPE? PLEASE leave a 🌟 star rating! Let me know how you liked it by leaving the 📝 comment below or share and tag me on social media @willcookforsmiles. DON’T FORGET to subscribe to my newsletter!
Chocolate Mousse Recipe
Ingredients
- 8 oz bittersweet baking chocolate 60%-70%
- 1/2 cup water split in two
- 2 Tbsp unsalted butter
- 1 tsp vanilla extract
- 3 egg yolks from large eggs
- 1/4 cup white granulated sugar
- 1 1/4 cup heavy whipping cream
Instructions
Whipped Cream:
- Using a cold whisk attachment, beat cold heavy cream in the cold bowl of an electric mixer, until soft peaks appear. Set it in the refrigerator until ready to use.
Melting Chocolate:
- Preheat water in the double boiler over medium heat. Add chocolate, 1/4 cup of water, butter and vanilla extract.
- Let it start melting and then stir with a silicone covered whisk until all melted and smooth. Take off heat and set aside.
Egg Yolks:
- In a small, heavy-bottom sauce pot, over medium-low (to low) heat, whisk egg yolks, 1/4 cup of water and 1/4 cup of sugar together. Cook stirring slowly but constantly, until the mixture reaches 160° (F). This could take up to 10 minutes but don't walk away or you will cook your eggs. The eggs will look still completely liquid and bright yellow, just warmed to safe temperature. Take off heat.
Cool and Combine:
- Stir egg mixture into chocolate mixture until all combined and smooth.
- Place ice into a large mixing bowl, about half way. Set the sauce pot into the ice bath. Let chocolate cool, while slowly stirring, for 5-7 minutes. The chocolate mixture should be completely cooled (no longer warm) throughout before adding whipped cream.
- Fold whipped cream into cooled chocolate mixture until all smooth. Take you time folding with a spatula, you don't want to whip or it will flatten.
- At this time, you can divide chocolate mousse among dessert cups, cover air-tight, and refrigerate for at least 4 hours before serving.
Video
Notes
- Baking chocolate – make sure to use baking/cooking chocolate bar and choose either dark or semi-sweet. Get the chocolate from the baking isle, not the candy isle!
- Heavy whipping cream – do not substitute this ingredient! It’s important to use heavy whipping cream to make whipped cream.
- Adding liqueur – Feel free to stir in a tablespoon or two of amaretto, Kahlua, Bailey’s or crème de cocoa. Make sure to stir the liqueur into the egg yolk mixture, after you’ve brought it to temperature and before mixing it with the melted chocolate mixture.
- Storing – Make sure to store chocolate mousse in an air-tight container in the refrigerator. Properly stored, it will last 5-7 days.
- Make ahead – feel free to make this chocolate mousse 1-2 days ahead of time and store air-tight in the refrigerator!
Nutrition
Originally published on Will Cook For Smiles on November 23, 2014.
Would you like to save this recipe?
Categories:
Chocolate Recipes, Dessert Recipes, Father's Day Recipe Ideas, Gluten Free Recipes, Most Popular Recipes, Mother's Day Recipe Ideas, Valentine's Day,All images and text ©Lyubov Brooke for ©Will Cook For Smiles. Please do not use my images without prior permission. If using my posts in collections and features, please link back to this post for the recipe.
Disclaimer: Nutrition information shown is not guaranteed to be 100% accurate as most ingredients and brands have variations.


Excellent recipe. The portion with heating the eggs/sugar/water is quite tedious. But it turned out well.
Love this, what tip did you use to pipe it into the glasses?
Looks like a 1M
Hi Mary,
Yes the tip I use is 1M. You can also just add dollops and then top it off with some shaved chocolate pieces or chocolate nibs on top!
Hvala.
Čudovita sladica.
You are so welcome! Glad you like it!
Hi I just wanted to know if this could be used as a topping on a cake. I’d like to make mousse for a chocolate cake so I just want to know if this would work
I think that would be delicious! Because it is light and fluffy and porous it won’t be as smoothed as cream cheese or buttercream so it will not spread as well so you should use a piping bag instead of spreading it. And if your cake layers are not too heavy you can add it in the middle as well. Let me know how it goes.
Can I use a metal whisk and get the same results?
Sure, it will be a workout you need to keep a steady pace but you can do that.
Hi, I want to make this, do you have any ideas how to transport it for a few hour car ride? In a cooler with ice, maybe a bowl or gallon ziploc, or something else?
Hi Beth!
So sorry for a later response. Yes, you will want to put it in a cooler with ice packs in it. I’d recommend a glass container with a well fitting lid to store the actual chocolate mousse. Then nestle it on top of ice packs inside a cooler and I would even add an unfolded towel between the storage container and ice packs. Just so it’s not a direct ice pack contact.
My daughter and I love this recipe and are resolved to eat more of it this year! Your photos are as decadent as your recipe!
Thank you so much, Lucinda!
Hi this looks goid! Did you use the double broiler in cooking eggs or straight from the stove?
Hi, Maria! Yes, you will cook the eggs using the double broiler or you can use a glass mixing bowl if you don’t have a double boiler and place it over a pot of water.
This looks so delicious! My problem is that I eat too much. Thanks for sharing!
Oh yes, I run into this problem a lot as well 😀 That’s why I make sure someone is here to help me eat it!
Thank you, Karly!
Thank you for this. For anyone interested, I made this Saturday for Mother’s Day on Sunday. I used Guittard Extra Dark Chocolate (63% Cacao). It was a HIT! It was rich and smooth and SO. VERY. GOOD.
John, I am so glad you liked it!
hello , i was wandering if i could use semisweet choc olate? if so would i decrease sugar amt? also am i actually adding water in with the chocolate or just in the pan undereath? also is this airy and light or heavy like pudding? and also
when do i strain the mix to make sure i didnt scramble eggs?
Hi Linda! Yes, you can substitute semi-sweet as long as you use baking chocolate and not chocolate chips. As far as adding or taking away sugar, that it up to you based on how sweet you like your desserts.
You are melting chocolate over water in a double boiler, so there will be water in the bottom part of the double boiler. Then in the top pot, you will be combining the chocolate and 1/4 cup of water. So really it’s both.
The texture is light and creamy, kind of like a thicker whipped cream.
There is nothing to strain actually. The best way not to cook the eggs but bring them to temperature is to do it low and slow. Slowly stir the whole time as the eggs are heating up. If you would feel better, you can do the eggs in a double boiler as well, just wash it first.
I hope this helps!
I just made your Chocolate Mousse recipe and it is fabulous!! What a rich creamy chocolate flavor!
Thank you very much!
Happy New Year 2019!
I’m so happy to hear it, Melinda!
Happy New Year!