
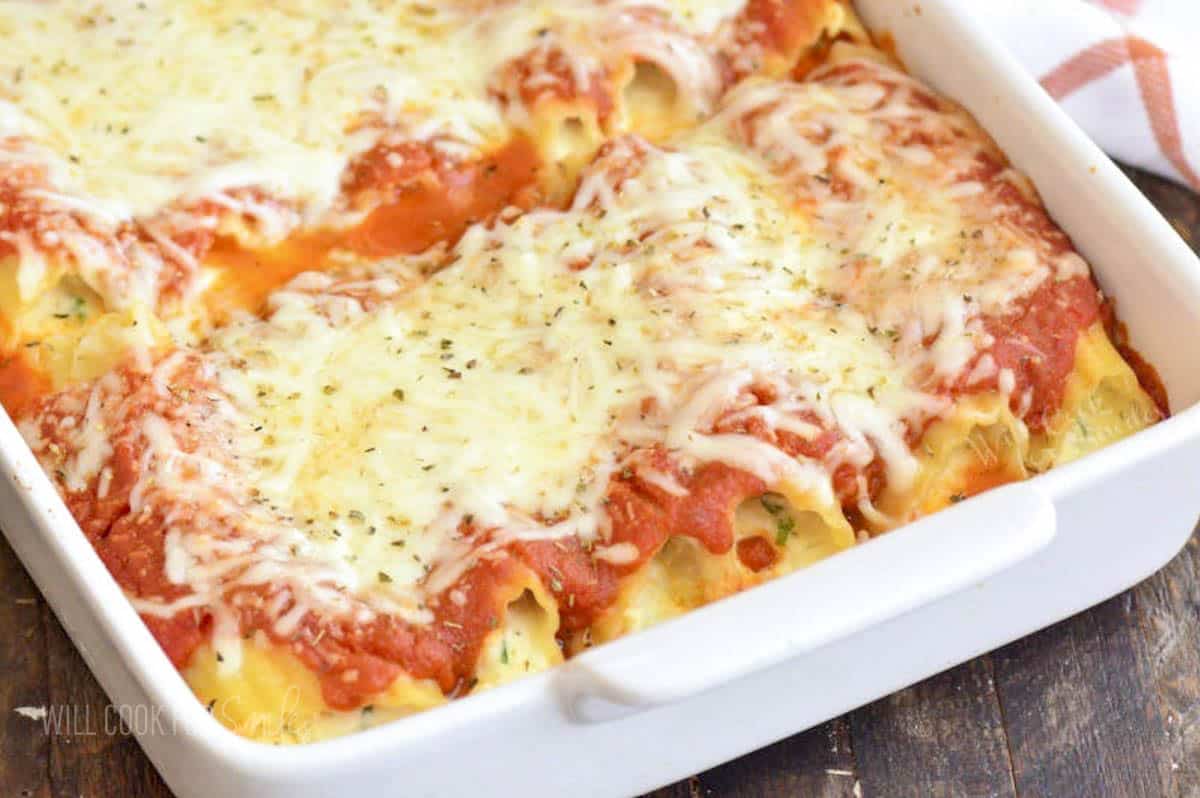
Classic Manicotti Recipe
What Is Manicotti?
Manicotti is an Italian-American dish that originated from the classic Italian cannelloni. Manicotti is named after the shape of pasta used for this dish, which means “little muffs” or “little sleeves” in Italian. This pasta is tube-shaped and usually about 4 inches in length with ridged edges. Stuffing for manicotti is very similar to one in ravioli and stuffed shells, the only real difference being that it’s piped into these tube shells!
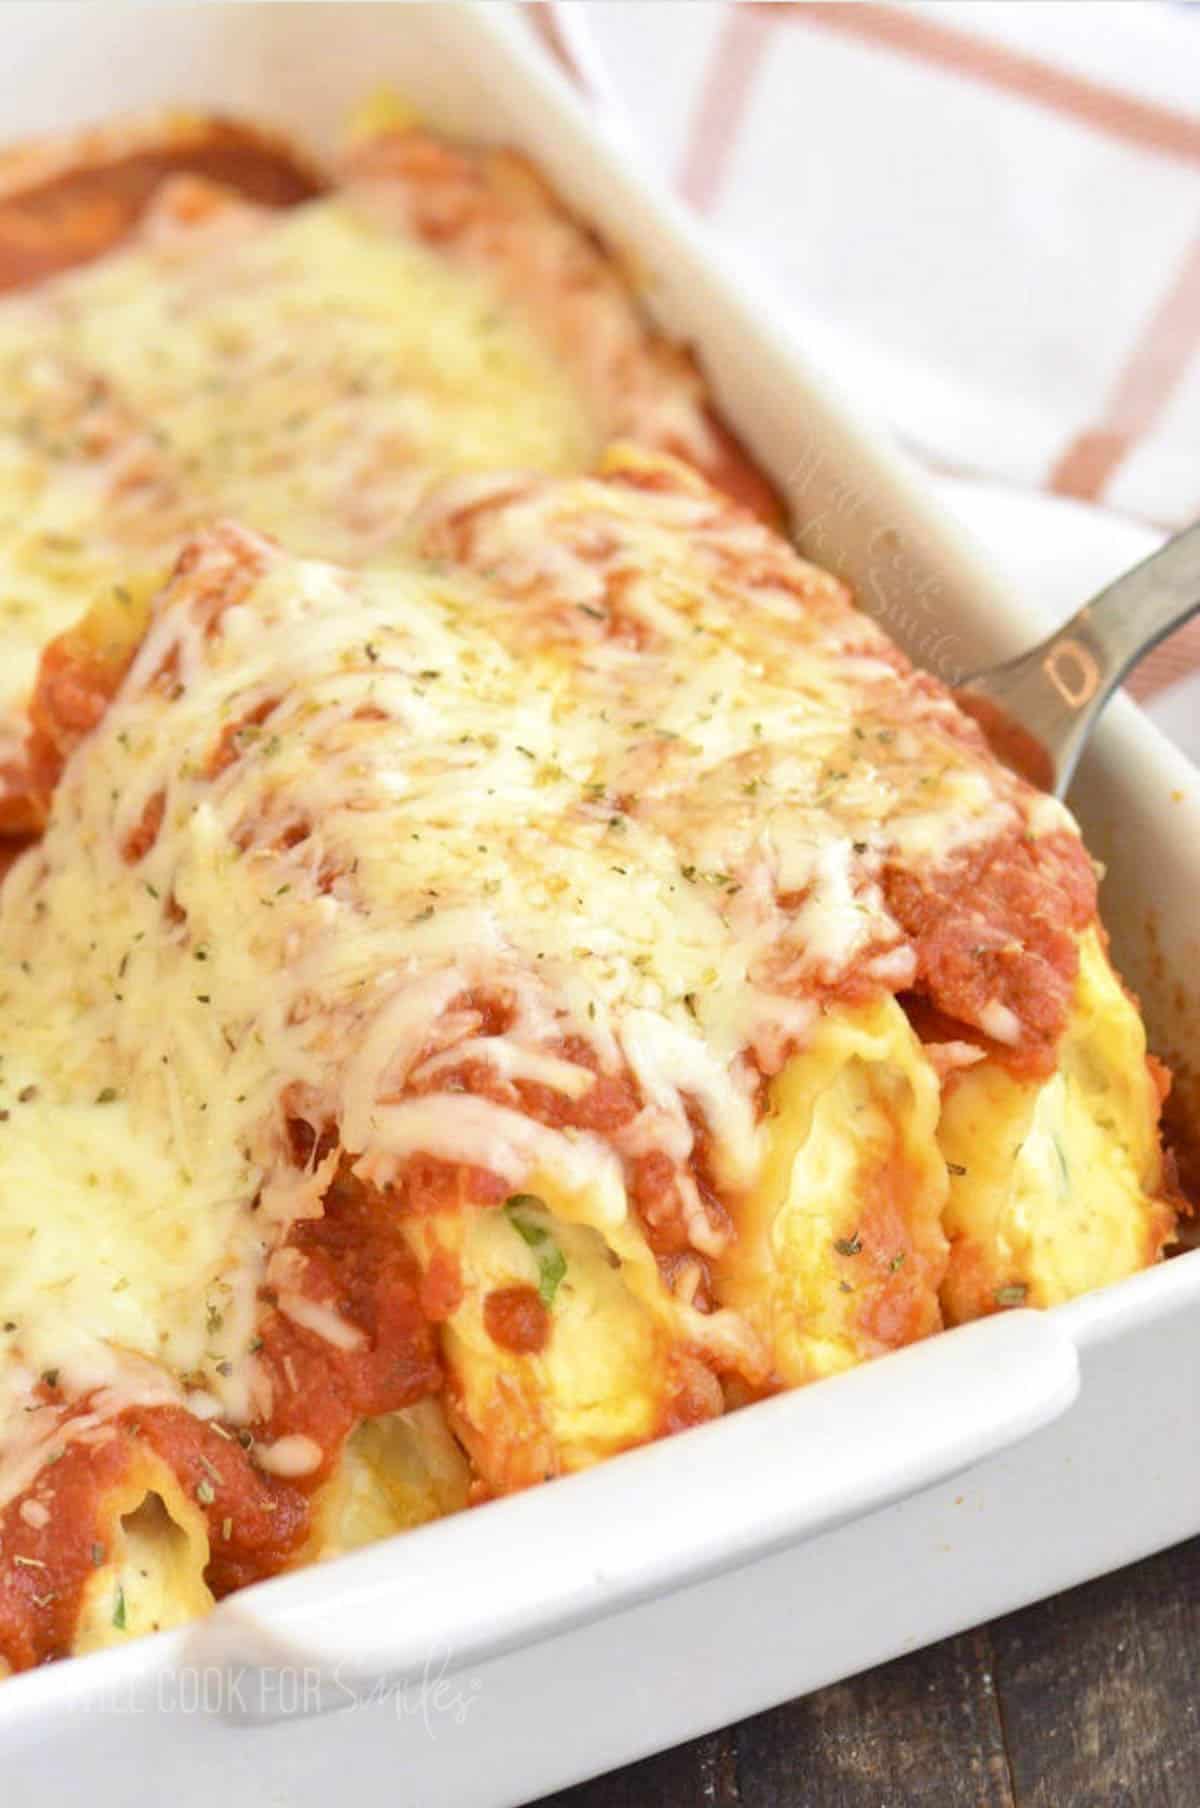
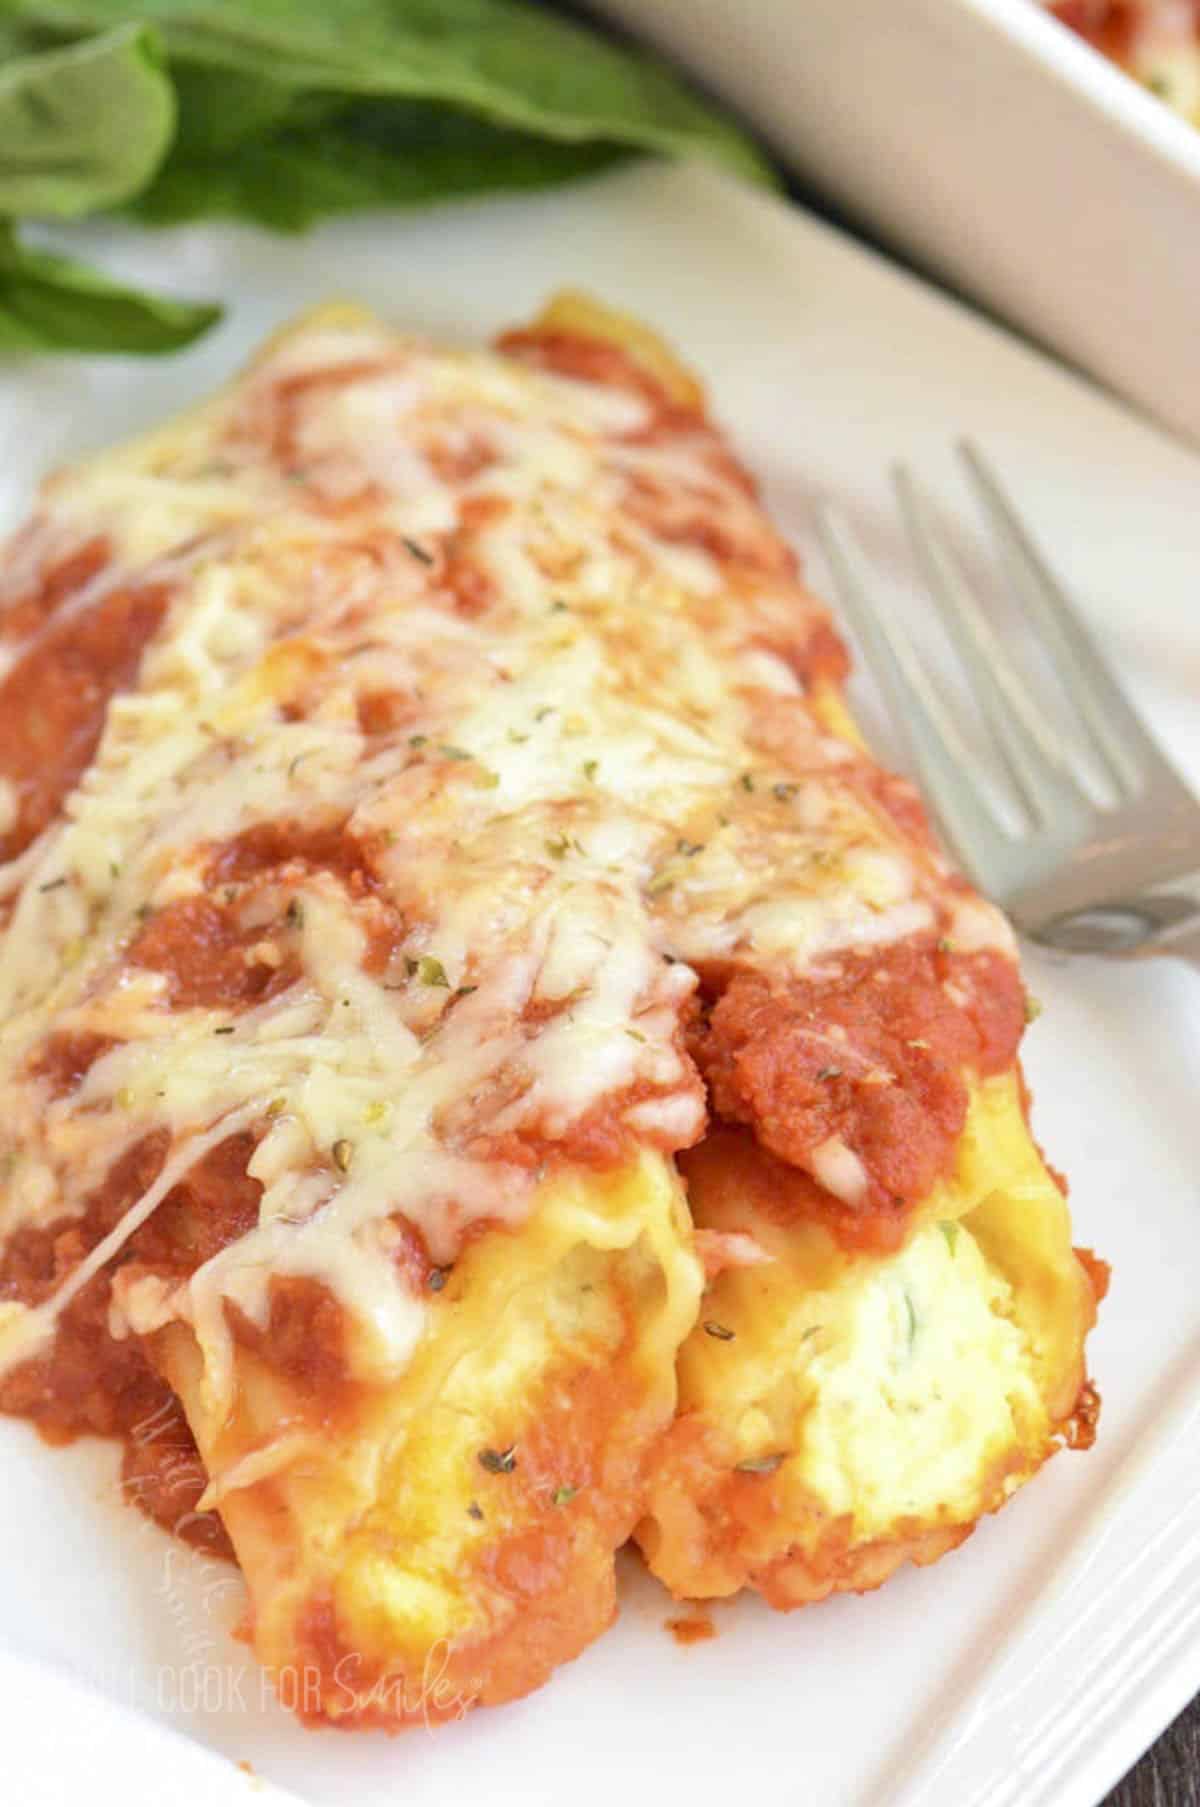
The filling is a creamy, cheesy combination of whole milk ricotta cheese, mozzarella cheese, parmesan cheese, egg, and herbs. These stuffed pasta tubes taste amazing baked in homemade spaghetti sauce and more cheeses on top.
This dish is the epitome of comfort food, so make sure to whip it up on a night that you’re really hungry! It hits the spot in the most filling and flavorful way. As much as you may want seconds, you might just be too full to go back for more.
Ingredient Notes
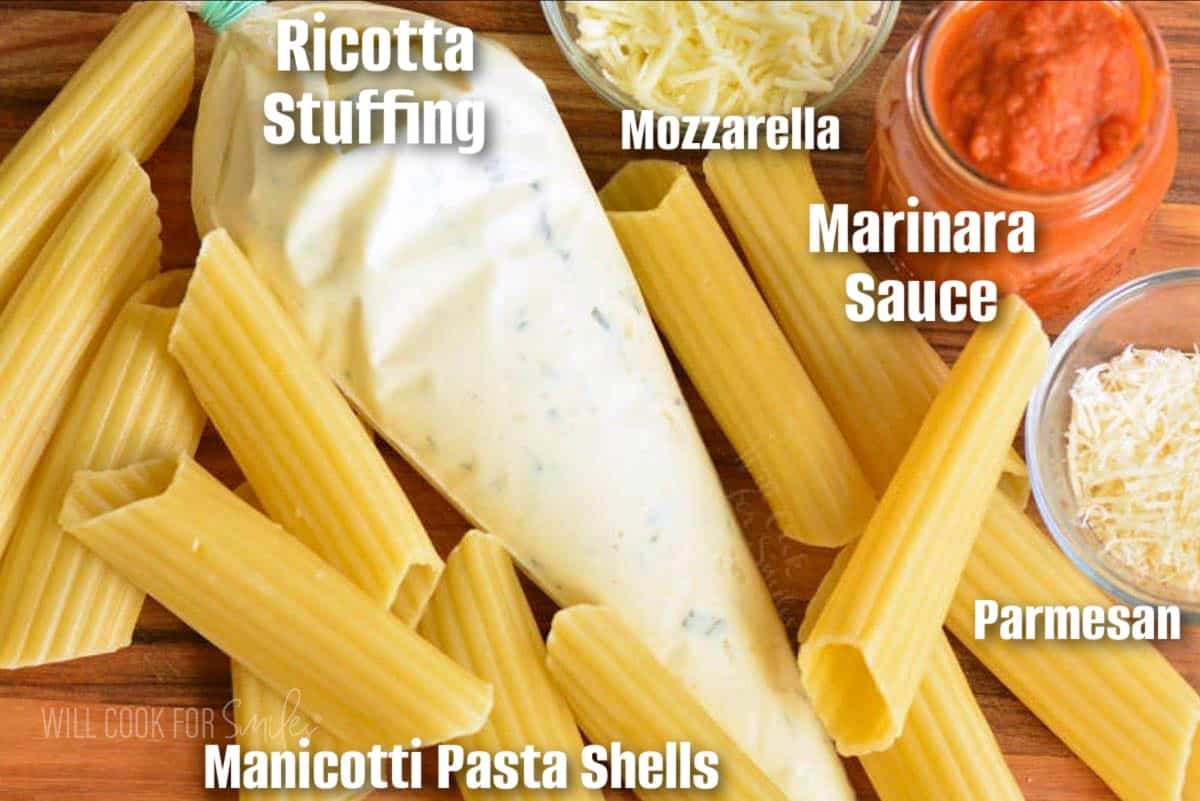
Manicotti Pasta Shells – You should be able to find these in the pasta aisle of your local grocery store.
Pasta Sauce – of course, it’s always best to use homemade marinara sauce, but you can also use your favorite store-bought one.
Garlic – it’s best to use fresh garlic (not pre-minced) for the better overall flavor!
Cheeses – You’ll need ricotta, parmesan, and mozzarella cheeses for this supremely cheesy recipe!
Ricotta cheese – use whole milk ricotta cheese for the best results. (You can substitute cottage cheese if you’d like, just make sure to choose small curd cottage cheese and drain it well. Note there will be some difference in texture and flavor!)
Herbs – For the sauce, you’ll need some fresh basil and dried oregano. The filling calls for fresh basil and fresh parsley. While fresh herbs will give you the best flavor and aroma, you can substitute died when needed.
See recipe card for complete information on ingredients and quantities.
How To Make Manicotti?
- Make the sauce – Sauté the vegetables first until softened. Then add the canned tomatoes, bay leaves, oregano, sugar, half the basil and salt. Stir well and cover with a lid but leave a crack for steam to escape. Cook for about 20 minutes, then add remaining basil. Stir and cook for another 20 minutes or so.
- Blend the sauce – Take out the bay leaves and blend sauce in the blender until smooth. Make sure to open the little tab so the steam can escape while blending.
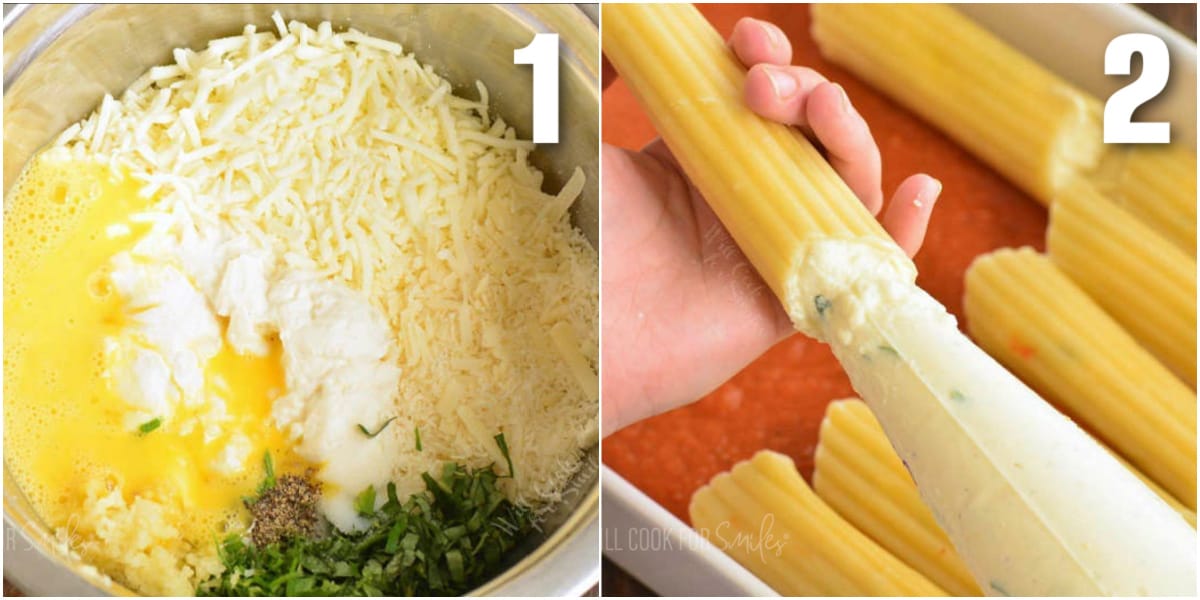
- Make the filling – Simply gather the filling ingredients in a bowl and mix until it’s all evenly incorporated.
- Stuff the manicotti – Transfer the prepared filling into a large piping bag (I use 16 oz piping bag). Tie the opening of the bag with a produce rubber band and cut off the tip when ready to stuff into pasta. Hold the manicotti shell pasta in one hand and squeeze the stuffing into it from the piping bag, filling it almost full. Don’t overfill though, or a lot of it will come out while baking!
PRO TIP: using a piping bag is the perfect way to squeeze in the filling into tube pasta like for manicotti, cannoli, or even into the pasta shells.
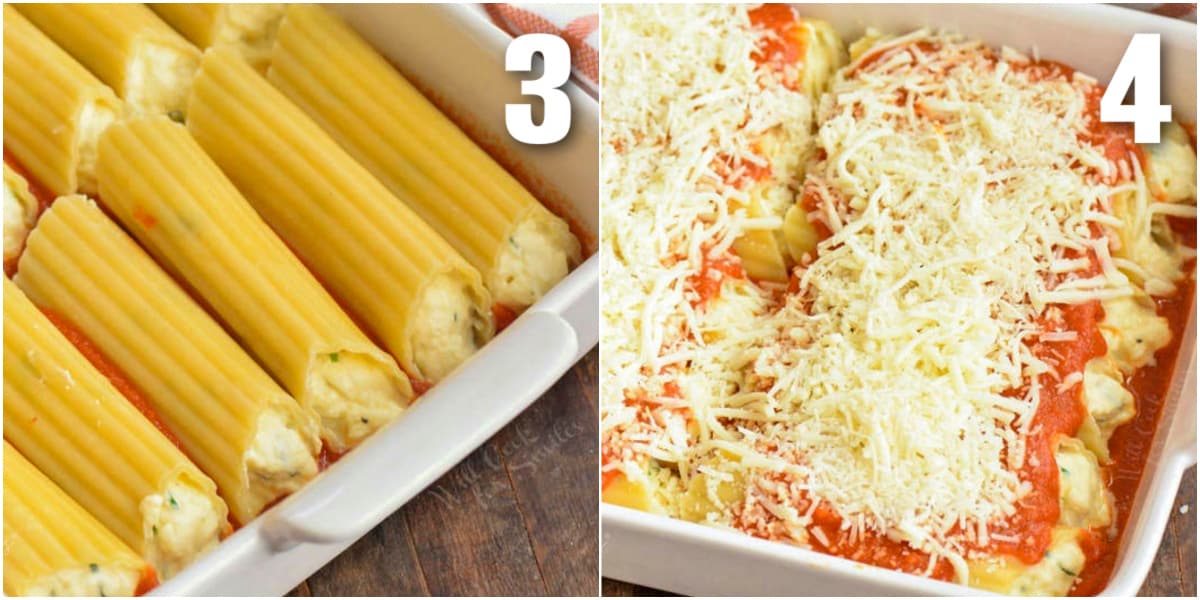
- Assemble the manicotti – Spread about a cup and a half of pasta sauce in the baking dish. Nestle the stuffed manicotti in the sauce and cover it with remaining sauce. Spread mozzarella and parmesan cheese over the top.
- Bake the manicotti – Cover the pan tightly with foil and bake for about 30 minutes at 350°F. (If using oven ready pasta shells, bake for about 40 minutes.) Take off the foil and bake another 10 minutes.
PRO TIP: Spray one side of foil with non-stick cooking spray, the side that will be facing down, so that the cheese doesn’t stick to the foil.
Recipe FAQs
You can easily make manicotti ahead of time. Follow all the steps of preparing manicotti up to the baking but instead of baking, place the covered baking pan into the refrigerator.
To bake it the next day, preheat the oven to 350°F and let the pan warm up a little on the counter while the oven is preheating. Bake for about 40 minutes with foil on top, take off the foil, and bake for another 10 minutes.
You can store leftover manicotti in the same baking pan it was baked in. Make sure to cover it tightly! You can also transfer it into another food storage container with an airtight lid. Properly stored, cooked manicotti will last 3-5 days in the refrigerator.
Microwave: This method is best for reheating individual servings of manicotti. Place one to three pieces on a microwave-safe place, cover it with another bowl turned upside down or a microwave lid, and reheat. Depending on how many pieces you are reheating, it will take 1-2 minutes to warm all the way through.
Oven: This method is good for reheating individual portions or the whole pan. Cover the baking dish with foil and bake at 350°F until hot throughout. Depending on how full the baking dish is, it will take about 20 minutes.
Freezing Instructions
It’s best to freeze manicotti before baking in an aluminum baking pan. You can even divide this recipe into two or three smaller portions to thaw and bake at different times.
- Prepare manicotti according to the recipe up to the baking step. Wrap the whole pan tightly with two layers of cling wrap and then in aluminum foil. Don’t forget to date and label!
- Manicotti can be frozen for up to 3 months.
- Thaw it overnight or up to 24 hours in the refrigerator.
- To bake it after freezing, make sure to take off the cling wrap. Cover the pan with foil on top and bake at 350°F for about 40 minutes. Take off the foil and bake for another 10 minutes.
DID YOU MAKE THIS RECIPE? PLEASE leave a 🌟 star rating! Let me know how you liked it by leaving the 📝 comment below or share and tag me on social media @willcookforsmiles. DON’T FORGET to subscribe to my newsletter!
Manicotti Recipe
Ingredients
Pasta Sauce:
- 3 tbsp olive oil
- 1 Vidalia onion
- 2 medium carrots
- 5-6 garlic cloves
- 28 oz can crushed tomatoes
- 1/4 cup minced fresh basil
- 1 tsp dried oregano
- 1 tbsp white granulated sugar
- 2 bay leaves
- salt to taste
Pasta:
- 8 oz manicotti pasta shells
Manicotti Stuffing:
- 20 oz whole milk ricotta cheese
- 1 cup shredded Mozzarella cheese
- 1/2 cup grated Parmesan cheese
- 1 egg whisked
- 4 garlic cloves
- 2 tbsp minced fresh basil
- 1 tbsp minced fresh parsley
- 1 tsp salt more or less to taste
- 1/2 tsp fresh cracked black pepper
Topping:
- 1 1/2 cups shredded Mozzarella cheese for topping
- 1/2 cup grated Parmesan cheese for topping
Instructions
Sauce:
- Preheat a Dutch oven over medium heat and add olive oil. Saute diced onions, carrots, and garlic first until softened. Add canned tomatoes, bay leaves, oregano, sugar, and salt.
- Stir well, cover with a lid but leave a crack for steam to escape. Cook for about 20 minutes, stirring from time to time. Add basil, stir, and cook for another 20 minutes or so.
- Take out and discard bay leaves and blend sauce in the blender until smooth. (Make sure to open the little tab so the steam can escape while blending.)
- NOTE: you may have about a cup of sauce leftover. Store it in a glass container with a lid, in the refrigerator.
Manicotti Pasta Shells:
- Bring a pot of water to boil and salt it. Cook pasta in salted boiling water for 6 minutes, drain off water, and set pasta shells aside on a clean cutting board to cool down.
Manicotti Filling:
- Spread about a cup and a half of marinara sauce in the bottom of the baking dish. Set aside.
- Combine all ingredients for the stuffing in a mixing bowl and mix until evenly incorporated.
- Transfer prepared stuffing into a large piping bag (I use 16 oz piping bag.) Tie the opening of the bag with a produce rubber band and cut off the tip when ready to stuff pasta tubes.
- Hold manicotti shell in one hand and squeeze the stuffing into it from the piping bag, filling it almost full. Don’t overfill though or a lot of it will come out while baking.
- Nestle stuffed manicotti in the sauce. Repeat with all the manicotti pasta shells.
- Spread more marinara sauce over the top of all the filled manicotti.
- Spread mozzarella and Parmesan cheese over the top.
Baking Manicotti:
- Preheat the oven to 350° and lightly grease a 9×13 baking dish.
- Spray one side of foil with non-stick cooking spray, the side that will be facing down, so that the cheese doesn’t stick to the foil. Cover the baking dish tightly with foil.
- Bake for about 30 minutes. Take off the foil and bake another 10 minutes.
Video
Notes
- Pasta Sauce: while it’s always best to use homemade spaghetti sauce (aka marinara), you can also use your favorite store-bought one to save time when needed.
- To Make Ahead: Assemble the manicotti but do not bake. Cover and refrigerate for up to one day.
- To Bake (from refrigerated): Let the dish warm on the counter as the oven preheats to 350°F. Bake covered with foil for 40 minutes, then uncovered for 10 minutes.
- To Store Leftovers: Tightly cover the baking pan or transfer to an airtight container. Refrigerate for 3-5 days.
- To Reheat in Oven: Cover with foil and bake at 350°F for about 20 minutes, or until hot. Microwave: Place individual servings on a plate, cover, and heat for 1-2 minutes.
- How to Freeze: It is best to freeze unbaked manicotti. Assemble in a freezer-safe pan, wrap tightly in two layers of cling wrap then one layer of foil. Label and freeze for up to 3 months.
- Thawing & Baking: Thaw in the refrigerator overnight. Remove the cling wrap, cover with foil, and bake at 350°F for 40 minutes. Uncover and bake for another 10 minutes.
Nutrition
More Italian Recipes to Try
Would you like to save this recipe?
All images and text ©Lyubov Brooke for ©Will Cook For Smiles. Please do not use my images without prior permission. If using my posts in collections and features, please link back to this post for the recipe.
Disclaimer: Nutrition information shown is not guaranteed to be 100% accurate as most ingredients and brands have variations.


So good!!!!!! I made this for my nephews birthday and it was a hit! Only thing I added was some beef and sausage to the sauce, this is definitely a new favorite in my house.
Yum! Sounds like a wonderful addition! I am so glad you liked it!
I made homemade marinara sauce and homemade meatballs to go with it talking about pasta Sunday dinner
Yum! That sounds so good! I hope everyone enjoys it!
Im so excited for this new recipe. Im not a true Italian, but I thought it had a little too much garlic. I may cut back and add some onion powder. Has anypne ever tried using onion? Just a thought. Thank you for your recipe!
You mean more onion and less garlic? I’m sure would be just as good. Great thing about sauces, make it how you like it.
This was really delicious. Made it for our Italian style Christmas dinner today. Big hit with the family!
I am so glad it was a hit! Thanks for taking the time to let me know!
Amazing recipe! Made it this evening and it was a huge hit with the entire family!
I am so happy to hear that!
My sauce came out really thick. I don’t know what I did wrong.
You may have over cooked the sauce to much and that is why it thickened?
Delicious and easy recipe! My husband loved it!
A tasty and very filling dish. I love it thank you.
Glad you liked it, Trudy!
Made this for my boyfriend birthday and it has now become a staple because he loves it so much! We like it spicy so I used Rao’s Arrabbiata sauce
Yum! I am so glad he likes it!
Made this tonight and it was amazing.
I am so happy to hear that!
Made this tonight and it was amazing.
So glad you liked it, Leah!
This turned out great!! We love meat so I added some Italian sausage & hamburger. Hubby said it was excellent about 3 times!! ☺️👍
Awesome, Jodi! I am glad he liked it!
Do you use a 9×13 baking dish?
This turned out amazing! Loved the piping bag idea to fill-saved so much time.
Thank you, Katie! Thanks for stopping by to let me know! 🙂